404の実装で雪見だいふくをする方法CANVAS
はじめに
を、"li.li.li.li.li.li.li "と呼びます。パソコンもリトルキングにつないで、ゲーム、コントラ、スーパーマリオ、タンクバトルなどをよくやっていた。時代は白馬のごとく、技術はどんどん進歩し、今やネットワークテレビを持つものは二度とそんな状況は現れないだろうが、本当に懐かしい時代である。
私たちのテーマは、今日404ページの雪の画面のバージョンを行うことです、我々は404は、ページを見つけることができないあなたが同じ信号がそれを生きる見つけるために福正に行くように年無信号ではない、この時間は、我々はまだ彼を達成するためにキャンバス技術を使用して、また、CSS、次の図の効果の痕跡が使用されます。
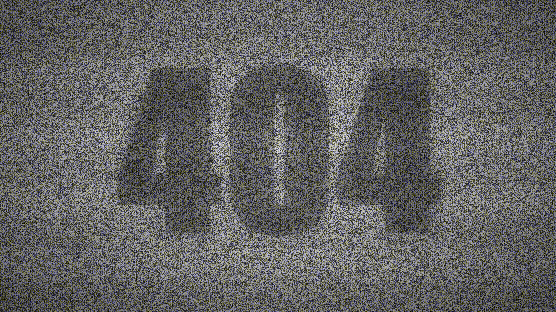
今回は、インフラ、雪の結晶の画面の描画、css3のグラデーション、テキストの描画、帯の描画について、プロジェクトの内容を確認します。
はじめに
1. インフラストラクチャー
htmlを先に書き、その中でmoduleパターンを使って、後からモジュールを読み込むようにしています。
<div class="content">
    <canvas id="canvas"></canvas>
</div>

<script type="module" src=". /app.js"></script>
cssの基本スタイルをもう一度書いて、ここでは中の要素をフルスクリーンで表示させています。
* {
    padding: 0;
    margin: 0;
}
html,
body {
    width: 100%;
    height: 100vh;
    overflow: hidden;
    position: relative;
    font-size: 12px;
}
#canvas {
    width: 100%;
    height: 100%;
    position: absolute;
    top: 0;
    left: 0;
    right: 0;
    bottom: 0;
    z-index: 1;
}
.content {
    z-index: 9;
    width: 100%;
    height: 100%;
    display: flex;
    align-items: center;
    justify-content: center;
    background-color: transparent;
}
次に、メインのロジックを書きます。
/*app.js*/
class Application {
  constructor() {
    this.canvas = null; // canvas
    this.ctx = null; // environment
    this.w = 0; // canvas width
    this.h = 0; // canvas height
    this.offset = 0; // band offset position
    this.imgData = null; // canvas image information
    this.text = "404"; // draw text
    this.alpha = 0; // transparency
    this.alphaNum = 0.005; // transparency decay value
    this.alphaMax = 0.35; // extreme value of transparency
    this.init();
  }
  init() {
    // initialize
    this.canvas = document.clone.getElementById("canvas");
    this.ctx = this.canvas.getContext("2d");
    window.addEventListener("resize", this.reset.bind(this));
    this.reset();
    this.render();
  }
  reset() {
    // screen change call
    this.w = this.oz.canvas.width = this.ctx.width = window.innerWidth;
    width = this.ctx.width = window.innerWidth; this.h = this.canvas.height = this.ctx.height = window.innerHeight;
  }
  render() {
    // Main rendering
    this.step();
  }
  drawBackground() {
    // draw the snowflake screen
  }
  drawFrame(delta) {
    // Draw the wave
  }
  drawText() {
    // Draw text
  }
  step(delta) {
    // redraw
    const {w, h, ctx} = this;
    requestAnimationFrame(this.step.bind(this));
    ctx.clearRect(0, 0, w, h);
    this.drawBackground();
    this.drawText();
    this.drawFrame(delta);
  }
}
window.onload = new Application();
描画側については後で説明します。ここまででやったことは、キャンバスを取得して幅と高さを与え、リスニングのたびに幅と高さを変えられるようにしたことです。さらに、実際には彼の内部には何も空白がないのに、実行時に常に再描画されるようになっているのです。
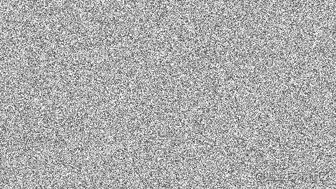
2. 雪見だいふくの描画
キャンバスの中に何かを入れたいので、まずは雪の結晶の背景を描きます。そこで、雪の結晶の画面がどのように作られるかを分析するところから始めましょう。
それほど難しいことではなく、まず現在のキャンバス内のすべての点の色値情報を取得し、それをランダムなグレースケール値に修正し、描画を続けると、点滅し続ける雪の結晶が描画されるということです。
/*app.js*/
reset() {
    this.w = this.canvas.width = this.ctx.width = window.innerWidth;
    this.h = this.canvas.height = this.ctx.height = window.innerHeight;
    this.changeImgData()
}
changeImgData() {
    const {w, h, ctx} = this;
    ctx.fillStyle = 'white';
    ctx.fillRect(0, 0, w, h);
    ctx.fill();
    return this.imgData = ctx.getImageData(0, 0, w, h);
}
このステップでは、画面が変わるたびにキャンバスの画像データを取得することを想定しています。imgDataには、Uint8ClampedArrayというデータメッセージがあり、赤、緑、青、透明それぞれ0から3までのポイントの色値に対応したものが格納されています。
次に、この情報を使って、あることをします。
/*app.js*/
drawBackground() {
    const {ctx, imgData} = this;
    for (let i = 0, data = imgData.data; i < data.length; i += 4) {
        let color = Math.floor(Math.random() * 255) + 50;
        data[i] = color;
        data[i + 1] = color;
        data[i + 2] = color;
    }
    ctx.putImageData(imgData, 0, 0);
}
メッセージ内のデータを取得し、各色値をグレースケールでランダムな値に変更するようにしています。そして、putImageDataを使って、キャンバス全体である現在の矩形を再び描画し、雪の画面が現れるようにします〜〜。
3. 円形グラデーション
しかし、スプラッシュ画面を見ると白すぎて、テレビのフレームアップのようなテイストではないので、コンテナでcss3を使ってグラデーションの背景擬似クラスをオーバーレイで書き込んでいます。人々にもっと見えるように、背後にあるテーマのテキストを作るために、真ん中に白の少しを残す。もちろん、キャンバス上にグラデーションを描いても同じ効果が得られます。
.content::after {
    content: "";
    display: block;
    position: absolute;
    top: 0;
    bottom: 0;
    left: 0;
    right: 0;
    z-index: 99;
    background: radial-gradient(
        ellipse at center,
        rgba(0, 0, 0, 0) 0%,
        rgba(0, 0, 0, 0, 0.6) 100%
    );
}

一瞬で元気になりませんか~?
4. テキストの描画
drawText() {
    this.alpha += this.alphaNum;
    if (this.alpha >= this.alphaMax) {
        this.alpha = this.alphaMax;
        this.alphaNum *= -1;
    } else if (this.alpha < 0) {
        this.alpha = 0;
        this.alphaNum *= -1;
    }
    const {ctx, text, w, h} = this;
    let fontSize = w * 0.36;
    ctx.save();
    ctx.fillStyle = `rgba(0,0,0,${this.alpha})`
    ctx.font = `bold ${fontSize}px fantasy, monospace`;
    ctx.textAlign = "center";
    ctx.textBaseline = 'middle';
    ctx.shadowColor = "black";
    ctx.shadowBlur = 20;
    ctx.fillText(text, w / 2, h / 2);
    ctx.restore();
}
ここで描画する前に、我々は彼が定期的に点滅しているように、彼の透明度を変更する必要があります、つまり、彼は0から臨界値に到達するために、その透明度を蓄積し、次に反対、およびその逆を取るようにします。描画の背面も非常にシンプルで、彼が画面の中央に配置され、少し投影されるように、ここで行うことがあまりにも多くありません。
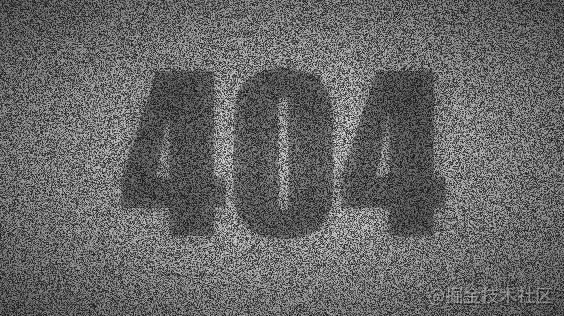
よりリアルにするために、不安定な信号の印象を与える間隔で別の波の矩形を生成し、フォント点滅のアニメーションを補完しています。
5. 波の描画
drawFrame(delta) {
    this.offset = delta / 10;
    const {w, h, ctx} = this;
    for (let y = -h / 5, v = h / 5; y < h; y += v) {
      ctx.fillStyle = `rgba(0,0,0,${(this.alphaMax - this.alpha) / 8 + 0.02})`;
      ctx.shadowColor = "black";
      ctx.shadowBlur = 20;
      ctx.fillRect(0, y + this.offset % v, w, v / 2);
    }
  }
ここでは、1ステージおきに自動的に描画される矩形を設定しています。その透明度の周期はテキストと負の相関があり、テキストの透明度が高いほど低くなり、その対象のテキストをより見やすくします。
中のoffset変数は、波が途切れることなく下に移動するように、波が通過するオフセット位置のためのものです。背面は、通常の長方形の描画に、よりリアルにするために若干の投影を加えたものです。
ここで終了です。かなりシンプルでしょう?あっという間に童心に帰れます。
拡大・拡張
今回は、まだ基本的にはgetImageDataとputImageDataを一度に組み合わせて使用しますが、もちろんそれに限らず、様々な効果を関連付けることができます。また、フォントを扱うためのガウスぼかしアルゴリズムなども実際に行うことができ、より特徴的な操作と言えます。
注:雪景色の画面はユーザーの目をすぐに疲れさせ、健康に影響を与えるので、それを変える方法を考えることで、ユーザーに急いで正しいページを探させることが目的です。開発者は、決して、長時間凝視しないでください、さもないと、不快感があります、え~と。
404の実装のキャンバス雪の画面のバージョンを行う方法については、この記事は、このに導入され、404コンテンツのより関連するキャンバス雪の画面のバージョンは、スクリプト以前の記事のホームを検索するか、次の関連記事を閲覧し続け、私はあなたが将来的に多くのスクリプトのホームをサポートすることを願っています
関連
-
html5呼び出しカメラサンプルコード
-
html5ジャンプアプレット wx-open-launch-weappは落とし穴に踏み込んだ
-
HTML5のmeta viewportパラメータの解析
-
amazeuiのページチェック機能を実装するためのコード
-
アップロード用画像の圧縮にcanvasを使用した例
-
html5 自動再生 mov形式動画サンプルコード
-
window.openがブラウザにブロックされている場合の解決策を詳しく説明します。
-
H5では、ダイナミックなグラフィックス機能を実現するために、キャンバスの最も強力なインタフェース
-
モバイルウェブの画像プリロード方式について簡単に紹介します。
-
キャンバスでDVDスタンバイのアニメーションを作成するコード
最新
-
nginxです。[emerg] 0.0.0.0:80 への bind() に失敗しました (98: アドレスは既に使用中です)
-
htmlページでギリシャ文字を使うには
-
ピュアhtml+cssでの要素読み込み効果
-
純粋なhtml + cssで五輪を実現するサンプルコード
-
ナビゲーションバー・ドロップダウンメニューのHTML+CSSサンプルコード
-
タイピング効果を実現するピュアhtml+css
-
htmlの選択ボックスのプレースホルダー作成に関する質問
-
html css3 伸縮しない 画像表示効果
-
トップナビゲーションバーメニュー作成用HTML+CSS
-
html+css 実装 サイバーパンク風ボタン