ckeditorカスタムプラグインの使用方法説明
ckeditorは強力なリッチテキストエディタであり、日々の開発に必要な機能のほとんどを提供してくれますが、特殊な状況により、ckeditorのプラグインを変更する必要があるかもしれません。
プロジェクトの必要性から、ckeditorの画像アップロード機能を書き換える必要があります。
1. ckeditor/plugins/ディレクトリにカスタムプラグインを格納するための新しいeditoruploadディレクトリを作成し、その中にカスタム画像を格納するための新しいディレクトリimagesを作成し、プラグイン画像image.pngをimagesディレクトリに配置します。
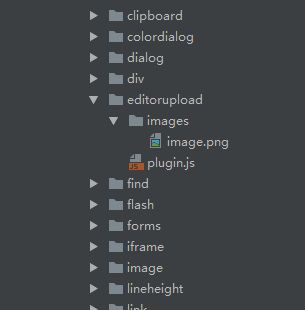
2. editoruploadディレクトリに、plugin.jsを新規に作成します。
(function () {
  var a = {
      exec: function (editor) {
        // Call the function in jsp to pop up the upload box.
        var url = '. /view/fileupload/upload.jsp';
        openDialog({ //openDialog opens a new window
          title: 'Insert image',
          url: url,
          height: 600,
          width: 900,
          callback:function(){

          }
        });

      }
    },
    b = 'editorupload';


  CKEDITOR.plugins.add('editorupload', {
    init: function (editor) {
      editor.addCommand(b, a);
      editor.ui.addButton('editorupload', {
        label: 'add image', // name displayed when hovering over the plugin
        icon: 'plugins/editorupload/images/image.png', // path to custom icon
        command: b
      });
    }
  });
})();
上記のコードでは、画像をアップロードするための新しい upload.jsp ページが作成され、openDialog を使用して新しいウィンドウがポップアップされ、ポップアップ・ボックスの高さと幅が設定されています。
CKEDITOR.plugins.addでckeditorにカスタムエディタuploadを追加します。
以下は、upload.jspページのコードの一部です。
<div id="mainContent">
  </div>
  <div class=" box">
    <table class=" m-table">
      <colgroup>
        <col width="20%"/>
        <col width="80%"/>
      </colgroup>
      <tr>
        <td style="vertical-align:top;"><label class="module-name">Image description</label></td>
        <td>
          <ul>
            <li>1. "PC Home Page Rotation Picture" is 666×250 in length and width to show the best effect; "APP Home Page Rotation Picture" is 422×262 in length and width to show the best effect; </li>
            <li>3. The picture will only take effect on the home page if it is submitted; </li>
          </ul>
        </td>
      </tr>
    </table>
  </div>

  <div id="Pictures" class="detailWraper nopadding" style="display: none;height: auto;">
    <input id="hidPicturesStatus" type="hidden" value="0"/>
    <input id="hidCurrPictures" type="hidden" value=''/>
    <input id="hidDictSuggestion" type="hidden" value=''/>
    <table>
      <tr>
        <td>
          <div id="fileQueue"></div>
          <div id="picWrapper"></div>
          <a id="fake-dlg-bigPic" href="javascript:void(0)" style="display: none;"></a>
          <div id="dlg-bigPic" class="popImg" style="display: none;">
            <a class="leftBtn" href="javascript:void(0)"></a>
            <a class="rightBtn" href="javascript:void(0)"></a>
            <a class="closeImgBtn" href="javascript:void(0)"></a>
            <div class="imgList">
              <ul></ul>
            </div>
          </div>
          <div class="validation-summary-valid">
            <ul>
              <li style="display: none"></li>
            </ul>
          </div>

        </td>
      </tr>
    </table>
  </div>
  <div>
    <button id="fileUpload">Bulk Upload</button>
    <button id="submit" class="btn btn-primary" style="vertical-align: top;line-height:23px;width:112px;height: 35px;">Submit a photo
    </button>
  </div>
</div>
upload.jpsページセクションのjsコード。
//Submit a photo
    photoTaskDetail.submit = function () {
      var pictures = window.picManager._getPictures();
      if (pictures.length < 1) {
        alert('Please upload at least 1 picture');
        return false;
      }
      for (var i in pictures) {
        var imgPath = "<img src='" + staticFileRoot + pictures[i].URL + "'/>";
        var element = window.parent.CKEDITOR.dom.element.createFromHtml(imgPath);
        window.parent.CKEDITOR.instances.editorContent.insertElement(element);
      }
      parent.closeDialog(false);
    }
上記のコードでは、複数の写真をアップロードし、それらを別々にckeditorに入れることができます。
ckeditorのconfig.jsを設定します。
config.extraPlugins += (config.extraPlugins ? ',editorupload' : 'editorupload');
CKEDITOR.editorConfig = function( config ) {
  config.font_names= '宋体/SONG;黑体/黑体;仿宋/仿宋_GB2312;普通体/楷体/楷体_GB2312;隶書/隶書;幼圆/幼圆;微微软雅黑/Microsoft雅黑;'+ config.font_names;
  config.language = 'zh-cn';
  config.extraPlugins += (config.extraPlugins ? ',lineheight' : 'lineheight');
  config.extraPlugins += (config.extraPlugins ? ',editorupload' : 'editorupload');
  CKEDITOR.config.lineheight_sizes = CKEDITOR.config.lineheight_sizes + '30px';
  config.height = 650;
  config.toolbarCanCollapse = true;
  config.uiColor = '#90B8E9';
  config.toolbar = 'Full';
  config.toolbar_Full = [
   { name: 'document', items: [ 'Source', '-', 'Save', 'NewPage', 'DocProps', 'Preview', 'Print', '-', 'Templates' ] }
   { name: 'clipboard', items: [ 'Cut', 'Copy', 'Paste', 'PasteText', 'PasteFromWord', '-', 'Undo', 'Redo' ] },
   { name: 'links', items:['Link','Unlink']},
   { name: 'insert', items:['HorizontalRule','Table','Image'] }

   '/',
   { name: 'basicstyles', items: [ 'Bold', 'Underline', 'Strike', 'Subscript', 'Superscript', '-', 'RemoveFormat'] }
   { name: 'paragraph', items: [ 'list', 'indent', 'blocks', 'align', 'bidi' ] }
   { name: 'styles', items: [ 'lineheight', 'Format', 'Font', 'FontSize' ] }
   { name: 'colors',items: ['TextColor', 'BGColor']},
   { name: 'tools', items : [ 'Maximize', 'editorupload'] }
];
ckeditorにeditoruploadプラグインを追加します。
以下は、実装の一部スクリーンショットです。
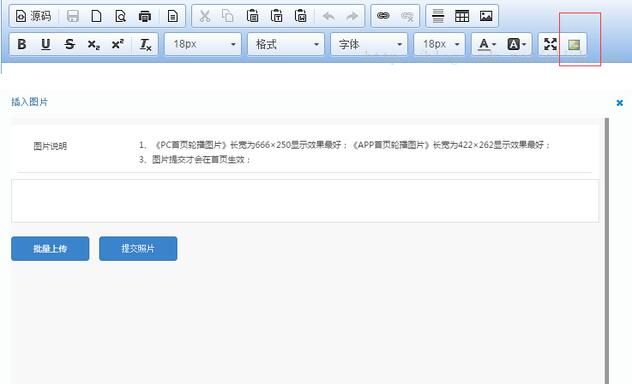
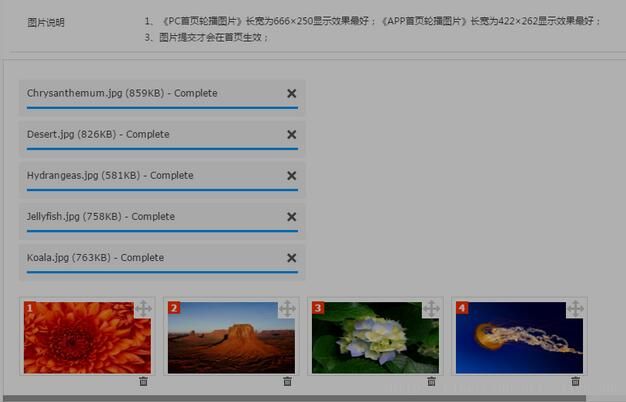
実装の概要です。 プラグインをカスタマイズする過程で、元のプラグインの画像挿入機能をONにしなければならず、アップロードを担当する画像がckeditorに入らず、画像アドレスが自動的にフィルタリングされてしまいます。これは、ckeditorのバージョンのバグが原因かもしれません。どなたか解決策をお持ちの方、ご指導お願いします。
以上が今回の内容の全てです。勉強になると思いますし、BinaryDevelopをもっと応援して頂ければと思います。
関連
-
Google ChromeをeWebEditorに対応させる方法
-
CKEditorにsyntaxhighlighterコードハイライトプラグインを追加。
-
SyntaxHighlighterのコードハイライトで改行がない場合の対処法
-
fckeditor エディタでのカスタムページ区切り
-
php UEditor Baiduエディタインストールと使用方法の共有
-
プラグイン開発方式のCKEDITOR二次開発
-
デフォルトの新しいウィンドウを開く修正方法にリンクを追加するdecmsのckeditorエディタ
-
FckeditorエディタによるPHP環境での画像アップロード設定 詳細チュートリアル
-
ブラウザfckeditorは、画像をアップロードすることはできません後IE9は、ポップアップフローティングコンテンツは、解決策を表示しません
-
アメニティにおすすめの優秀なフロントエンド開発エディター数名
最新
-
nginxです。[emerg] 0.0.0.0:80 への bind() に失敗しました (98: アドレスは既に使用中です)
-
htmlページでギリシャ文字を使うには
-
ピュアhtml+cssでの要素読み込み効果
-
純粋なhtml + cssで五輪を実現するサンプルコード
-
ナビゲーションバー・ドロップダウンメニューのHTML+CSSサンプルコード
-
タイピング効果を実現するピュアhtml+css
-
htmlの選択ボックスのプレースホルダー作成に関する質問
-
html css3 伸縮しない 画像表示効果
-
トップナビゲーションバーメニュー作成用HTML+CSS
-
html+css 実装 サイバーパンク風ボタン
おすすめ
-
UEditorリッチテキストエディタでjsが画像のアドレスを取得する。
-
UEditorエディターの使用を前提とした開発 細かい配慮がなされている
-
IE10、IE11でのFCKEditorの非互換性の問題を解決しました。
-
ueditor1.2.1 ハイパーリンクのデフォルトを変更する、ueditor editor open link in new window
-
FCKeditor + SyntaxHighlighterでコードハイライトプラグインを作る
-
Ueditor BaiduエディターのHtmlモード自動置換スタイルソリューション
-
ckeditor syntaxhighlighter コードハイライタープラグイン 設定 共有
-
BaiduのUEditorは、統計ワードカウントの右下隅を変更するには、HTMLスタイルが含まれています
-
FCKeditorがクロームで表示されない
-
UEditor エディタのクロスドメインアップロードソリューション