Angularフレームワーク入門
1. AngularJSの紹介
AngularJSは、2009年にMisko Heveryらによって作られ、その後Googleによって買収されました。Googleの多くの製品に採用されている優れたフロントエンドJSフレームワークで、多くの特徴を持っていますが、中でも注目すべきは MVC、モジュール性、自動化された双方向データバインディング、依存性注入、などです。
ダウンロードはこちら
https://code.angularjs.org/
学習バージョン:angular-1.6.9.zip(2018-02-02)
2. AngularJSの4大特徴
2.1 MVCパターン
AngularはソフトウェアエンジニアリングのMVCパターンに従っており、プレゼンテーション、データ、ロジックコンポーネント間の疎結合を推奨しています。依存性注入を通じて、Angularは、ビュー独立制御のような伝統的なサーバーサイドのサービスをクライアントサイドのウェブアプリケーションにもたらします。その結果、バックエンドの負担が大幅に軽減され、より軽量なウェブアプリケーションが実現します。
Model:data、これは実際にはアンギュラー変数($scope.XX)である。
表示します。データのレンダリング、Html+Directive(ディレクティブ)です。
コントローラーです。データを操作する、つまり関数、追加、削除、検索を行う。
2.2 双方向バインディング
AngularJSは、ユーザーインターフェースの構築やソフトウェアのビルドの記述には宣言型プログラミングを、ビジネスロジックの表現には命令型プログラミングが適しているという信念に基づいて構築されています。このフレームワークは、モデルとビューの間の自動同期を可能にする双方向データバインディングによって、動的なコンテンツに対応するために従来のHTMLを取り込み、拡張しています。その結果、AngularJSはDOMの操作を不要にし、テスト容易性を向上させることができます。
2.3 ディペンデンシーインジェクション
依存性注入(DI)は、オブジェクトが手動で作成する必要がない他のオブジェクトに依存することを意味するデザインパターンですが、"轟音"を必要とするだけで、オブジェクトが作成され、その依存オブジェクトは自動的にフレームワークによって作成され、それに注入される、実際には、最小知識の法則 モジュール内のすべてのサービスとプロバイダのオブジェクトがそのパラメータの名前に基づいてDIのことができます。
2.4 モジュラーデザイン
高結合・低結合の法則。
1) 公式に提供されているモジュール ng, ngRoute, ngAnimate
2) ユーザー定義モジュール angular.module('モジュール名',[ ])
3 基本的なディレクティブ
3.0 パッケージの紹介
<script src="js/angular.min.js"></script>
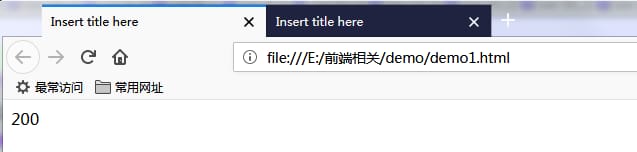
3.1 表現
構文形式です。{ <未定義 {変数名}} または { <未定義 { object. VariableName}}
<html>
<head>
<meta charset="UTF-8">
<title>Insert title here</title>
<script src="angular.min.js"></script>
</head>
<body>
<div ng-app>
{
結果
ng-appディレクティブはAngularアプリケーションのルート要素を定義し、ルート要素のすべての子要素で使用されると、angularは自動的にこのディレクティブを認識します。
ng-appディレクティブは、ページがロードされたときに、アプリ内のangularのディレクティブを自動的に初期化します。
3.2 双方向バインディング
構文形式:ng-model="変数名"またはng-model="オブジェクト。変数名"
<html>
<head>
<meta charset="UTF-8">
<title>Insert title here</title>
<script src="angular.min.js"></script>
</head>
<body>
<div ng-app>
name:<input type="text" ng-model="name" /></br>
sex:<input type="text" ng-model="user.sex" /></br>
age: <input type="text" ng-model="user.age" /></br>
name:{
結果
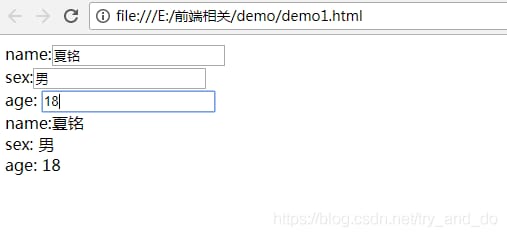
説明 ng-modelディレクティブは変数のバインドに使用され、ユーザーがテキストボックスに入力した内容が変数にバインドされ、式がリアルタイムでその変数を出力できるようにします。
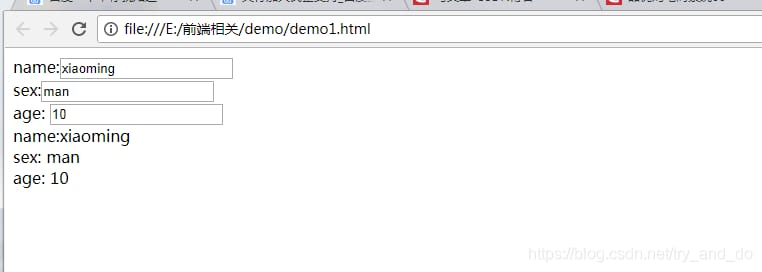
3.3 初期化ディレクティブ
構文形式: ng-init="variable-name='variable-value'; variable-name='変数-値'"。
<html>
<head>
<meta charset="UTF-8">
<title>Insert title here</title>
<script src="angular.min.js"></script>
</head>
<body>
<div ng-app ng-init ="name='xiaoming';user.sex='man';user.age=10 ">
name:<input type="text" ng-model="name" /></br>
sex:<input type="text" ng-model="user.sex" /></br>
age: <input type="text" ng-model="user.age" /></br>
name:{
結果
3.4 コントローラー
モジュール構文フォーマットの定義:var variable name = angular.module("module name", []);
[] は他のモジュールに追加できる配列オブジェクトです
コントローラの構文形式を定義します。
モジュール変数名.controller("controllerName", function($scope){}) を追加しました。
<html>
<head>
<meta charset="UTF-8">
<title>Insert title here</title>
<script src="angular.min.js"></script>
<script type="text/javascript">
/*define myApp module*/
var app = angular.module("myApp",[]);
/* add myAPP module to controller*/
app.controller("myController",function($scope){
$scope.add = function(){
return parseInt($scope.x)+parseInt($scope.y);
};
});
</script>
</head>
<body>
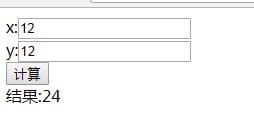
<div ng-app ="myApp" ng-controller="myController">
x:<input type="text" ng-model="x" /></br>
y:<input type="text" ng-model="y" /></br>
Result:{
結果
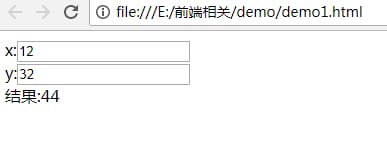
ng-controllerは、使用するコントローラを指定します。
スコープを理解する。
スコープはAngularアプリ全体のデータモデルと関連付けられ、式が実行されるコンテキストとなります。スコープを使えば、ビューとコントローラの間にチャンネルを作るのと同じです。スコープされたビューは、データを修正するとすぐに$scopeを更新し、$scopeが変わるとビューもすぐに再レンダリングするという事実に基づいています。
注:mg-model によって束縛される変数データは、$scope スコープオブジェクトに格納されます。
3.5 イベントディレクティブ
l ng-click: クリックイベント
l ng-dblclick: ダブルクリックイベント
l ng-blur: フォーカスを失うイベント
l ng-focus: フォーカスイベントを取得する
l ng-change: onchange変更イベントに対応する。
l ng-keydown: キーボードキー押下イベント
l ng-keyup: キーボードキーの押下と解放
l ng-keypress: 上記と同様です。
l ng-mousedown: マウスプレス・イベント
l ng-mouseup: マウスプレスのポップアップ
l ng-mouseenter: マウスインイベント
l ng-mouseleave: マウスアウェイイベント
l ng-mousemove: マウスオーバー・イベント
l ng-mouseover: マウスオーバーイベント
構文形式:ng-xxx="controller()で定義されたメソッド名;"。
<html>
<head>
<meta charset="UTF-8">
<title>Insert title here</title>
<script src="angular.min.js"></script>
<script type="text/javascript">
/*define myApp module*/
var app = angular.module("myApp",[]);
/* Add the myAPP module to the controller */
app.controller("myController",function($scope){
$scope.blur = function(){
alert($scope.x);
};
$scope.keyup = function(){
alert($scope.y);
};
$scope.add = function(){
$scope.count = parseInt($scope.x)+parseInt($scope.y);
};
});
</script>
</head>
<body>
<div ng-app ="myApp" ng-controller="myController">
x:<input type="text" ng-model="x" ng-blur="blur()"/></br>
y:<input type="text" ng-model="y" ng-keyup="keyup()"/></br>
<input type="button" value="calculate" ng-click="add()" /> <br>
result:{
結果
説明: コントローラのメソッドをバインドする ng-xxx イベントディレクティブ。
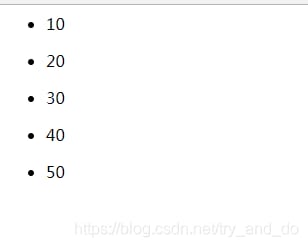
3.6 周期配列
構文形式: ng-repeat="variable-name in set or array";
<html>
<head>
<meta charset="UTF-8">
<title>Insert title here</title>
<script src="angular.min.js"></script>
<script type="text/javascript">
/*define myApp module*/
var app = angular.module("myApp",[]);
/* Add the myAPP module to the controller */
app.controller("myController",function($scope){
/*Define the array*/
$scope.list = [10,20,30,40,50];
});
</script>
</head>
<body>
<div ng-app ="myApp" ng-controller="myController">
<ul ng-repeat="m in list">
<li>{
結果
3.7 オブジェクトの配列をループする
<html>
<head>
<meta charset="UTF-8">
<title>Insert title here</title>
<script src="angular.min.js"></script>
<script type="text/javascript">
/*define myApp module*/
var app = angular.module("myApp",[]);
/* Add the myAPP module to the controller */
app.controller("myController",function($scope){
/*Define the array object*/
$scope.list = [{name:"xiaoming",sex:"male",age:10},
{name:"sdfs",sex:"female",age:20},
{name:"sfg",sex:"man",age:24}];
});
</script>
</head>
<body>
<div ng-app ="myApp" ng-controller="myController">
<table>
<tr>
<th>id</th>
<th>name</th>
<th>sex</th>
<th>age</th>
</tr>
<tr ng-repeat = "m in list">
<td>{
結果
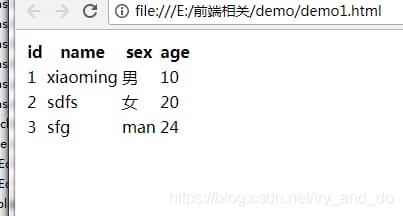
$index: イテレート時にインデックス番号を取得します。
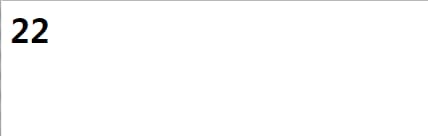
3.8 条件付きディレクティブ
構文形式:ng-if="条件式"。
<html>
<head>
<meta charset="UTF-8">
<title>Insert title here</title>
<script src="angular.min.js"></script>
<script type="text/javascript">
/*define myApp module*/
var app = angular.module("myApp",[]);
/* Add the myAPP module to the controller */
app.controller("myController",function($scope){
/*define object*/
$scope.a = {age:22} ;
});
</script>
</head>
<body>
<div ng-app ="myApp" ng-controller="myController">
<h1 ng-if="a.age>20">{
結果
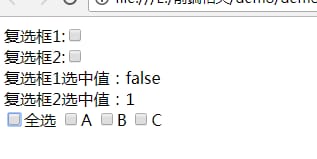
3.9 チェックボックス
l ng-true-value="true": チェックされた値
l ng-false-value="false": 未選択の値です。
l ng-checked="true|false": チェックボックスがチェックされているかどうか。
<html>
<head>
<meta charset="UTF-8">
<title>Insert title here</title>
<script src="angular.min.js"></script>
<script type="text/javascript">
/*define myApp module*/
var app = angular.module("myApp",[]);
/* Add the myAPP module to the controller */
app.controller("myController",function($scope){
/*define object*/
$scope.value1="true";
$scope.value2="1";
$scope.value3="true"
});
</script>
</head>
<body>
<div ng-app ="myApp" ng-controller="myController">
checkbox1:<input type="checkbox" ng-model="value1" /><br>
Checkbox2:<input type="checkbox" ng-model="value2" ng-false-value="1"
ng-true-value="2" />
<br>
Checkbox 1 checked value: {
結果
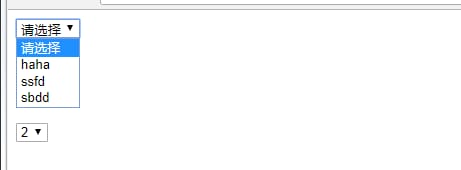
3.10 ドロップダウンリストボックス
l ng-options="element variable.key as element variable.key for element variable in array": オプション値式バインディング
l ng-selected="true|false": ドロップダウンリストボックスで指定されたオプションが選択されているかどうかを示します。
<html>
<head>
<meta charset="UTF-8">
<title>Insert title here</title>
<script src="angular.min.js"></script>
<script type="text/javascript">
/*define myApp module*/
var app = angular.module("myApp",[]);
/* Add the myAPP module to the controller */
app.controller("myController",function($scope){
/*define object*/
$scope.list=[
{id:1,name:"haha"},
{id:2,name:"ssfd"},
{id:3,name:"sbdd"}
];
});
</script>
</head>
<body>
<div ng-app ="myApp" ng-controller="myController">
<select ng-model ="code" ng-options="city.id as city.name for city in list">
<option value=""> please select </option>
{
結果
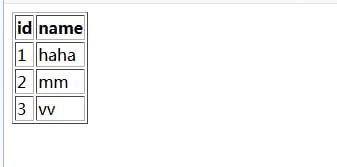
4 組み込みサービス
4.1 $http サービス
私たちのデータは通常バックエンドから取得されますが、どのように取得するのでしょうか?通常、これを行うには、組み込みサービスの$httpサービスを使用します。
4.1.1 $http() でリクエストを送信する
シンタックス形式です。
$http({ <未定義
method : 'get|post', // リクエストメソッド
url : '', // リクエストURL
params : {'name':'admin'}となります。// リクエストパラメータ
}).then(function(response){ // リクエスト成功
// response: レスポンスオブジェクトは、レスポンスデータ、ステータスコードをカプセル化します。
},function(response){ // リクエストに失敗しました。
// response: レスポンスオブジェクトは、レスポンスステータスコードをカプセル化します。
});
非同期リクエストを送信する。
<html>
<head>
<meta charset="UTF-8">
<title>Insert title here</title>
<script src="angular.min.js"></script>
<script type="text/javascript">
/*define myApp module*/
var app = angular.module("myApp",[]);
/* Add the myAPP module to the controller */
app.controller("myController",function($scope,$http){
/*define object*/
$scope.httpGet = function(){
$http({method:"get",
url:"mm.json"}).then(function(response){
$scope.list = response.data;
},function(response){
alert("failed to load")});
};
});
</script>
</head>
<body>
<div ng-app ="myApp" ng-controller="myController" ng-init="httpGet()">
<table border="2">
<tr>
<th>id</th>
<th>name</th>
</tr>
<tr ng-repeat="m in list">
<td>{
結果
4.1.2 $http.get() によるリクエストの送信
構文形式です。
// 第 1 の形式
$http.get(URL,{)
パラメータを指定します。{
id"id:idです。
}
}).then(function(response){// リクエストは成功しました。
// response: レスポンスオブジェクトは、レスポンスデータ、ステータスコードをカプセル化します。
}, function(response){ // リクエストに失敗しました。
// 応答 レスポンスオブジェクトは、レスポンスステータスコードをカプセル化します。
});
// 2つ目の書式
$http.get(URL).then(function(response){ // リクエスト成功
// response: レスポンスオブジェクトは、レスポンスデータ、ステータスコードをカプセル化します。
},function(response){ // リクエストに失敗しました。
// response: レスポンスオブジェクトは、レスポンスステータスコードをカプセル化します。
});
4.1.3 $http.post() によるリクエストの送信
構文形式です。
// 第一の方法
$http.post(URL,{)
"id" : id
}).then(function(response){ // リクエスト成功
// response: レスポンスオブジェクトは、レスポンスデータ、ステータスコードをカプセル化します。
},function(response){ // リクエストに失敗しました。
// response: レスポンスオブジェクトは、レスポンスステータスコードをカプセル化します。
});
実は、Angularを学ぶために必要なのは、ディレクティブを学ぶことです。
関連
最新
-
nginxです。[emerg] 0.0.0.0:80 への bind() に失敗しました (98: アドレスは既に使用中です)
-
htmlページでギリシャ文字を使うには
-
ピュアhtml+cssでの要素読み込み効果
-
純粋なhtml + cssで五輪を実現するサンプルコード
-
ナビゲーションバー・ドロップダウンメニューのHTML+CSSサンプルコード
-
タイピング効果を実現するピュアhtml+css
-
htmlの選択ボックスのプレースホルダー作成に関する質問
-
html css3 伸縮しない 画像表示効果
-
トップナビゲーションバーメニュー作成用HTML+CSS
-
html+css 実装 サイバーパンク風ボタン
おすすめ
-
ハートビート・エフェクトのためのHTML+CSS
-
HTML ホテル フォームによるフィルタリング
-
HTML+cssのボックスモデル例(円、半円など)「border-radius」使いやすい
-
HTMLテーブルのテーブル分割とマージ(colspan, rowspan)
-
ランダム・ネームドロッパーを実装するためのhtmlサンプルコード
-
Html階層型ボックスシャドウ効果サンプルコード
-
QQの一時的なダイアログボックスをポップアップし、友人を追加せずにオンラインで話す効果を達成する方法
-
sublime / vscodeショートカットHTMLコード生成の実装
-
HTMLページを縮小した後にスクロールバーを表示するサンプルコード
-
html のリストボックス、テキストフィールド、ファイルフィールドのコード例