[解決済み] アンドロイドでカスタムダイアログボックスを作成する方法は?
質問
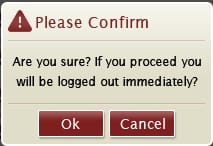
以下のようなカスタムダイアログボックスを作成したい。
以下のようなことを試してみました。
-
のサブクラスを作成しました。 AlertDialog.Builder を作成し、カスタムタイトルとカスタムコンテンツビューを使用して、それを使用しましたが、結果は期待通りではありませんでした。
-
もう一つの試みは ダイアログフラグメント を作成し、onCreateDialog 内でダイアログをカスタマイズしていますが、結果は期待通りではありません。
-
次に ダイアログ クラスがあります。結果は期待通りではありませんでした。
この3つのケースで、問題は、タイトル表示を見下ろすとダイアログのサイズが期待通りにならないこと、タイトル表示を使用するとコンテンツ表示の周りに太いボーダーができることです(これは本当に見栄えが悪いです)。今、私の頭の中に2つの疑問があります...
-
どうすれば実現できるのでしょうか?すでにいろいろと試しているので、直接的な回答があれば、よりありがたいです。
-
アンドロイドアプリでエラーやアラートのダイアログを表示するのに最適な方法は何ですか?
EDIT Android Developer Documentation では、エラー/アラートメッセージを表示するために、DialogFragmentsかDialogsを使うべきであると推奨しています。しかし、ある箇所で次のように書かれています。
ヒント:カスタムダイアログが必要な場合、ダイアログAPIを使う代わりに、アクティビティをダイアログとして表示することができます。アクティビティを作成し、マニフェスト要素でそのテーマを Theme.Holo.Dialog に設定するだけです。
どういうことですか?エラーメッセージを表示するためだけにActivityを使うのはやりすぎじゃないですか?
どのように解決するのですか?
ここでは、次のような簡単なダイアログを作成しました。
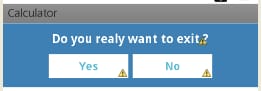
custom_dialog.xml
<?xml version="1.0" encoding="utf-8"?>
<LinearLayout xmlns:android="http://schemas.android.com/apk/res/android"
    android:layout_width="fill_parent"
    android:layout_height="80dp"
    android:background="#3E80B4"
    android:orientation="vertical" >

    <TextView
        android:id="@+id/txt_dia"
        android:layout_width="wrap_content"
        android:layout_height="wrap_content"
        android:layout_gravity="center"
        android:layout_margin="10dp"
        android:text="Do you realy want to exit ?"
        android:textColor="@android:color/white"
        android:textSize="15dp"
        android:textStyle="bold"/>


    <LinearLayout
        android:layout_width="wrap_content"
        android:layout_height="wrap_content"
        android:layout_gravity="center"
        android:background="#3E80B4"
        android:orientation="horizontal" >

        <Button
            android:id="@+id/btn_yes"
            android:layout_width="100dp"
            android:layout_height="30dp"
            android:background="@android:color/white"
            android:clickable="true"
            android:text="Yes"
            android:textColor="#5DBCD2"
            android:textStyle="bold" />

        <Button
            android:id="@+id/btn_no"
            android:layout_width="100dp"
            android:layout_height="30dp"
            android:layout_marginLeft="5dp"
            android:background="@android:color/white"
            android:clickable="true"
            android:text="No"
            android:textColor="#5DBCD2"
            android:textStyle="bold" />
    </LinearLayout>

</LinearLayout>
あなたは
extends Dialog
と
implements OnClickListener
public class CustomDialogClass extends Dialog implements
    android.view.View.OnClickListener {

  public Activity c;
  public Dialog d;
  public Button yes, no;

  public CustomDialogClass(Activity a) {
    super(a);
    // TODO Auto-generated constructor stub
    this.c = a;
  }

  @Override
  protected void onCreate(Bundle savedInstanceState) {
    super.onCreate(savedInstanceState);
    requestWindowFeature(Window.FEATURE_NO_TITLE);
    setContentView(R.layout.custom_dialog);
    yes = (Button) findViewById(R.id.btn_yes);
    no = (Button) findViewById(R.id.btn_no);
    yes.setOnClickListener(this);
    no.setOnClickListener(this);

  }

  @Override
  public void onClick(View v) {
    switch (v.getId()) {
    case R.id.btn_yes:
      c.finish();
      break;
    case R.id.btn_no:
      dismiss();
      break;
    default:
      break;
    }
    dismiss();
  }
}
ダイアログを呼び出すには?
R.id.TXT_Exit:
CustomDialogClass cdd=new CustomDialogClass(Values.this);
cdd.show();
更新情報
久しぶりに友人から、背景を透明にした曲線のダイアログを作りたいとの要望がありました。ということで、実装してみました。
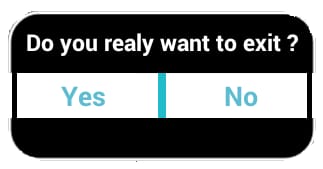
曲線の形状を作成するには、別途
curve_shap.XML
を以下のように設定します。
<shape xmlns:android="http://schemas.android.com/apk/res/android" >

    <solid android:color="#000000" />

    <stroke
        android:width="2dp"
        android:color="#ffffff" />

    <corners
        android:bottomLeftRadius="20dp"
        android:bottomRightRadius="20dp"
        android:topLeftRadius="20dp"
        android:topRightRadius="20dp" />

</shape>
ここで、次のように追加します。
curve_shap.XML
をメインビューレイアウトに追加します。私の場合、メインビューのレイアウトに
LinearLayout
<LinearLayout xmlns:android="http://schemas.android.com/apk/res/android"
        android:layout_width="fill_parent"
        android:layout_height="80dp"
        android:background="@drawable/curve_shap"
        android:orientation="vertical" >
...
</LinearLayout>
どのように呼び出すのですか?
CustomDialogClass cdd = new CustomDialogClass(MainActivity.this);
cdd.getWindow().setBackgroundDrawable(new ColorDrawable(Color.TRANSPARENT));
cdd.show();
これでうまくいくといいのですが。
関連
-
[解決済み】このアクティビティでは、Theme.AppCompatテーマ(またはその子孫)を使用する必要があります。
-
[android studio]com.android.ide.common.process.ProcessException: aaptの実行に失敗しました
-
GIF、Lottie、SVGA
-
エラー:未宣言の識別子(AS)の使用
-
Android Get set image.setImageResource(R.drawable.xxx) リソース
-
[解決済み] Androidのソフトキーボードをプログラムで閉じる/隠すにはどうすればよいですか?
-
[解決済み] Androidでアクティビティ起動時にEditTextにフォーカスが当たらないようにする方法
-
[解決済み] グリッドレイアウトにおけるフリングジェスチャーの検出
-
[解決済み] タイトルのないDialogFragmentを作成するには?
-
[解決済み】Android UserManager.isUserAGoat()の正しい使用例?)
最新
-
nginxです。[emerg] 0.0.0.0:80 への bind() に失敗しました (98: アドレスは既に使用中です)
-
htmlページでギリシャ文字を使うには
-
ピュアhtml+cssでの要素読み込み効果
-
純粋なhtml + cssで五輪を実現するサンプルコード
-
ナビゲーションバー・ドロップダウンメニューのHTML+CSSサンプルコード
-
タイピング効果を実現するピュアhtml+css
-
htmlの選択ボックスのプレースホルダー作成に関する質問
-
html css3 伸縮しない 画像表示効果
-
トップナビゲーションバーメニュー作成用HTML+CSS
-
html+css 実装 サイバーパンク風ボタン
おすすめ
-
AAPT2エラーについて:詳しくはログをご確認ください。
-
NetworkOnMainThreadException
-
armeabi-v7a armeabi arm64-v8a パラメータの意味説明
-
GIF、Lottie、SVGA
-
指定された子にはすでに親がいます。まず、その子の親に対して removeView() をコールする必要があります。
-
android block certificate validation CertPathValidatorException: 認証パスのトラストアンカーが見つかりません
-
エラー:未宣言の識別子(AS)の使用
-
JVMのエラーに遭遇しました。Java Runtime Environmentによって致命的なエラーが検出されました。
-
android.content.ActivityNotFoundException を解決します。Intent問題を処理するActivityが見つからない
-
[解決済み] アンドロイドで角丸のカスタムダイアログを作成する方法