ネイティブJSのパース getComputedStyle
getComputedStyleとgetPropertyValue
getComputedStyleとは何ですか?DOM の getComputedStyle メソッドは、ある要素で利用可能なすべての css プロパティのリストを取得するために使用され、配列として返され、読み取り専用です。
ページ上に id が指定された要素があるとすると、getComputedStyle を使用してその要素のスタイルを取得すると、次のようになります。
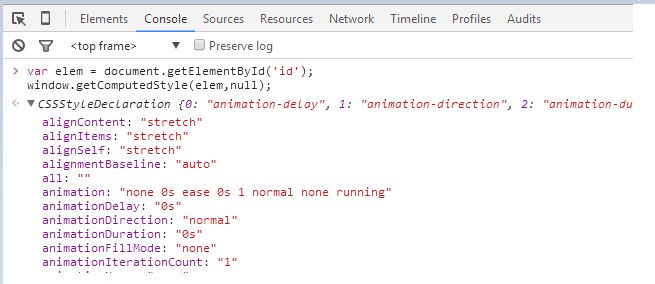
試してみると、window.getComputedStyle はすべてのスタイルを取得することがわかりますが、単一のスタイルだけを取得したい場合は、どうすればよいのでしょう。そこで、もう 1 つのメソッドである getPropertyValue を導入します。
使い方も簡単です。
// Syntax.
// Use getPropertyValue to specify the property to get
window.getComputedStyle("element", "pseudo-class").getPropertyValue(style);
IEでgetAttributeを使用したcurrentStyle
通常のブラウザの話はもう十分として、古くからの友人である IE について説明しましょう。getComputedStyle は独自の特殊な currentStyle 属性を持ち、getPropertyValue は IE で getAttribute を使用します。
getComputedStyleメソッドと違い、currentStyleはプロパティ名を取得するためにキャメルバックスタイルで書かなければならない。つまり、font-size属性を取得したいのであれば、引数はfontSizeであるべきなので、IEで単一の属性の値を取得するには、属性名をキャメルケースに変換する必要があるのです。
// Syntax under IE.
// Converting CSS naming to hump representation under IE
// font-size --> fontSize
// A little regularization is all that's needed
function camelize(attr) {
    // /\-(\w)/g The (\w) inside the regular is a catch, and the catch corresponds to the letter of the function that follows
    // meaning that the x of the matched -x structure is converted to an uppercase X (where x is any letter)
    return attr.replace(/\-(\w)/g, function(all, letter) {
        return letter.toUpperCase();
    });
}
// Use currentStyle.getAttribute to get the style attribute of the element element
element.currentStyle.getAttribute(camelize(style));
getComputedStyleを使用したスタイル
要素の CSS スタイル宣言オブジェクトは element.style でも取得できますが、getComputedStyle メソッドとはいくつかの違いがあることに注意する必要があります。
まず、element.style は read-write ですが、getComputedStyle は read-only です。
次に、element.style はスタイルに関するプロパティの値を取得するだけで、CSS スタイルのすべての値を取得するわけではありませんが、これはどういう意味でしょうか。CSS の基本で CSS スタイル シートを表現する方法には、次の 3 つがあることを思い出してください。
1. インラインスタイル:HTMLタグの中に記述され、インラインスタイルはそのタグに対してのみ利用可能です。
2.内部スタイルシート。HTMLの<style>タグの内部に記述され、内部スタイルは、それが記述されているページでのみ有効です。
3. 外部スタイルシート。多くのページで同じスタイルを使用する必要がある場合、スタイルをCSSファイル(拡張子は.CSS)に記述し、そのスタイルを使用する各ページでCSSファイルを参照します。
element.style がこれらのスタイル シートで定義されたスタイルのみを取得するのに対し、getComputedStyle は、スタイル シートで定義されているかどうかにかかわらず、すべてのスタイルの値(ブラウザによって異なり、Chrome では 264、Firefox では 238)を取得します(例)。
<style>
#id{
    width : 100px;
    float:left;
}
</style>

var elem = document.getElementById('id');

elem.style.length // 2
window.getComputedStyle(elem, null).length // 264
defaultViewを使用したgetComputedStyle
window.getComputedStyleの他の書き方として、document.defaultView.getComputedStyleがあります。
どちらも使い方は全く同じで、jQuery v1.10.2ではwindow.getComputedStyleが使用されています。以下はその方法です。

stackoverflowで調べると、Firefox 3.6ではdocument.defaultView.getComputedStyleを使用しないとエラーになることが記載されているなど、例外もあるようです。しかし、結局のところ、FF3.6はとっくに終わっているので、今は安全にwindow.getComputedStyleを使用することができる。
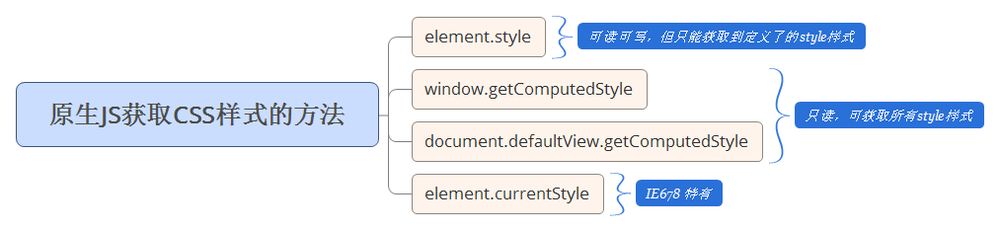
図解でまとめると
CSS スタイルの取得と設定の JS ネイティブ実装
ということで、次のステップは、すべてのブラウザに互換性のあるCSS get and setを実装したウィジェットをネイティブJSで実装することです。
getStyle(elem、style)
CSSセットについては、window.getComputedStyleをサポートするブラウザであれば、直接呼び出すだけで非常に簡単です。
getStyle: function(elem, style) {
    // Mainstream browsers
    if (win.getComputedStyle) {
        return win.getComputedStyle(elem, null).getPropertyValue(style);
    }
}
逆に、IEブラウザだとポツポツとありますね。
不透明度の透明度設定
初期のIEで透明度を設定するには、2つの方法がありました。
1.alpha(opacity=0.5)
2.filter:progid:DXImageTransform.Microsoft.gradient( GradientType= 0 , startColorstr = '#ccccc',endColorstr = '#ddddd' ).DXImageTransform.Microsoft.gradient(グラデーションタイプ)を使用します。
そこで、IEでは、透明度をどうにかする必要があります。まずは、IEで透明度を取得する方法を書いてみましょう。
// Get transparency in IE
function getIEOpacity(elem) {
    var filter = null;

    // There are two ways to set transparency in early IE.
    // 1. alpha(opacity=0)
    // 2. filter:progid:DXImageTransform.Microsoft.gradient( GradientType= 0 , startColorstr = '#ccccc', endColorstr = '# ddddd' );
    // Use regular matching
    filter = elem.style.filter.match(/progid:DXImageTransform.Microsoft. ? opacity=(. *).? \)/i) || elem.style.filter.match(/alpha\(opacity=(. *)\)/i);

    if (filter) {
        var value = parseFloat(filter);
        if (!isNaN(value)) {
            // convert to standard result
            return value ? value / 100 : 0;
        }
    }
    // The transparency value returns 1 by default
    return 1;
フロートスタイルの取得
float 属性はより重要な属性の 1 つですが、ECMAScript では float は予約語であるため、この属性は使用できません。
ので、標準ブラウザではcssFloat、IE678ではstyleFloatのように、ブラウザごとに代わりに記述されます。試したところ、標準ブラウザでは getPropertyValue("float") を使って float の値を直接取得することもできます。IE678ではできないので、floatについてもHACKが必要です。
幅|高さスタイルの取得
次に、要素の高さと幅です。高さや幅が設定されていない要素に対して、IE678 で getPropertyValue("width|height") を使用すると、auto が得られます。標準的なブラウザはpxの値を直接返しますが、もちろんIEでもpxの値を返したいのです。
ここでのHACKメソッドは、element.getBoundingClientRect()メソッドを使用することです。
element.getBoundingClientRect() -- ドキュメントビューの左上隅を基準に、要素の4点の値 top, left, bottom, right を取得し、それを計算することで正確な要素サイズを簡単に取得することができます。
スタイルのハンプ表現を取得する
前述のとおり、IEでcurrentStyleを使用する場合、プロパティ名を取得するためにハンプが必要です。
OK、これでHACKポイントはすべて解決です。IEでは、スタイルを取得する方法は、次のように書きます。
getStyle: function(elem, style) {
    // Mainstream browsers
    if (win.getComputedStyle) {
        ...
    // getComputedStyle is not supported
    } else {
        // Get transparency in IE
        if (style == "opacity") {
            getIEOpacity(elem);
        // Get float under IE687 using styleFloat
        } else if (style == "float") {
            return elem.currentStyle.getAttribute("styleFloat");
                // Get the height and width using getBoundingClientRect
        } else if ((style == "width" || style == "height") && (elem.currentStyle[style] == "auto")) {
            var clientRect = elem.getBoundingClientRect();

            return (style == "width" ? clientRect.right - clientRect.left : clientRect.bottom - clientRect.top) + "px";
        }
        // Other styles, no special handling required
        return elem.currentStyle.getAttribute(camelize(style));
    }
}
setStyle(elem,style,value)を設定します。
getの後、setStyleはgetStyleよりもはるかに便利です。なぜなら、標準ブラウザとIEの両方で、element.style.cssTextを使って要素のスタイルを設定することができるからです。
cssText -- CSSのスタイルを設定する方法ですが、元のスタイルを破壊して再構築する作業となり、この破壊と再構築によってブラウザにオーバーヘッドが発生します。また、IEではcssText(空でない場合)の場合、最後のセミコロンが削除されるので、そこに追加するプロパティの前に";"を付ける必要がある。
ただ、IEでの不透明度については、追加の処理が必要です。わかりやすくするために、コードを貼り付けるだけです。
// Set the style
setStyle: function(elem, style, value) {
    // If you're setting opacity, you'll need to do something special
    if (style == "opacity") {
        // IE7 bug: filter requires hasLayout=true to execute (otherwise no effect)
        if (!elem.currentStyle || !elem.currentStyle.hasLayout) {
            // A way to set hasLayout=true
            elem.style.zoom = 1;
        }
        // IE678 sets transparency as filter, not opacity
        style = "filter";

        // !!! Convert to boolean type to determine
        if (! XDomainRequest) {
            value = "progid:DXImageTransform.Microsoft.Alpha(style=0,opacity=" + value * 100 + ")";
        } else {
            value = "alpha(opacity=" + value * 100 + ")"
        }
    }
    // Generic methods
    elem.style.cssText += ';' + (style + ":" + value);
}
この時点で、JSネイティブのgetStyleとsetStyleが実装されています。このように、シンプルなインターフェースの裏側には様々なことが関係しているのです。ブラウザの互換性は落とし穴ではありますが、それを登っていく過程は歯を食いしばるには最適な時間です。
jQueryのようなフレームワークでも高速化は可能ですが、根本的な実装を理解し、ネイティブJSの書き方をマスターすることで、より大きな進化を遂げることができるのは間違いありません。
以上、ネイティブJSのgetComputedStyleのパースについて詳しく説明しました。ネイティブJSのgetComputedStyleについては、Scripting Houseの他の関連記事も参考にしてみてください
関連
最新
-
nginxです。[emerg] 0.0.0.0:80 への bind() に失敗しました (98: アドレスは既に使用中です)
-
htmlページでギリシャ文字を使うには
-
ピュアhtml+cssでの要素読み込み効果
-
純粋なhtml + cssで五輪を実現するサンプルコード
-
ナビゲーションバー・ドロップダウンメニューのHTML+CSSサンプルコード
-
タイピング効果を実現するピュアhtml+css
-
htmlの選択ボックスのプレースホルダー作成に関する質問
-
html css3 伸縮しない 画像表示効果
-
トップナビゲーションバーメニュー作成用HTML+CSS
-
html+css 実装 サイバーパンク風ボタン