MHAの高可用性構成とフェイルオーバー
記事目次
- 前書き
- I. MHAの紹介
- II. MySQL MHA Clustering の構築
-
- 1. 実験的なアイデア
- 2. 実験環境
- 3. 実験前の準備
- 4. マスター、スレーブ1、スレーブ2にmysql5.7をインストールする。
- 5. Master、Slave1、Slave2ノードでMySQLマスター設定ファイルを変更します。
- 6. マスター、スレーブ1、スレーブ2の各ノードに2つのソフトリンクを作成します。
- 7. mysqlをマスター1台、スレーブ2台で構成する。
- 8. MHAソフトウェアのインストール
- 9. 全サーバーでパスワードレス認証を設定する
- 10 マネージャーノードでMHAを構成する
- 11. 最初のコンフィギュレーションでは、マスターノードでバーチャルIPを手動で有効にする必要があります
- 12. マネージャノードでの ssh パスワードレス認証のテスト
- 13. マネージャーノードで mysql のマスター・スレーブ接続をテストする。
- 14. マネージャノードでMHAを起動する
- 15. MHAのステータスを見る
- 16. MHAのログを見る
- 17. Mysql1 の VIP アドレスを表示する
- III. MHAクラスタ障害シミュレーション
前書き
mysqlクラスタを構築する場合、マスター1台でマスター・スレーブ間のレプリケーションを行うとデータベースの読み書き能力が大幅に向上しますが、1点の故障がクラスタ全体をダウンさせることがあるので、通常はマスターに高可用性設定を行い、クラスタの冗長性を向上させることにしています。
I. MHAの紹介
1. MHAとは
- MHA (Master High Availability) は、高可用性MySQL環境におけるフェイルオーバーとマスタースレーブレプリケーションのための優れたソフトウェア群です。
- MHA は、MySQL の単一障害点問題を解決するために作成されました。
- MySQLのフェイルオーバー時に、MHAは0~30秒以内にフェイルオーバーを自動的に完了させます。
- MHAは、真の高可用性を実現するために、最大限のデータ一貫性を確保します。
2. MHAの特徴
- 自動フェイルオーバー時に、MHAはダウンしたプライマリサーバからバイナリログを保存しようとするため、データ損失を最大化することができます。
- 準同期レプリケーションにより、データ損失のリスクは大幅に軽減されます。1つのスレーブだけが最新のバイナリログを受信した場合、MHAは他のすべてのスレーブサーバに最新のバイナリログを適用できるため、すべてのノードでデータの一貫性を確保できます。
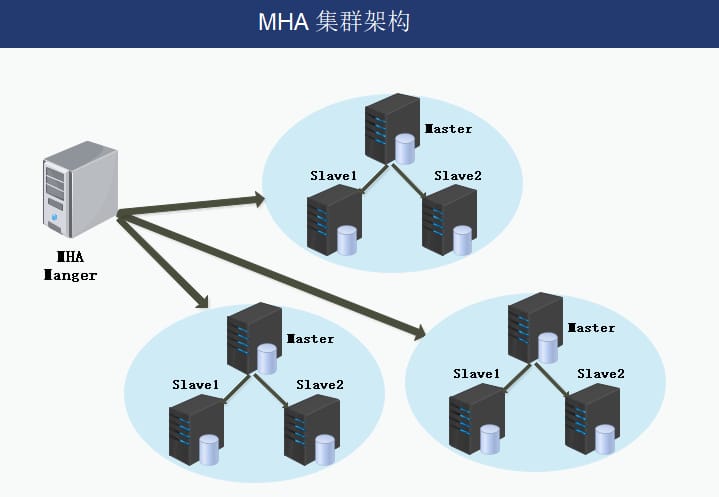
- MHAは現在、最低3つのサービス、すなわち1つのマスターと2つのスレーブを持つ1マスター・多スレーブアーキテクチャをサポートしています。
3. 構成と根拠
-
MHAノード(データノード)
The MHA Node runs on each MySQL server. -
MHAマネージャ(管理ノード)
MHA Manager can be deployed on a separate machine to manage multiple master-slave clusters, or on a slave node.


MHA Manager detects master nodes in the cluster at regular intervals. When the master fails, it automatically promotes the slave with the latest data to the new master, and then redirects all other slave to the new master. the entire failover process is completely transparent to the application.
<フォント 要約すると、MHAはクラスタにおける単一障害点の問題を解決するために設計されており、可能な限りデータを保持し、すべてのノードで一貫したログを確保することができます。
<ブロッククオート追記:データレプリケーションの種類
- 完全同期型レプリケーション
- 準同期レプリケーション
- 非同期レプリケーション
4. MHA切替の流れ
MHA Manager manages multiple sets of master-slave replication, and the MHA workings can be summarized as follows
- クラッシュしたマスターからバイナリログイベント(binlogイベント)を保存する
- 最新のアップデートでスレーブを特定 差分リレーログを他のスレーブに適用する
- マスターから保存されたバイナリログイベント(binlogイベント)を適用する
- スレーブを新しいマスターに昇格させる 他のスレーブを新しいマスターに接続させてレプリケーションを行う
II. MySQL MHA Clustering の構築
1. 実験的なアイデア
MHAアーキテクチャ
- データベースのインストール
- マスター1台、スレーブ2台
- MHAビルド
障害シミュレーション
- メインライブラリの不具合
- 代替プライマリがプライマリになる
- 元の故障したマスターをリストアして、スレーブとしてMHAに再接続する。
2. 実験環境
<テーブル サーバー ホスト名 システム IP ソフトウェアとバージョン MHAマネージャノードサーバ 管理者 CentOS7 192.168.10.50 MHAノードとマネージャコンポーネントのインストール マスターノードサーバー mysql1 CentOS7 192.168.10.20 mysql5.7、MHAノードコンポーネントのインストール Slave1 ノードサーバー mysql2 CentOS7 192.168.10.30 mysql5.7、MHAノードコンポーネントのインストール Slave2 ノードサーバ mysql3 CentOS7 192.168.10.40 mysql5.7、MHAノードコンポーネントのインストール3. 実験前の準備
All hosts with firewalls and SELINUX turned off
systemctl stop firewalld && systemctl disable firewalld
setenforce 0
Script installation
#! /bin/bash
#One-click installation of mysql-5.7.17
#Internet download of two source packages, packages on my cloud host
#Installation package downloaded in /data directory
#compile and install will take a long time, please be patient
mkdir /data
wget http://101.34.22.188/mysql-5.7.17/boost_1_59_0.tar.gz -P /data
wget http://101.34.22.188/mysql-5.7.17/mysql-5.7.17.tar.gz -P /data
systemctl stop firewalld && systemctl disable firewalld
setenforce 0
ntpdate ntp1.aliyun.com
tar zxvf /data/mysql-5.7.17.tar.gz -C /opt
tar zxvf /data/boost_1_59_0.tar.gz -C /usr/local
mv /usr/local/boost_1_59_0 /usr/local/boost
yum -y install gcc gcc-c++ ncurses ncurses-devel bison cmake make git perl expat-devel pcre-devel pcre
useradd -s /sbin/nologin mysql
cd /opt/mysql-5.7.17/
cmake \
-DCMAKE_INSTALL_PREFIX=/usr/local/mysql \
-DMYSQL_UNIX_ADDR=/usr/local/mysql/mysql.sock \
-DSYSCONFDIR=/etc \
-DSYSTEMD_PID_DIR=/usr/local/mysql \
-DDEFAULT_CHARSET=utf8 \
-DDEFAULT_COLLATION=utf8_general_ci \
-DWITH_EXTRA_CHARSETS=all \
-DWITH_INNOBASE_STORAGE_ENGINE=1 \
-DWITH_ARCHIVE_STORAGE_ENGINE=1 \
-DWITH_BLACKHOLE_STORAGE_ENGINE=1 \
-DWITH_PERFSCHEMA_STORAGE_ENGINE=1 \
-DMYSQL_DATADIR=/usr/local/mysql/data \
-DWITH_BOOST=/usr/local/boost \
-DWITH_SYSTEMD=1
cd /opt/mysql-5.7.17/
make -j 4 && make install
echo > /etc/my.cnf
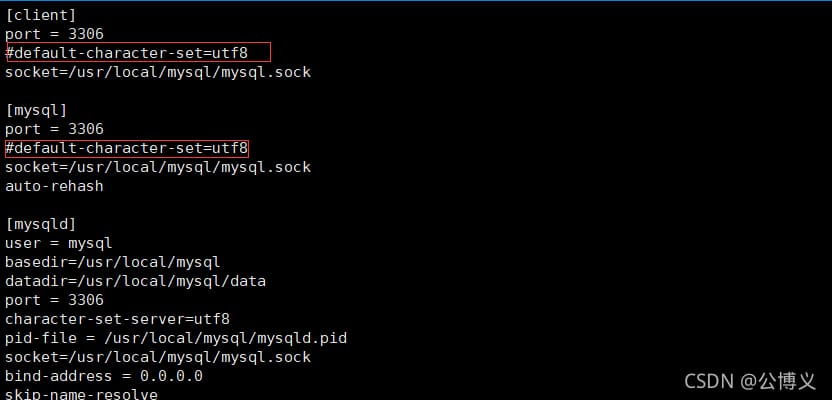
cat > /etc/my.cnf<<EOF
[client]
port = 3306
default-character-set=utf8
socket=/usr/local/mysql/mysql.sock
[mysql]
port = 3306
default-character-set=utf8
socket=/usr/local/mysql/mysql.sock
auto-rehash
[mysqld]
user = mysql
basedir=/usr/local/mysql
datadir=/usr/local/mysql/data
port = 3306
character-set-server=utf8
pid-file = /usr/local/mysql/mysqld.pid
socket = /usr/local/mysql/mysql.sock
bind-address = 0.0.0.0
skip-name-resolve
max_connections=2048
default-storage-engine=INNODB
max_allowed_packet=16M
server-id = 1
sql_mode=NO_ENGINE_SUBSTITUTION,STRICT_TRANS_TABLES,NO_AUTO_CREATE_USER,NO_AUTO_VALUE_ON_ZERO,NO_ZERO_IN_DATE,NO_ZERO_DATE,ERROR_ FOR_DIVISION_BY_ZERO,PIPES_AS_CONCAT,ANSI_QUOTES
EOF
chown -R mysql.mysql /usr/local/mysql/
chown mysql.mysql /etc/my.cnf
echo "PATH=$PATH:/usr/local/mysql/bin" >> /etc/profile
source /etc/profile
cd /usr/local/mysql/bin/
. /mysqld --initialize-insecure --user=mysql --basedir=/usr/local/mysql --datadir=/usr/local/mysql/data
cp /usr/local/mysql/
If you want to set a database password, execute.
mysql> set password=password('123456');
Query OK, 0 rows affected, 1 warning (0.00 sec)
mysql> flush privileges;
Query OK, 0 rows affected (0.00 sec)
Comment out the default character set for several nodes here ********
4. マスター、スレーブ1、スレーブ2ノードにmysql5.7をインストールする。
vim /etc/my.cnf
[mysqld]
server-id = 1
log_bin = master-bin
log-slave-updates = true

systemctl restart mysqld
5. Master、Slave1、Slave2ノードのMySQLマスター設定ファイルを変更します。
vim /etc/my.cnf
server-id = 2 # The server-id cannot be the same for all three servers
log_bin = master-bin
relay-log = relay-log-bin
relay-log-index = slave-relay-bin.index

systemctl restart mysqld
マスター (192.168.10.20)
vim /etc/my.cnf
server-id = 3 # The server-id cannot be the same for all three servers
log_bin= master-bin
relay-log = relay-log-bin
relay-log-index = slave-relay-bin.index

systemctl restart mysqld

ln -s /usr/local/mysql/bin/mysql /usr/sbin/
ln -s /usr/local/mysql/bin/mysqlbinlog /usr/sbin/
スレーブ1 (192.168.10.30)
mysql -uroot -p123456
grant replication slave on *. * to 'myslave'@'192.168.10.%' identified by '123456'; # synchronize from database to use
grant all privileges on *. * to 'mha'@'192.168.10.%' identified by 'manager'; #manager use
grant all privileges on *. * to 'mha'@'master' identified by 'manager'; #prevent the slave from not connecting to the master by hostname
grant all privileges on *. * to 'mha'@'slave1' identified by 'manager';
grant all privileges on *. * to 'mha'@'slave2' identified by 'manager';
flush privileges;
スレーブ2 (192.168.10.40)
mysql> show master status;
+-------------------+----------+--------------+------------------+-------------------+
| File | Position | Binlog_Do_DB | Binlog_Ignore_DB | Executed_Gtid_Set |
+-------------------+----------+--------------+------------------+-------------------+
| master-bin.000001 | 1897 | | | |
+-------------------+----------+--------------+------------------+-------------------+
1 row in set (0.00 sec)
6. マスター、スレーブ1、スレーブ2の各ノードに2つのソフトリンクを作成します。
change master to master_host='192.168.10.20',master_user='myslave',master_password='123456',master_log_file='master-bin.000001', master_log_pos=1897;

start slave;
7. mysqlの設定 マスター1台、スレーブ2台
<ブロッククオート全データベースノードのmysql認証
mysql> show slave status\G;

# Ensure that both IO and SQL threads are Yes, which means synchronization is working
Slave_IO_Running: Yes
Slave_SQL_Running: Yes
マスターノードでのバイナリやシンクポイントの表示
set global read_only=1;
flush privileges;
Slave1、Slave2ノードの同期操作の実行
Test for synchronization by inserting a strip of data in the master
create database test_db;
use test_db;
create table test(id int);
insert into test(id) values (1);
Slave1, Slave2ノードでのデータ同期結果の表示
yum install epel-release --nogpgcheck -y

yum install -y perl-DBD-MySQL \
perl-Config-Tiny \
perl-Log-Dispatch \
perl-Parallel-ForkManager \
perl-ExtUtils-CBuilder \
perl-ExtUtils-MakeMaker \
perl-CPAN
両方のスレーブをリードオンリーモードに設定する必要があります。
The node component must be installed first on all servers, and the manager component must be installed last on the MHA-manager node because the manager relies on the node component.
wget http://101.34.22.188/mha/node/mha4mysql-node-0.57.tar.gz -P /opt
cd /opt
tar zxvf mha4mysql-node-0.57.tar.gz
cd mha4mysql-node-0.57
perl Makefile.PL
make -j 4 && make install
データベースの同期をテストするためのデータを挿入する
wget http://101.34.22.188/mha/manager/mha4mysql-manager-0.57.tar.gz -P /opt
cd /opt
tar zxvf mha4mysql-manager-0.57.tar.gz
cd mha4mysql-manager-0.57
perl Makefile.PL
make -j 4 && make install

The manager component generates several tools under /usr/local/bin after installation, notably the following.
masterha_check_ssh #Check the SSH configuration status of MHA
masterha_check_repl #Check MySQL replication status
masterha_manger #Start manager's script
masterha_check_status #Check the current MHA running status
masterha_master_monitor #Check if the master is down
masterha_master_switch #Control failover (automatic or manual)
masterha_conf_host #Add or remove configured server information
masterha_stop #Shut down the manager


The node component will also generate several scripts under /usr/local/bin after installation (these tools are usually triggered by scripts from MHAManager and require no human intervention) mainly as follows
save_binary_logs #Save and copy master's binary logs
apply_diff_relay_logs #Identify differential relay log events and apply their differential events to other slave
filter_mysqlbinlog #Remove unnecessary ROLLBACK events (MHA no longer uses this tool)
purge_relay_logs # purge relay logs (without blocking SQL threads)
8. MHAソフトウェアのインストール
<ブロッククオートMHAの依存環境を、epelのソースから始まるすべてのサーバーにインストールする
ssh-keygen -t rsa #press enter all the way
ssh-copy-id 192.168.10.20 #type yes and then enter the password
ssh-copy-id 192.168.10.30
ssh-copy-id 192.168.10.40
MHAパッケージをインストールし、最初にすべてのサーバーにノードコンポーネントをインストールします(ノードは最初にインストールする必要があります)。
ssh-keygen -t rsa
ssh-copy-id 192.168.10.30
ssh-copy-id 192.168.10.40
MHAマネージャノードにマネージャコンポーネントをインストールする。
ssh-keygen -t rsa
ssh-copy-id 192.168.10.20
ssh-copy-id 192.168.10.40
ssh-keygen -t rsa
ssh-copy-id 192.168.10.20
ssh-copy-id 192.168.10.30
9. 全サーバーでパスワードレス認証を設定する
マネージャーノードで、すべてのデータベースノードにパスワードレス認証を設定する
cp -rp /opt/mha4mysql-manager-0.57/samples/scripts /usr/local/bin

The copy will result in four executable files
ll /usr/local/bin/scripts/
----------------------------------------------------
master_ip_failover #script for VIP management during automatic switchover
master_ip_online_change #Management of vip when switching online
power_manager #Scripts to shut down hosts after failover
send_report #Scripts to send alarms after failover
----------------------------------------------------
マスターからデータベースノードslave1、slave2へのパスワードレス認証の設定
cp /usr/local/bin/scripts/master_ip_failover /usr/local/bin
slave1でデータベースノードmasterとslave2へのパスワードレス認証を設定する。
vim /usr/local/bin/master_ip_failover

#! /usr/bin/env perl

use strict;
use warnings FATAL => 'all';

use Getopt::Long;

my (
  $command, $ssh_user, $orig_master_host,
  $orig_master_ip, $orig_master_port, $new_master_host,
  $new_master_ip, $new_master_port,
);

# ---------- add content section ----------
my $vip = '192.168.10.200';
my $brdc = '192.168.10.255';
my $ifdev = 'ens33';
my $key = '1';
my $ssh_start_vip = "/sbin/ifconfig ens33:$key $vip";
my $ssh_stop_vip = "/sbin/ifconfig ens33:$key down";
my $exit_code = 0;
#my $ssh_start_vip = "/usr/sbin/ip addr add $vip/24 brd $brdc dev $ifdev label $ifdev:$key;/usr/sbin/arping -q -A -c 1 -I $ifdev $vip;iptables -F ;";
#my $ssh_stop_vip = "/usr/sbin/ip addr del $vip/24 dev $ifdev label $ifdev:$key";
# --------------------------------

GetOptions(
  'command=s' => \$command,
  'ssh_user=s' => \$ssh_user,
  'orig_master_host=s' => \$orig_master_host,
  'orig_master_ip=s' => \$orig_master_ip,
  'orig_master_port=i' => \$orig_master_port,
  'new_master_host=s' => \$new_master_host,
  'new_master_ip=s' => \$new_master_ip,
  'new_master_port=i' => \$new_master_port,
);

exit &main();

sub main {

print "\n\nIN SCRIPT TEST====$ssh_stop_vip==$ssh_start_vip===\n\n\n";

if ( $command eq "stop" || $command eq "stopssh" ) {

my $exit_code = 1;
eval {
print "Disabling the VIP on old master: $orig_master_host \n";
&stop_vip();
$exit_code = 0;
};
if ($@) {
warn "Got Error: $@\n";
exit $exit_code;
}
exit $exit_code;
}
elsif ( $command eq "start" ) {

my $exit_code = 10;
eval {
print "Enabling the VIP - $vip on the new master - $new_master_host \n";
&start_vip();
$exit_code = 0;
};
if ($@) {
warn $@;
exit $exit_code;
}
exit $exit_code;
}
elsif ( $command eq "status" ) {
print "Checking the Status of the script. OK \n";
exit 0;
}
else {
&usage();
exit 1;
}
}
sub start_vip() {
`ssh $ssh_user\@$new_master_host \" $ssh_start_vip \"`;
}
## A simple system call that disable the VIP on the old_master
sub stop_vip() {
`ssh $ssh_user\@$orig_master_host \" $ssh_stop_vip \"`;
}

sub usage {
print
"Usage: master_ip_failover --command=start|stop|stopssh|status --orig_master_host=host --orig_master_ip=ip --orig_master_port=port --new_master_host=host --new_master_ip=ip --new_master_port=port\n";
}


Field explanation.
############################# add content section #########################################
my $vip = '192.168.10.200'; #Specify the address of the vip
my $brdc = '192.168.10.255'; #Specify the broadcast address of the vip
my $ifdev = 'ens33'; #Specify the NIC to which the vip is bound
my $key = '1'; #Specify the serial number of the virtual NIC to which the vip is bound
my $ssh_start_vip = "/sbin/ifconfig ens33:$key $vip"; # represents the value of this variable as ifconfig ens33:1 192.168.10.200
my $ssh_stop_vip = "/sbin/ifconfig ens33:$key down"; # represents the value of this variable as ifconfig ens33:1 192.168.10.200 down
my $exit_code = 0; #Specify the exit status code as 0
#my $ssh_start_vip = "/usr/sbin/ip addr add $vip/24 brd $brdc dev $ifdev label $ifdev:$key;/usr/sbin/arping -q -A -c 1 -I $ifdev $vip;iptables -F ;";
#my $ssh_stop_vip = "/usr/sbin/ip addr del $vip/24 dev $ifdev label $ifdev:$key";
##################################################################################
slave2上のデータベースノードmasterとslave1へのパスワードレス認証を設定する
mkdir /etc/masterha
cp /opt/mha4mysql-manager-0.57/samples/conf/app1.cnf /etc/masterha

vim /etc/masterha/app1.cnf #Remove the original content, copy it directly and change the IP address of the node server
[server default]
manager_log=/var/log/masterha/app1/manager.log
manager_workdir=/var/log/masterha/app1
master_binlog_dir=/usr/local/mysql/data
master_ip_failover_script=/usr/local/bin/master_ip_failover
master_ip_online_change_script=/usr/local/bin/master_ip_online_change
password=manager
ping_interval=1
remote_workdir=/tmp
repl_password=123456
repl_user=myslave
secondary_check_script=/usr/local/bin/masterha_secondary_check -s 192.168.10.30 -s 192.168.10.40
shutdown_script=""
ssh_user=root
user=mha

[server1]
hostname=192.168.10.20
port=3306

[server2]
candidate_master=1
check_repl_delay=0
hostname=192.168.10.30
port=3306

[server3]
hostname=192.168.10.40
port=3306

Field explanation.
[server default]
manager_log=/var/log/masterha/app1/manager.log #manager log
manager_workdir=/var/log/masterha/app1 #manager work directory
master_binlog_dir=/usr/local/mysql/data/ #master saves the binlog location, the path here should be the same as the binlog path configured in master, so that MHA can find it
master_ip_failover_script=/usr/local/bin/master_ip_failover # Set the switch script for automatic failover, which is the script above
master_ip_online_change_script=/usr/local/bin/master_ip_online_change #Set the switch script for manual switchover
password=manager #set the password for the root user in mysql, which is the same password used to create the monitor user in the previous article
ping_interval=1 #Set the time interval to send ping packets for monitoring the master library, the default is 3 seconds, and failover will be done automatically if there is no response after three attempts
remote_workdir=/tmp #set the binlog location of the remote mysql in case of switchover
repl_password=123 #set the password of the replica user
repl_user=myslave #Set the user of the replicated user
report_script=/usr/local/send_report #Set the script to send alarms after the switchover
secondary_check_script=/usr/local/bin/masterha_secondary_check -s 192.168.10.14 -s 192.168.10.15 #Specify the IP address of the slave server to check
shutdown_script="" #set the script to shut down the failed host after the failure (the main role of the script is to shut down the host to prevent brain cracking, not used here)
ssh_user=root #Set the ssh login username
user=mha #set the monitoring user root

[server1]
hostname=192.168.10.16
port=3306

[server2]
hostname=192.168.10.14
port=3306
candidate_master=1
# set as candidate master, after setting this parameter, this slave will be promoted to master after master-slave switch, even if this slave is not the latest slave in the cluster

check_repl_delay=0
#By default, if a slave lags behind the master by more than 100M relay logs, MHA will not select this slave as a new master because it takes a long time to recover this slave; by setting check_repl_delay=0, MHA will ignore the replication delay when selecting a new master when triggering a switch. This parameter is very useful for hosts with candidate_master=1, because this candidate master must be the new master during the switchover process.

[server3]
hostname=192.168.10.15
port=3306

/sbin/ifconfig ens33:1 192.168.10.200/24

If it works, the final output is successful
masterha_check_ssh -conf=/etc/masterha/app1.cnf

The MySQL Replication Health is OK message appears at the end to indicate that it is OK


If the check does not pass, see if the character set is uncommented
masterha_check_repl -conf=/etc/masterha/app1.cnf

nohup masterha_manager --conf=/etc/masterha/app1.cnf --remove_dead_master_conf --ignore_last_failover < /dev/null > /var/log/ masterha/app1/manager.log 2>&1 &

Parameter description.
--remove_dead_master_conf: This parameter means that when a master-slave switch occurs, the old master's ip will be removed from the configuration file.
--manger_log: Where the logs are stored.
--ignore_last_failover: By default, if MHA detects continuous downtime with less than 8 hours between downtimes, Failover will not be performed, which is limited to avoid the ping-pong effect. By default, the MHA will record the file app1.failover.complete in the log after the switchover, and the next switchover will not be allowed to trigger the switchover if the file is found in the directory, unless the file is deleted after the first switchover. For convenience, here set to --ignore_last_failover.


You can see that the current master is the Mysql1 node
masterha_check_status --conf=/etc/masterha/app1.cnf

You can also see that the current master is 192.168.10.20
cat /var/log/masterha/app1/manager.log | grep "current master"

Check to see if 192.168.10.200 exists, this VIP address does not disappear when the manager node stops serving MHA.
ifconfig
10 マネージャーノードでのMHAの設定
<ブロッククオートマネージャノード上の関連スクリプトを/usr/local/binディレクトリにコピーします。
masterha_stop --conf=/etc/masterha/app1.cnf
tail -f /var/log/masterha/app1/manager.log
自動切り替え時のVIP管理用の上記スクリプトを/usr/local/binディレクトリにコピーし、master_ip_failoverスクリプトがVIPとフェイルオーバーを管理するために使用されます。
systemctl stop mysqld
以下を修正する(オリジナルを削除し、直接コピーしてvip関連のパラメータを変更する)。
[root@master2 ~]#ifconfig
ens33: flags=4163<UP,BROADCAST,RUNNING,MULTICAST> mtu 1500
        inet 192.168.10.30 netmask 255.255.255.0 broadcast 192.168.10.255
        inet6 fe80::fd95:f79c:11fe:c64d prefixlen 64 scopeid 0x20<link>
        ether 00:0c:29:c4:cf:09 txqueuelen 1000 (Ethernet)
        RX packets 401240 bytes 544451852 (519.2 MiB)
        RX errors 0 dropped 0 overruns 0 frame 0
        TX packets 168247 bytes 22546724 (21.5 MiB)
        TX errors 0 dropped 0 overruns 0 carrier 0 collisions 0

ens33:1: flags=4163<UP,BROADCAST,RUNNING,MULTICAST> mtu 1500
        inet 192.168.10.200 netmask 255.255.255.0 broadcast 192.168.10.255
        ether 00:0c:29:c4:cf:09 txqueuelen 1000 (Ethernet)

lo: flags=73<UP,LOOPBACK,RUNNING> mtu 65536
        inet 127.0.0.1 netmask 255.0.0.0
        inet6 ::1 prefixlen 128 scopeid 0x10<host>
        loop txqueuelen 1000 (Local Loopback)
        RX packets 684 bytes 56281 (54.9 KiB)
        RX errors 0 dropped 0 overruns 0 frame 0
        TX packets 684 bytes 56281 (54.9 KiB)
        TX errors 0 dropped 0 overruns 0 carrier 0 collisions 0

virbr0: flags=4099<UP,BROADCAST,MULTICAST> mtu 1500
        inet 192.168.122.1 netmask 255.255.255.0 broadcast 192.168.122.255
        ether 52:54:00:92:5b:82 txqueuelen 1000 (Ethernet)
        RX packets 0 bytes 0 (0.0 B)
        RX errors 0 dropped 0 overruns 0 frame 0
        TX packets 0 bytes 0 (0.0 B)
        TX errors 0 dropped 0 overruns 0 carrier 0 collisions 0
Repairing mysql
systemctl restart mysqld

Repair master-slave
MHAソフトウェアディレクトリを作成し、構成ファイルをコピーします。ここでは、app1.cnf構成ファイルは、mysqlノードサーバーを管理するために使用されます。
mysql> show master status;
+-------------------+----------+--------------+------------------+-------------------+
| File | Position | Binlog_Do_DB | Binlog_Ignore_DB | Executed_Gtid_Set |
+-------------------+----------+--------------+------------------+-------------------+
| master-bin.000004 | 154 | | | | |
+-------------------+----------+--------------+------------------+-------------------+
1 row in set (0.00 sec)
# At this point slave1 becomes the master and mysql1 becomes the slave, so point to the new master IP on mysql1
change master to master_host='192.168.10.30',master_user='myslave',master_password='123456',master_log_file='master-bin.000004', master_log_pos=154;

start slave;

Modify the configuration file app1.cnf on the manager node (and add this record to it, as it will automatically disappear when it detects a failure)
#modify the new slave IPs (20, 40)
#server1 is the new master IP (30), server2/3 is the slave IP (20, 40)
vi /etc/masterha/app1.cnf
......
secondary_check_script=/usr/local/bin/masterha_secondary_check -s 192.168.10.20 -s 192.168.10.40
......
[server1]
hostname=192.168.10.30
port=3306

[server2]
candidate_master=1
check_repl_delay=0
hostname=192.168.10.20
port=3306

[server3]
hostname=192.168.10.40
port=3306


Start MHA on manager node
# Restart MHA
masterha_stop --conf=/etc/masterha/app1.cnf

nohup masterha_manager --conf=/etc/masterha/app1.cnf --remove_dead_master_conf --ignore_last_failover < /dev/null > /var/log/ masterha/app1/manager.log 2>&1 &

# At this point, if you check the MHA status, you can see that the current master is mysql2
masterha_check_status --conf=/etc/masterha/app1.cnf
#If you need to make mysql1 master again, stop the mysqld service on the mysql2 node. mysql1 gets master status and VIP, restart the mysqld service on mysql2, and add it to the cluster.
11. 初めて設定するときは、マスターノードでバーチャルIPを手動で有効にする必要があります
dos2unix /usr/local/bin/master_ip_failover
12. 12. マネージャーノードでの ssh パスワードレス認証のテスト
If it works, the final output is successful

masterha_check_ssh -conf=/etc/masterha/app1.cnf
<イグ
13. マネージャノードでmysqlのマスター・スレーブ接続をテストする
The MySQL Replication Health is OK message appears at the end to indicate that it is OK


If the check does not pass, see if the character set is uncommented

masterha_check_repl -conf=/etc/masterha/app1.cnf
<イグ
14. マネージャノードでMHAを起動する
nohup masterha_manager --conf=/etc/masterha/app1.cnf --remove_dead_master_conf --ignore_last_failover < /dev/null > /var/log/ masterha/app1/manager.log 2>&1 &
Parameter description.

--remove_dead_master_conf: This parameter means that when a master-slave switch occurs, the old master's ip will be removed from the configuration file.
--manger_log: Where the logs are stored.
--ignore_last_failover: By default, if MHA detects continuous downtime with less than 8 hours between downtimes, Failover will not be performed, which is limited to avoid the ping-pong effect. By default, the MHA will record the file app1.failover.complete in the log after the switchover, and the next switchover will not be allowed to trigger the switchover if the file is found in the directory, unless the file is deleted after the first switchover. For convenience, here set to --ignore_last_failover.
15. MHAのステータスを見る
You can see that the current master is the Mysql1 node

masterha_check_status --conf=/etc/masterha/app1.cnf
<イグ
16. MHAのログを見る
You can also see that the current master is 192.168.10.20

cat /var/log/masterha/app1/manager.log | grep "current master"
<イグ
17. Mysql1のVIPアドレスの表示
Check to see if 192.168.10.200 exists, this VIP address does not disappear when the manager node stops serving MHA.

ifconfig
追記:マネージャーサービスを停止するには、次のコマンドを使用します。
または、プロセスIDをkillしてシャットダウンすることもできます。masterha_stop --conf=/etc/masterha/app1.cnf
III. MHAクラスタ故障シミュレーション
<ブロッククオートマネージャノードでの観測ログの監視
tail -f /var/log/masterha/app1/manager.log
マスターノード Mysql1 の mysql サービスを停止します。
systemctl stop mysqld
1つの正常な自動切り替えの後、MHAプロセスは終了する。hmaは自動的にapp1.cnfファイルの内容を修正して、ダウンしているmysql1ノードを削除する。mysql2がVIPを引き継ぐかどうかを確認する
[root@master2 ~]#ifconfig
ens33: flags=4163<UP,BROADCAST,RUNNING,MULTICAST> mtu 1500
        inet 192.168.10.30 netmask 255.255.255.0 broadcast 192.168.10.255
        inet6 fe80::fd95:f79c:11fe:c64d prefixlen 64 scopeid 0x20<link>
        ether 00:0c:29:c4:cf:09 txqueuelen 1000 (Ethernet)
        RX packets 401240 bytes 544451852 (519.2 MiB)
        RX errors 0 dropped 0 overruns 0 frame 0
        TX packets 168247 bytes 22546724 (21.5 MiB)
        TX errors 0 dropped 0 overruns 0 carrier 0 collisions 0

ens33:1: flags=4163<UP,BROADCAST,RUNNING,MULTICAST> mtu 1500
        inet 192.168.10.200 netmask 255.255.255.0 broadcast 192.168.10.255
        ether 00:0c:29:c4:cf:09 txqueuelen 1000 (Ethernet)

lo: flags=73<UP,LOOPBACK,RUNNING> mtu 65536
        inet 127.0.0.1 netmask 255.0.0.0
        inet6 ::1 prefixlen 128 scopeid 0x10<host>
        loop txqueuelen 1000 (Local Loopback)
        RX packets 684 bytes 56281 (54.9 KiB)
        RX errors 0 dropped 0 overruns 0 frame 0
        TX packets 684 bytes 56281 (54.9 KiB)
        TX errors 0 dropped 0 overruns 0 carrier 0 collisions 0

virbr0: flags=4099<UP,BROADCAST,MULTICAST> mtu 1500
        inet 192.168.122.1 netmask 255.255.255.0 broadcast 192.168.122.255
        ether 52:54:00:92:5b:82 txqueuelen 1000 (Ethernet)
        RX packets 0 bytes 0 (0.0 B)
        RX errors 0 dropped 0 overruns 0 frame 0
        TX packets 0 bytes 0 (0.0 B)
        TX errors 0 dropped 0 overruns 0 carrier 0 collisions 0
フェイルオーバーの代替マスターのためのアルゴリズム。
- スレーブの総合判断は(位置/GTID)からメリットを判断し、データに差があり、マスターに最も近いスレーブが代替マスターとなる。
- データが一致した場合、設定ファイルの順番で代替マスタが選択されます。
-
重みを付けて設定(candidate_master=1)すると、重みに従って強制的に代替マスタが指定されます。
- デフォルトでは、スレーブがマスターより100Mリレーログが遅れている場合、weightがあっても失敗します。
- check_repl_delay=0にすると、かなり遅れても強制的に代替マスターとして選択されます。
トラブルシューティングの手順
Repairing mysql

systemctl restart mysqld


Repair master-slave
現在のマスターサーバーであるMysql2のバイナリやシンクポイントを表示します。
mysql> show master status;
+-------------------+----------+--------------+------------------+-------------------+
| File | Position | Binlog_Do_DB | Binlog_Ignore_DB | Executed_Gtid_Set |
+-------------------+----------+--------------+------------------+-------------------+
| master-bin.000004 | 154 | | | | |
+-------------------+----------+--------------+------------------+-------------------+
1 row in set (0.00 sec)
元のマスターであるmysql1サーバに同期操作を実行する。
# At this point slave1 becomes the master and mysql1 becomes the slave, so point to the new master IP on mysql1
change master to master_host='192.168.10.30',master_user='myslave',master_password='123456',master_log_file='master-bin.000004', master_log_pos=154;

start slave;
Modify the configuration file app1.cnf on the manager node (and add this record to it, as it will automatically disappear when it detects a failure)

#modify the new slave IPs (20, 40)
#server1 is the new master IP (30), server2/3 is the slave IP (20, 40)
vi /etc/masterha/app1.cnf
......
secondary_check_script=/usr/local/bin/masterha_secondary_check -s 192.168.10.20 -s 192.168.10.40
......
[server1]
hostname=192.168.10.30
port=3306

[server2]
candidate_master=1
check_repl_delay=0
hostname=192.168.10.20
port=3306

[server3]
hostname=192.168.10.40
port=3306


Start MHA on manager node

# Restart MHA
masterha_stop --conf=/etc/masterha/app1.cnf

nohup masterha_manager --conf=/etc/masterha/app1.cnf --remove_dead_master_conf --ignore_last_failover < /dev/null > /var/log/ masterha/app1/manager.log 2>&1 &

# At this point, if you check the MHA status, you can see that the current master is mysql2
masterha_check_status --conf=/etc/masterha/app1.cnf
#If you need to make mysql1 master again, stop the mysqld service on the mysql2 node. mysql1 gets master status and VIP, restart the mysqld service on mysql2, and add it to the cluster.
追記:中国語と英語の文字に互換性がない場合のエラー報告問題の解決について
dos2unix /usr/local/bin/master_ip_failover
関連
-
[エラー処理] [MySQL] [Err] 1241 - オペランドは 1 つのカラムを含む必要があります。
-
SQLラーニングノート--オペランドには1つのカラムが必要です。
-
ERROR 1136 (21S01) を解決してください。列の数が Mysql の行 1 の値の数と一致しません。
-
解決策:ユーザー root で localhost:3306 にある MySQL に接続できませんでした。
-
解決策:java.sql.SQLException: ユーザー ''@'localhost'' (パスワード: YES を使用) のアクセスが拒否されました。
-
plsql-stored-procedure ORA-06550 エラー処理
-
MySQL】1136 - 列数が1行目の値数と一致しない問題を解決
-
MySQL - ストアドプロシージャ (データ型、関数)
-
executeQuery()ソリューションでデータ操作文を発行できない。
最新
-
nginxです。[emerg] 0.0.0.0:80 への bind() に失敗しました (98: アドレスは既に使用中です)
-
htmlページでギリシャ文字を使うには
-
ピュアhtml+cssでの要素読み込み効果
-
純粋なhtml + cssで五輪を実現するサンプルコード
-
ナビゲーションバー・ドロップダウンメニューのHTML+CSSサンプルコード
-
タイピング効果を実現するピュアhtml+css
-
htmlの選択ボックスのプレースホルダー作成に関する質問
-
html css3 伸縮しない 画像表示効果
-
トップナビゲーションバーメニュー作成用HTML+CSS
-
html+css 実装 サイバーパンク風ボタン
おすすめ
-
ハートビート・エフェクトのためのHTML+CSS
-
HTML ホテル フォームによるフィルタリング
-
HTML+cssのボックスモデル例(円、半円など)「border-radius」使いやすい
-
HTMLテーブルのテーブル分割とマージ(colspan, rowspan)
-
ランダム・ネームドロッパーを実装するためのhtmlサンプルコード
-
Html階層型ボックスシャドウ効果サンプルコード
-
QQの一時的なダイアログボックスをポップアップし、友人を追加せずにオンラインで話す効果を達成する方法
-
sublime / vscodeショートカットHTMLコード生成の実装
-
HTMLページを縮小した後にスクロールバーを表示するサンプルコード
-
html のリストボックス、テキストフィールド、ファイルフィールドのコード例