[CSSチュートリアル]純粋なCSSは、効果を引き出すために、ページ内のリストを達成するために
以下のような効果をよく見かけることがあります。
はい、これはページ上のインタラクションの一般的な形式です。通常、display プロパティを制御して none と他の値を切り替えることができますが、これは可能ですが、効果が非常に硬いため、このようなニーズがあります - 要素を展開および折りたたんだときに高さを明確にスライドさせる効果が必要です。- 要素を展開したり折りたたんだりしたときに、高さが明確にスライドするような効果を持たせたいと考えています。
以前の実装では、jQueryの
{
  "ROSTemplateFormatVersion": "2015-09-01",
  "Description": "Create SNAT gateway with one click",
  "Parameters": {
    "SecurityGroupId": {
      "Description": "SecurityGroupId",
      "Type": "String"
    },
    "RouteTableId": {
      "Description": "Router ID in proprietary network",
      "Type": "String"
    },
    "RouteId": {
      "Description": "Router ID in proprietary network",
      "Type": "String"
    },
    "EIPBandwidth": {
      "Default": 5,
      "MinValue": 1,
      "Description": "Speed limit for flexible public IP, default is 5Mbps. ",
      "Type": "Number",
      "MaxValue": 200
    },
    "ECSZoneId": {
      "Description": "Available Zones, , <a href='#/product/cn-shenzhen/list/zoneList' target='_blank'>View Available Zones</a>",
      "Type": "String"
    },
    "ECSPassword": {
      "NoEcho": true,
      "MaxLength": 30,
      "Description": "Instance's password",
      "Type": "String",
      "ConstraintDescription": "8-30 characters, must contain all three (upper and lower case letters, numbers and special symbols). ",
      "MinLength": 8
    },
    "VSwitchId": {
      "Type": "String"
    },
    "VpcId": {
      "Type": "String"
    },
    "VSwitchCidrBlock": {
      "Description": "Access to the VSwitch segment of the external network through the SNAT gateway, this segment must belong to the VPC",
      "Type": "String"
    },
    "EIPInternetChargeType": {
      "Default": "PayByTraffic",
      "AllowedValues": [
        "PayByBandwidth",
        "PayByTraffic"
      ],
      "Description": "Elastic public IP billing type, PayByBandwidth(billed by fixed bandwidth), PayByTraffic(billed by usage traffic), fixed bandwidth is billed in days, usage traffic is billed in hours",
      "Type": "String"
    },
    "ECSSysDiskSize": {
      "Default": 40,
      "MinValue": 40,
      "Description": "System disk size, between 40-500",
      "Type": "Number",
      "MaxValue": 500
    },
    "ECSDiskCategory": {
      "Default": "cloud_efficiency",

      "Description": "Example specification, <a href='#/product/cn-shenzhen/list/typeList' target='_blank'>View example specification</a>",
      "Type": "String"
    },
    "ECSImageId": {
      "Default": "ubuntu1404_64_40G_cloudinit_20160427.raw",
      "Description": "Image file ID, indicating the image resource selected when booting the instance, <a href='#/product/cn-shenzhen/list/imageList' target='_blank'>View instance specs</ a>",
      "Type": "String"
    },
    "ECSTag": {
      "Description": "ECS tag",
      "Type": "String"
    }
  },
  "Resources": {
    "ElasticIpAssociation": {
      "Type": "ALIYUN::ECS::EIPAssociation",
      "Properties": {
        "InstanceId": {
          "Fn::Select": [
            "0",
            {
              "Fn::GetAtt": [
                "ECSSnatGateWay",
                "InstanceIds"
              ]
            }
          ]
        },
        "AllocationId": {
          "Fn::GetAtt": [
            "ElasticIp",
            "AllocationId"
          ]
        }
      }
    },
    "VRoute": {
      "Type": "ALIYUN::ECS::Route",
      "Properties": {
        "NextHopId": {
          "Fn::Select": [
            "0",
            {
              "Fn::GetAtt": [
                "ECSSnatGateWay",
                "InstanceIds"
              ]
            }
          ]
        },
        "RouteId": {
          "Ref": "RouteId"
        },
        "RouteTableId": {
          "Ref": "RouteTableId"
        },
        "DestinationCidrBlock": "0.0.0.0/0"
      }
    },
    "ECSSnatGateWay": {
      "Type": "ALIYUN::ECS::InstanceGroup",
      "Properties": {
        "SecurityGroupId": {
          "Ref": "SecurityGroupId"
        },
        "ImageId": {
          "Ref": "ECSImageId"
        },
        "Password": {
          "Ref": "ECSPassword"
        },
        "MinAmount": "1",
        "InternetMaxBandwidthIn": 100,
        "UserData": {
          "Fn::Replace": [
            {
              "ros-notify": {
                "Fn::GetAtt": [
                  "ECSSnatGateWayConditionHandle",
                  "CurlCli"
                ]
              }
            },
            {
              "Fn::Join": [
                "",
                [
                  "#! /bin/sh",
                  "\n",
                  "PostRouting=",
                  {
                    "Ref": "VSwitchCidrBlock"
                  },
                  "\n",
                  "SourceRouting=`ifconfig eth0|grep inet|awk '{print $2}'|tr -d 'addr:'`",
                  "\n",
                  "echo 'net.ipv4.ip_forward=1'>> /etc/sysctl.conf \n",
                  "sysctl -p \n",
                  "iptables -t nat -I POSTROUTING -s $PostRouting -j SNAT --to-source $SourceRouting \n",
                  "apt-get update\n",
                  "apt-get ins
しかし、モバイルでは CSS3 のアニメーションが十分にサポートされているため、モバイル用の JavaScript フレームワークではアニメーションモジュールが提供されていないのが実情です。ここで自然に思い浮かぶのが、CSS3の技術です。
筆者が最初に反応したのは
height+overflow:hidden;
これは、パフォーマンスの問題がなく、表示の心配もないものです。しかし、そこでふと思ったのです。表示する必要のあるコンテンツは動的であることが多く、コンテンツの高さが固定されていないことがあります(もちろん
overflow-y:auto;
は今のところありません)。この効果を得るには、高さを "非固定 auto" にする必要があります!
しかし
auto
は数値ではなくキーワードなので、「数値とキーワードは互いにカウントできない」という暗黙の規定のもと、仮に
height
の中で
0px
と
auto
を切り替えても、トランジションやアニメーションの効果は発生しません。
同じくcssの
clip-path多くの初心者は、「なし」と「具体的な値」の間でアニメーションすることに慣れていますが、これは不可能なことです。
したがって、テキストの上部にある効果を得るために、筆者は max-height 属性を推奨しています。
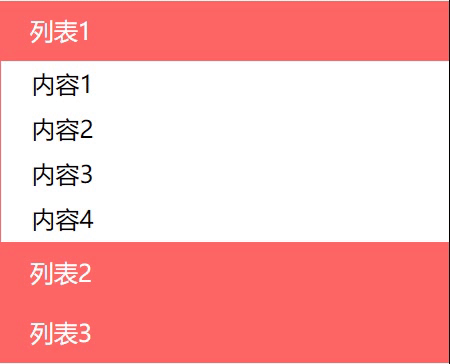
<div class="accordion">
	<input id="collapse1" type="radio" name="tap-input" hidden />
	<input id="collapse2" type="radio" name="tap-input" hidden />
	<input id="collapse3" type="radio" name="tap-input" hidden />
	<article>
		<label for="collapse1">list1</label>
		<p>content1<br>content2<br>content3<br>content4</p>
	</article>
	<article>
		<label for="collapse2">list2</label>
		<p>content1<br>content2<br>content3<br>content4</p>
	</article>
	<article>
		<label for="collapse3">list3</label>
		<p>content1<br>content2<br>content3<br>content4</p>
	</article>
</div>
.accordion {
	width: 300px;
}
.accordion article {
	cursor: pointer;
}
label {
	display: block;
	padding: 0 20px;
	height: 40px;
	background-color: #f66;
	cursor: pointer;
	line-height: 40px;
	font-size: 16px;
	color: #fff;
}
p {
	overflow: hidden;
	padding: 0 20px;
	margin: 0;
	border: 1px solid #f66;
	border-top: none;
	border-bottom-width: 0;
	max-height: 0;
	line-height: 30px;
	transition: all .5s ease;
}
input:nth-child(1):checked ~ article:nth-of-type(1) p,
input:nth-child(2):checked ~ article:nth-of-type(2) p,
input:nth-child(3):checked ~ article:nth-of-type(3) p {
	border-bottom-width: 1px;
	max-height: 130px;
}
cssでは
min-height/max-height
表示されるシナリオは、アダプティブレイアウトまたはフルードレイアウトである必要があります。また、展開された
max-height
の値が、コンテンツの高さよりも大きく設定されていることを確認する必要があります。
なぜなら、max-height >の高さでは、要素の高さはheight属性の高さとして計算されるからです。
.
しかし、max-height の値を大きくしすぎないことをお勧めします。結局のところ、遷移やアニメーションの時間は "アニメーションが完了するまでの時間" であって、"コンテンツが表示される時間" ではないからです。
という形でプルバック効果も提示しています。
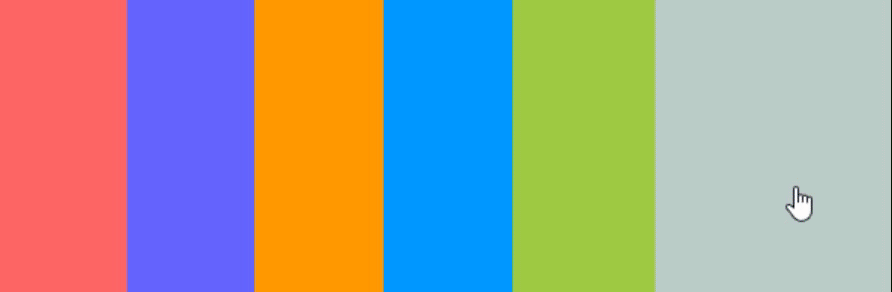
マウスを乗せると隣の部品が膨らんでしぼみ、マウスが離れると元の状態に戻るという部品が特徴です。マウスを素早く乗せると、アコーディオン演奏のような効果が得られます。
アコーディオン効果をJSで実装するためには、JSを起動する前に
mouseenter
と
mouseleave
は2つのマウスイベント、CSS
:hover
は、両方の効果を置き換えることができます。つまり、純粋なCSSでアコーディオン効果を実装するための鍵は
:hover
を以下のようなコアコードで記述します。
li {
}
li:hover {
}
要素が同じ/異なる幅の列に配置され、列内で伸縮させたいレイアウトの場合、より良い方法として フレックス !
<ul class="accordion">
    <li></li>
    <li></li>
    <li></li>
    <li></li>
    <li></li>
    <li></li>
</ul>
.accordion {
	display: flex;
	width: 600px;
	height: 200px;
}
li {
	flex: 1;
	cursor: pointer;
	transition: all 300ms;
}
li:nth-child(1) {
	background-color: #f66;
}
li:nth-child(2) {
	background-color: #66f;
}
li:nth-child(3) {
	background-color: #f90;
}
li:nth-child(4) {
	background-color: #09f;
}
li:nth-child(5) {
	background-color: #9c3;
}
li:nth-child(6) {
	background-color: #3c9;
}
li:hover {
	flex: 2;
	background-color: #ccc;
}
ここで注目すべきは、アニメーションの遅延のようないくつかの "特別な"ケースでは、以下のように開始することができます。 インラインスタイル としてHTMLに記述します。 CSSカスタム変数 という簡潔なコードになります。 CSS3カスタム変数の使用方法について、プロジェクトのリファクタリングから
ページ内のプル効果のリストを達成するために純粋なCSSに関するこの記事はここで紹介されて、より関連するCSSページリストプルコンテンツは、スクリプトホームの過去の記事を検索するか、次の関連記事を閲覧を続けてください、私はあなたが将来的にもっとスクリプトホームをサポートして願っています!.
関連
-
[CSSチュートリアル】カットコーナー+ボーダー+プロジェクション+コンテンツ背景色のグラデーション効果を実現するCSS
-
[CSSチュートリアル】Chromeのタブバーを実装するためのCSSのコツ
-
[CSSチュートリアル】overflow:hiddenの役割を解説(overflow hidden、clear float、外周マージンの崩れを解決する)。
-
[CSSチュートリアル】CSSで実現するTikTokのテキストジッター効果例
-
[css3]css3アニメーションマウスが絵の上に置かれると徐々に大きくなり、マウスが絵から離れると徐々に縮む効果
-
[CSSチュートリアル】ピュアCSSでDIVホバーを実現するサンプルコード(固定位置編)
-
フロントエンドの落とし穴 リソースはスタイルシートとして解釈されるが、MIMEタイプはtext/htmlで転送される。"<URL>". css スタイルの失敗
-
[CSSチュートリアル]css transform ページめくりアニメーションの記録
-
[CSSチュートリアル】ホバードロップダウンメニュー方式を実現するCSS
-
[CSSチュートリアル]CSSでimg画像を親コンテナdivと適応的なコンテナサイズに埋める
最新
-
nginxです。[emerg] 0.0.0.0:80 への bind() に失敗しました (98: アドレスは既に使用中です)
-
htmlページでギリシャ文字を使うには
-
ピュアhtml+cssでの要素読み込み効果
-
純粋なhtml + cssで五輪を実現するサンプルコード
-
ナビゲーションバー・ドロップダウンメニューのHTML+CSSサンプルコード
-
タイピング効果を実現するピュアhtml+css
-
htmlの選択ボックスのプレースホルダー作成に関する質問
-
html css3 伸縮しない 画像表示効果
-
トップナビゲーションバーメニュー作成用HTML+CSS
-
html+css 実装 サイバーパンク風ボタン
おすすめ
-
[CSSチュートリアル】CSSの新機能には、ページの再描画や並び替えの問題をコントロールする機能が含まれています。
-
[Div+CSSチュートリアル】divの背景を透明にする設定例
-
[CSSチュートリアル】インタビュー必見!聖杯レイアウトとダブルウィングレイアウトの違いとは?
-
[ブラウザ互換性チュートリアル]IE9でのネイティブページの互換性問題の解決方法について
-
[CSSチュートリアル】CSS複合セレクタの具体的な使用方法
-
原理を説明するためにいくつかの方法の虫眼鏡効果の模倣で[css3]css3
-
[CSSチュートリアル]overflow:autoの使い方解説
-
[css3]css3のtransformの遷移のジッターの問題を解決しました。
-
[css3]css3は、最初と最後のテキスト実行例を実現するためのコード
-
[css3]CSS3トランジションによる通知メッセージ回転バーの実装