ウォーターフォール型レイアウトを実現する3つの方法 まとめ
プリアンブル
今日、アイドルフィッシュを見ていたら、各行の高さが同じでないことを確認し、これはウォーターフォールというレイアウトだと気づき、なかなか面白いので調べてみることにしたところ、Web上でいくつかの解決策が見つかり、ウォーターフォールを実装する方法は3つほどあるようです。
<スパン I. ウォーターフォールのJS実装
アイデア分析
- ウォーターフォールのレイアウトは、幅が同じで高さが不揃いなのが特徴です。
- 最後の行の隙間を最小にするために、2行目から、1行目の最も短い画像の下に画像を配置する必要がある、というわけです。
- 親要素を相対配置にし、画像を配置する要素を絶対配置にします。そして、topの値とleftの値を設定して各要素を配置します。
コードの実装
<!DOCTYPE html>
<html>
<head>
    <style>
        .box {
            width: 100%;
            position:relative;
        }
        .item {
            position: absolute;
        }
        .item img {
            width: 100%;
            height:100%;
        }
    </style>
</head>
<body>
<div class="box">
    <div class="item">
        <img src="banner.jpg" alt="" />
    </div>
    <div class="item">
        <img src="show.jpg" alt="" />
    </div>
    <div class="item">
        <img src="cloth.jpg" alt="" />
    </div>
    <div class="item">
        <img src="banner.jpg" alt="" />
    </div>
    <div class="item">
        <img src="show.jpg" alt="" />
    </div>
    <div class="item">
        <img src="cloth.jpg" alt="" />
    </div>
    <div class="item">
        <img src="banner.jpg" alt="" />
    </div>
    <div class="item">
        <img src="show.jpg" alt="" />
    </div>
    <div class="item">
        <img src="cloth.jpg" alt="" />
    </div>
    <div class="item">
        <img src="show.jpg" alt="" />
    </div>
    <div class="item">
        <img src="cloth.jpg" alt="" />
    </div>
    <div class="item">
        <img src="banner.jpg" alt="" />
    </div>
</div>
</body>
<script src="jquery.min.js"></script>
<script>
    function waterFall() {
        // 1 Determine the width of the image - scrollbar width
        var pageWidth = getClient().width-8;
        var columns = 3; // 3 columns
        var itemWidth = parseInt(pageWidth/columns); // get the width of the item
        $(".item").width(itemWidth); //set to the width of the item
        var arr = [];
        $(".box .item").each(function(i){
            var height = $(this).find("img").height();
            if (i < columns) {
                // 2 The first row is laid out in order
                $(this).css({
                    top:0,
                    left:(itemWidth) * i+20*i,
                });
                //push the row height to the array
                arr.push(height);
            } else {
                // other rows
                // 3 Find the minimum height in the array and its index
                var minHeight = arr[0];
                var index = 0;
                for (var j = 0; j < arr.length; j++) {
                    if (minHeight > arr[j]) {
                        minHeight = arr[j];
                        index = j;
                    }
                }
                // 4 Set the position of the first box in the next row
                // the top value is the height of the smallest column
                $(this).css({
                    top:arr[index]+30,// set the distance of 30
                    left:$(".box .item").eq(index).css("left")
                });

                // 5 Modify the height of the smallest column
                // minimum column height = current own height + stitched in height
                arr[index] = arr[index] + height+30;// set the distance of 30
            }
        });
    }
    //clientWidth Handle compatibility
    function getClient() {
        return {
            width: window.innerWidth || document.documentElement.clientWidth || document.body.clientWidth,
            height: window.innerHeight || document.documentElement.clientHeight || document.body.clientHeight
        }
    }
    // Triggered in real time when the page size changes
    window.onresize = function() {
        // Redefine the waterfall
        waterFall();
    };
    // Initialize
    window.onload = function(){
        //implement waterfall
        waterFall();
    }
</script>
</html>
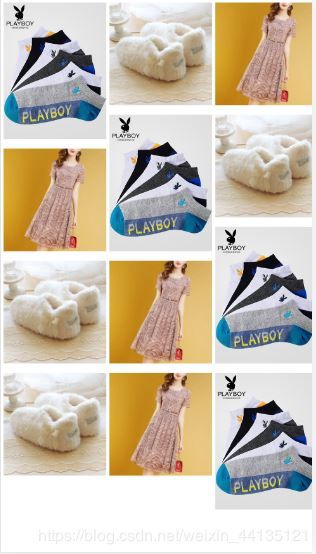
その効果は次のとおりです。
II. ウォーターフォールのカラム・マルチロウ・レイアウト
思考分析。
ウォーターフォールのカラム実装は、主に2つの性質に依存しています。
1つはcolumn-countプロパティで、いくつのカラムに分割されるかを示す。
1つはcolumn-gapプロパティで、列と列の間の距離を設定する。
コードの実装。
<!DOCTYPE html>
<html>
<head>
    <style>
        .box {
            margin: 10px;
            column-count: 3;
            column-gap: 10px;
        }
        .item {
            margin-bottom: 10px;
        }
        .item img {
            width: 100%;
            height:100%;
        }
    </style>
</head>
<body>
<div class="box">
    <div class="item">
        <img src="banner.jpg" alt="" />
    </div>
    <div class="item">
        <img src="show.jpg" alt="" />
    </div>
    <div class="item">
        <img src="cloth.jpg" alt="" />
    </div>
    <div class="item">
        <img src="banner.jpg" alt="" />
    </div>
    <div class="item">
        <img src="show.jpg" alt="" />
    </div>
    <div class="item">
        <img src="cloth.jpg" alt="" />
    </div>
    <div class="item">
        <img src="banner.jpg" alt="" />
    </div>
    <div class="item">
        <img src="show.jpg" alt="" />
    </div>
    <div class="item">
        <img src="cloth.jpg" alt="" />
    </div>
    <div class="item">
        <img src="show.jpg" alt="" />
    </div>
    <div class="item">
        <img src="cloth.jpg" alt="" />
    </div>
    <div class="item">
        <img src="banner.jpg" alt="" />
    </div>
</div>
</body>
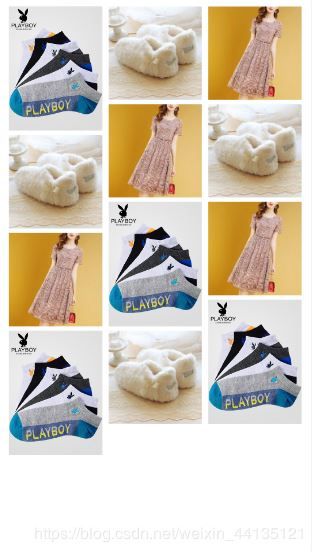
その効果は次のとおりです。
三、フレキシブルレイアウトでウォーターフォールを実現する
思考分析。
ウォーターフォールのフレックス実装では、一番外側の要素をdisplay: flexに設定する必要があり、これは水平に整列させることを意味します。そしてflex-flow:column wrapとすることで改行させるようにします。子要素が入るようにheight: 100vhを設定して、画面の高さを満たします。各カラムの幅はcalc関数で、つまりwidth: calc(100%/3 - 20px)で設定できます。左右のマージン距離を引いた幅で3列に等幅に分割します。
コードの実装。
<!DOCTYPE html>
<html>
<head>
    <style>
        .box {
          display: flex;
          flex-flow:column wrap;
          height: 100vh;
        }
        .item {
            margin: 10px;
            width: calc(100%/3 - 20px);
        }
        .item img {
            width: 100%;
            height:100%;
        }
    </style>
</head>
<body>
<div class="box">
    <div class="item">
        <img src="banner.jpg" alt="" />
    </div>
    <div class="item">
        <img src="show.jpg" alt="" />
    </div>
    <div class="item">
        <img src="cloth.jpg" alt="" />
    </div>
    <div class="item">
        <img src="banner.jpg" alt="" />
    </div>
    <div class="item">
        <img src="show.jpg" alt="" />
    </div>
    <div class="item">
        <img src="cloth.jpg" alt="" />
    </div>
    <div class="item">
        <img src="banner.jpg" alt="" />
    </div>
    <div class="item">
        <img src="show.jpg" alt="" />
    </div>
    <div class="item">
        <img src="cloth.jpg" alt="" />
    </div>
    <div class="item">
        <img src="show.jpg" alt="" />
    </div>
    <div class="item">
        <img src="cloth.jpg" alt="" />
    </div>
    <div class="item">
        <img src="banner.jpg" alt="" />
    </div>
</div>
</body>
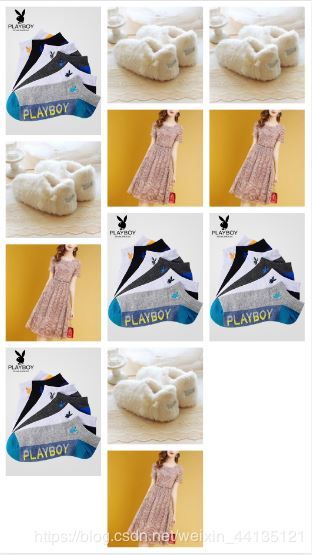
その効果は次のとおりです。
IV. 3つの方法の比較
シンプルなページ表現であれば、カラムレイアウトやフレックスレイアウトを利用することができます。動的にデータを追加したり、カラム数を動的に設定する必要がある場合は、JS + jQueryを使用する必要があります。
この記事がお役に立てれば幸いです。また、スクリプト・ハウスを応援していただければ幸いです。
関連
-
キャンバスで画像のミラーリングと反転を実現する2つの方法
-
画像アップロードとキャンバス圧縮処理の解析
-
HTML5でオプションのスタイルシートを使ってWebサイトやアプリケーションにダークモードを追加する方法を解説
-
HTML5 Blobによるファイルダウンロード機能のサンプルコード
-
クロスドメイン・モディフィケーション iframeページのコンテンツ詳細
-
html+js マークダウンエディタ効果
-
印刷用のクリア画像を生成するhtml2canvasのサンプルコード
-
円形のプログレスバーを生成する html svg
-
SVG描画をHTMLページに持ってくる実装
-
canvas 学習のまとめ III - パスの描画 - ラインセグメント
最新
-
nginxです。[emerg] 0.0.0.0:80 への bind() に失敗しました (98: アドレスは既に使用中です)
-
htmlページでギリシャ文字を使うには
-
ピュアhtml+cssでの要素読み込み効果
-
純粋なhtml + cssで五輪を実現するサンプルコード
-
ナビゲーションバー・ドロップダウンメニューのHTML+CSSサンプルコード
-
タイピング効果を実現するピュアhtml+css
-
htmlの選択ボックスのプレースホルダー作成に関する質問
-
html css3 伸縮しない 画像表示効果
-
トップナビゲーションバーメニュー作成用HTML+CSS
-
html+css 実装 サイバーパンク風ボタン
おすすめ
-
html5 モバイル 長押し禁止 画像保存 実装
-
キャンバスを使った移動可能なグリッドの描画方法のサンプルコード
-
canvas.toDataURL()エラーの詳細な解決策はすべてこちら
-
アップロード用画像の圧縮にcanvasを使用した例
-
html5 色彩公差キーイング with canvas
-
QRコードポスター付きキャンバス生成の落とし穴記録
-
IOSキーボードがfocusoutイベントでしまわれたときに元の場所に戻らない問題を解決する
-
iphoneXの前髪スクリーンに合わせたHtml5の簡易実装
-
キャンバスで画像を圧縮し、カードを作成する例
-
ベッセル曲線の軌跡アニメーションのためのCanvasサンプルコード