html5 色彩公差キーイング with canvas
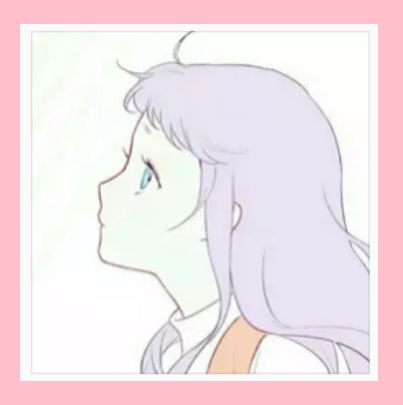
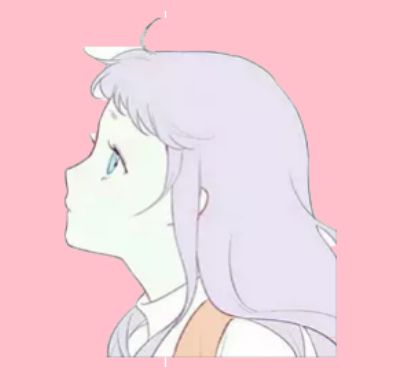
canvasのgetImageDataを使うと、画像の各画素の情報を得ることができ、各画素の情報を比較することで、消すべき画素点を見つけることができます。例えば、下の画像で、白い部分(ピンクはボディの背景色)を削除したい場合、以下のようになります。
let canvas = document.querySelector('#canvas');
let context = canvas.getContext('2d');
let img = document.createElement('img');
img.src = '. /head2.png';
img.onload = function () {
    canvas.height = img.height;
    canvas.width = img.width;
    context.drawImage(img, 0, 0);
    cutout(canvas, [255, 255, 255], 0.2); // key out the white, with a tolerance of 0.2
}
function cutout(canvas, color, range = 0) {
    let context = canvas.getContext('2d');
    let imageInfo = context.getImageData(0, 0, canvas.width, canvas.height);
    // pixiArr is an array, each of the four array elements represents a pixel point, these four array elements correspond to the r, g, b, a value of a pixel respectively.
    let pixiArr = imageInfo.data;
    for (let i = 0; i < pixiArr.length; i += 4) {
    // Set the alpha of the target pixel to 0 if it is matched
        if (testColor([pixiArr[i], pixiArr[i + 1], pixiArr[i + 2]], color, range)) pixiArr[i + 3] = 0;
    }
    context.putImageData(imageInfo, 0, 0);
}
function testColor(current, target, range) {
    for (let i = 0; i < 3; i++) {
        if (! ((1 - range) * target[i] <= current[i] && (1 + range) * target[i] >= current[i])) return false;
    }
    return true;
}
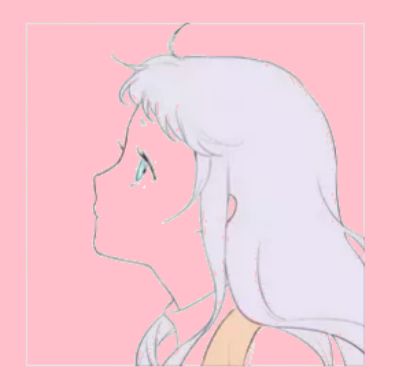
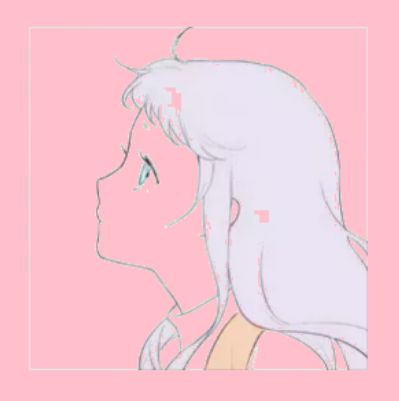
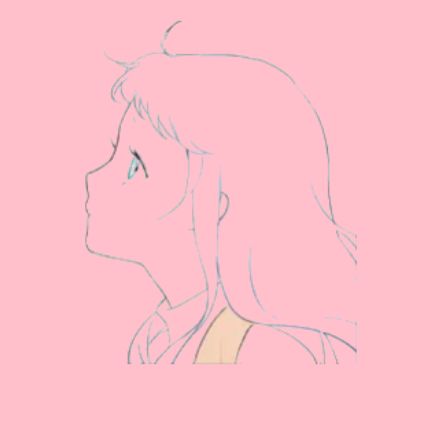
testColor(current, target, range) メソッドの3つのパラメータは、検出するピクセルのrgb配列、ターゲットピクセルのrgb配列、許容範囲であり、許容範囲はr、g、bの値にそれぞれ(1 + range)、(1 - range)を掛けることで簡単に計算して比較します。 効果 ↓................................................。
範囲 = 0.095
範囲 = 0.1
範囲 = 0.2
もちろん、ベースカラーが標準的なソリッドカラーの画像には、公差は必要ありません。
ボーダーの取り扱い
しかし、キーイング操作が境界の内側のピクセルに影響を与えないように、境界を設けたい場合もあります。例えば、上の画像では、アバター内のピクセルに影響を与えないようにしたい。一行ずつ見ていくと、境界線でないピクセルにぶつかったら操作を止めるだけで効果が得られるのではないでしょうか?
各行を別々にスキャンし、行の最初のピクセルへの左ポインタ、行の最後のピクセルへの右ポインタを定義し、左側がボーダーに当たった場合は左F、右側がボーダーに当たった場合は右Fをマークし、ボーダーに当たらない場合は、両方のポインタがボーダーに当たるまでポインタを内側に縮小し続ける。 左と右ポインタが重なる場合、次の行にスキップして全行スキャンを終了する。
function cutout(canvas, color, range = 0) {
    let context = canvas.getContext('2d');
    let imageInfo = context.getImageData(0, 0, canvas.width, canvas.height);
    let pixiArr = imageInfo.data;
    for (let row = 0; row < canvas.height; row++) {
        let left = row * 4 * canvas.width; // point to the first pixel of the row
        let right = left + 4 * canvas.width - 1 - 3; // point to the end of the row
        let leftF = false; // marker for whether the left pointer touches the border
        let rightF = false; // flag if the right pointer touches the border
        while (!leftF || !rightF) { // end when both left and right pointers are true, i.e. both hit the boundary
            if (!leftF) {
                if (testColor([pixiArr[left], pixiArr[left + 1], pixiArr[left + 2]], color, range)) {
                    pixiArr[left + 3] = 0; // set the alpha of this pixel to 0
                    left += 4; // move to the next pixel
                } else leftF = true; // hits the border
            }
            if (!rightF) {
                if (testColor([pixiArr[right], pixiArr[right + 1], pixiArr[right + 2]], color, range)) {
                    pixiArr[right + 3] = 0;
                    right -= 4;
                } else rightF = true;
            }
            if (left == right) { // left and right pointers overlap
                leftF = true;
                rightF = true;
            };
        }
    }
    context.putImageData(imageInfo, 0, 0);
}
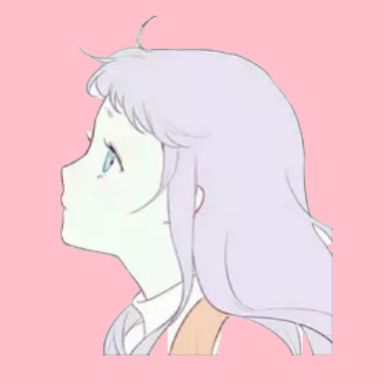
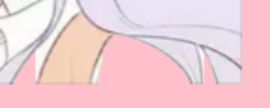
これはおそらく必要なことを行っているのですが、上の髪を見て、なぜ余分な白いパッチがあるのか見てみましょう。

行スキャンしかしていないので、左ポインタが髪の毛に触れるとスキャンが停止しますが、円弧の内側の髪の毛はスキャンできないので、列スキャンをする必要があり、上記のメソッドを修正し
function cutout(canvas, color, range = 0) {
    let context = canvas.getContext('2d');
    let imageInfo = context.getImageData(0, 0, canvas.width, canvas.height);
    let pixiArr = imageInfo.data;
    for (let row = 0; row < canvas.height; row++) {
        let left = row * 4 * canvas.width;
        let right = left + 4 * canvas.width - 1 - 3;
        let leftF = false;
        let rightF = false;
        while (!leftF || !rightF) {
            if (!leftF) {
                if (testColor([pixiArr[left], pixiArr[left + 1], pixiArr[left + 2]], color, range)) {
                    pixiArr[left + 3] = 0;
                    left += 4;
                } else leftF = true;
            }
            if (!rightF) {
                if (testColor([pixiArr[right], pixiArr[right + 1], pixiArr[right + 2]], color, range)) {
                    pixiArr[right + 3] = 0;
                    right -= 4;
                } else rightF = true;
            }
            if (left == right) {
                leftF = true;
                rightF = true;
            };
        }
    }
    // Similarly for column scanning
    for (let col = 0; col < canvas.width; col++) {
        let top = col * 4; // point to the column header
        let bottom = top + (canvas.height - 2) * canvas.width * 4 + canvas.width * 4; // point to the end of the column
        let topF = false;
        let bottomF = false;
        while (!topF || !bottomF) {
            if (!topF) {
                if (testColor([pixiArr[top], pixiArr[top + 1], pixiArr[top + 2]], color, range)) { if (testColor([pixiArr[top], pixiArr[top + 1], pixiArr[top + 2]], color, range)) {
                    pixiArr[top + 3] = 0;
                    top += canvas.width * 4;
                } else topF = true;
            }
            if
As for why the top and bottom are the way they are, you can probably figure out by drawing a matrix diagram.
 After processing↓
 You can also actually start by wrapping pixiArr as a matrix of one pixel points
[
[{r: 255, g: 255, b: 255, a: 1}, {r: 255, g: 255, b: 255, a: 1}, {r: 255, g: 255, b: 255, a: 1}],
[{r: 255, g: 255, b: 255, a: 1}, {r: 255, g: 255, b: 255, a: 1}, {r: 255, g: 255, b: 255, a: 1}], [{r: 255, g: 255, b: 255, a: 1}]
[{r: 255, g: 255, b: 255, a: 1}, {r: 255, g: 255, b: 255, a: 1}, {r: 255, g: 255, b: 255, a: 1}]
]
It is also simpler to calculate the pixel subscripts after processing, by first rotating this matrix directly in the column scan, and then processing it again with a row scan. Processing pixiArr this way also facilitates further optimization of the algorithm.
The above approach roughly accomplishes the keying effect, but there are many cases where this simple processing does not take into account.
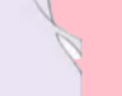
For example, the hair on the right is an area that neither the row scan nor the column scan can reach↓
 The clothes below were also wiped right out of the column scan because they had the same color as the base color and no border↓
 Finally
For images with a large distinction between subject and base color, the approach at the beginning is sufficient. The tolerance and boundary processing algorithms I use in this article have a lot of room for optimization, but they are very easy to implement and understand, and this article is meant to be a primer, so you can continue to implement the boundary and tolerance algorithms to the best of your ability.
Summary
The above is my introduction to html5 using canvas to achieve color tolerance keying function, I hope it will be helpful to you, if you have any questions please leave me a message, I will reply to you in time. I would like to thank you all for your support of the Script House website!
Finally
For images with a large distinction between subject and base color, the approach at the beginning is sufficient. The tolerance and boundary processing algorithms I use in this article have a lot of room for optimization, but they are very easy to implement and understand, and this article is meant to be a primer, so you can continue to implement the boundary and tolerance algorithms to the best of your ability.
Summary
The above is my introduction to html5 using canvas to achieve color tolerance keying function, I hope it will be helpful to you, if you have any questions please leave me a message, I will reply to you in time. I would like to thank you all for your support of the Script House website!
[
    [{r: 255, g: 255, b: 255, a: 1}, {r: 255, g: 255, b: 255, a: 1}, {r: 255, g: 255, b: 255, a: 1}],
    [{r: 255, g: 255, b: 255, a: 1}, {r: 255, g: 255, b: 255, a: 1}, {r: 255, g: 255, b: 255, a: 1}], [{r: 255, g: 255, b: 255, a: 1}]
    [{r: 255, g: 255, b: 255, a: 1}, {r: 255, g: 255, b: 255, a: 1}, {r: 255, g: 255, b: 255, a: 1}]
]
関連
-
CAPTCHAを生成するHTML5サンプルコード
-
フォントの調整のメニューの右上隅にWeChat内蔵のブラウザでHTML5は、ページが間違った問題を表示するために発生する
-
Html5ネイティブのドラッグ&ドロップ関連イベント紹介と基本的な実装方法
-
Canvasでグラフィックス/イメージバインディングのイベントリスナーを実装する方法
-
動画下の自動再生プロパティが無効な場合の解決方法(ミュートプロパティを追加する)。
-
textareaで改行や空白を処理する
-
html5 android compatibility for mobile video (remove play control, full screen)(モバイルビデオ用アンドロイド互換性)。
-
html5でBUI折りたたみメニュープラグインを書く方法
-
カスタムお絵かきボード用JavaScript+Canvasサンプルコード
-
HTML5ページシームレス点滅オープン問題と解決策
最新
-
nginxです。[emerg] 0.0.0.0:80 への bind() に失敗しました (98: アドレスは既に使用中です)
-
htmlページでギリシャ文字を使うには
-
ピュアhtml+cssでの要素読み込み効果
-
純粋なhtml + cssで五輪を実現するサンプルコード
-
ナビゲーションバー・ドロップダウンメニューのHTML+CSSサンプルコード
-
タイピング効果を実現するピュアhtml+css
-
htmlの選択ボックスのプレースホルダー作成に関する質問
-
html css3 伸縮しない 画像表示効果
-
トップナビゲーションバーメニュー作成用HTML+CSS
-
html+css 実装 サイバーパンク風ボタン
おすすめ
-
ポップアップウィンドウのhtml実装例
-
html5で複数ページ通信を行うsharedWorkerのコード例
-
html+cssでメニューバーのスロードロップダウン効果を実現するコード例
-
HTML5 ドラッグ&ドロップによるファイルアップロードのサンプルコード
-
html5ジャンプアプレット wx-open-launch-weappは落とし穴に踏み込んだ
-
ログイン期限切れでIframフレームワークから飛び出す方法を説明する
-
ウェブサイトパフォーマンスのための画像読み込みを遅らせる5つのコツ(要約)
-
画像処理におけるキャンバスの活用
-
html5動画の共通APIインタフェースの実例を紹介
-
ディテールキャンバスの描画Webフォントいくつかのメソッド