[CSSチュートリアル】resizeで画像のプレビューを切り替える方法
2022-01-21 10:19:44
キーポイント
- CSSのresizeプロパティで、要素のリサイズを制御することができます
- リサイズと連動して、子要素の幅をダイナミックに変更することができます。
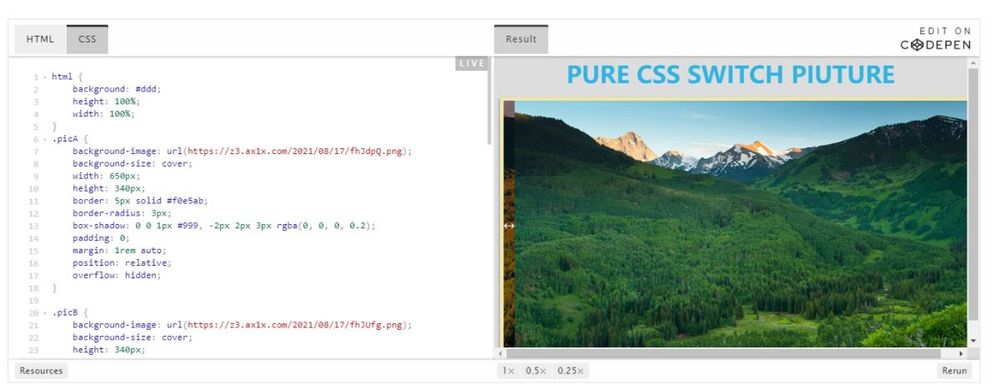
HTMLです。
<div class='picA'>
    <div class='picB'>
        <div readonly class='resizeElement'></div>
    </div>
</div>
SCSSです。
html {
    background: #ddd;
    height: 100%;
    width: 100%;
}
.picA {
    background-image: url(https://z3.ax1x.com/2021/08/17/fhJdpQ.png);
    background-size: cover;
    width: 650px;
    height: 340px;
    border: 5px solid #f0e5ab;
    border-radius: 3px;
    box-shadow: 0 0 1px #999, -2px 2px 3px rgba(0, 0, 0, 0, 0.2);
    padding: 0;
    margin: 1rem auto;
    position: relative;
    overflow: hidden;
}
.picB {
    background-image: url(https://z3.ax1x.com/2021/08/17/fhJUfg.png);
    background-size: cover;
    height: 340px;
    position: absolute;
    top: 0;
    left: 0;
    min-width: 0;
    max-width: 650px;
    box-sizing: border-box;
}
.picB:before {
    content: "↔";
    position: absolute;
    background: rgba(0, 0, 0, 0, 0.5);
    font-size: 16px;
    color: white;
    top: 0;
    right: 0;
    height: 100%;
    line-height: 340px;
}
.resizeElement {
    resize: horizontal;
    overflow: scroll;
    opacity: 0;
    position: relative;
    top: 50%;
    left: 0px;
    height: 15px;
    max-width: 650px;
    min-width: 15px;
    width: 0;
    cursor: move;
    transform: scaleY(35);
    transform-origin: center center;
    animation: delta 5s normal ease-in-out 1s;
}
@keyframes delta {
    30% {
        width: 0;
    }
    60% {
        width: 350px;
    }
    100% {
        width: 0;
    }
}
その効果は次の通りです。
リサイズを使って画像切り替えプレビュー機能を実装する方法については以上となります。リサイズの画像切り替えプレビューについては、スクリプトハウスの過去記事を検索していただくか、引き続き以下の関連記事をご覧ください。
関連
-
[CSSチュートリアル】CSSスコープ(スタイル分割)の使い方まとめ
-
[CSSチュートリアル】CSSアニメーション 途中で止める方法とポーズを維持する方法
-
[CSSチュートリアル]z-indexの違い。cssのz-index: 0とz-index: autoの違い。
-
[CSSチュートリアル】QQtabBarからCSS命名規則BEMの詳細を見る
-
[CSSチュートリアル】CSSを解析して、画像のテーマカラー機能を抽出する(コツ)
-
[CSSチュートリアル】position:stickyでトップ吸い上げアプレット問題を完璧に解決
-
[CSSチュートリアル】シンプルなナビゲーションバー機能を実現するhtml+css
-
[css3】background属性の8つの属性値について解説(インタビュー記事)
-
[CSSチュートリアル]CSSでimg画像を親コンテナdivと適応的なコンテナサイズに埋める
-
[css3]CSS3トランジションによる通知メッセージ回転バーの実装
最新
-
nginxです。[emerg] 0.0.0.0:80 への bind() に失敗しました (98: アドレスは既に使用中です)
-
htmlページでギリシャ文字を使うには
-
ピュアhtml+cssでの要素読み込み効果
-
純粋なhtml + cssで五輪を実現するサンプルコード
-
ナビゲーションバー・ドロップダウンメニューのHTML+CSSサンプルコード
-
タイピング効果を実現するピュアhtml+css
-
htmlの選択ボックスのプレースホルダー作成に関する質問
-
html css3 伸縮しない 画像表示効果
-
トップナビゲーションバーメニュー作成用HTML+CSS
-
html+css 実装 サイバーパンク風ボタン
おすすめ
-
[CSSチュートリアル】CSS3で3つの効果例の背景をぼかす。
-
[css3]css3アニメーションマウスが絵の上に置かれると徐々に大きくなり、マウスが絵から離れると徐々に縮む効果
-
フロントエンドの落とし穴 リソースはスタイルシートとして解釈されるが、MIMEタイプはtext/htmlで転送される。"<URL>". css スタイルの失敗
-
[CSSチュートリアル]実装ステップの吸引上部と下部のH5レイアウトのための純粋なCSSソリューション
-
[Web標準チュートリアル】html5+CSS3コーディング規約
-
[css3] css3の擬似クラスについて、共通使用前と共通使用後で説明する。
-
[css3]CSS3+HTML5+JSでブロックの縮小・拡大アニメーション効果を実装する。
-
[CSSチュートリアル]スクロールバーを非表示にし、サンプルコードの内容をスクロールすることができますするCSS
-
[css3]CSS3のtransition-delayプロパティのデフォルト値0を単体で失敗しないように修正。
-
[css3]css3のtransformの遷移のジッターの問題を解決しました。