html2canvas.jsを使用してページのスクリーンショットを撮影し、表示またはアップロードするサンプルコード
先日、html2canvas.jsを使ってページのスクリーンショットを実装するプロジェクトを書いたのですが、いろいろと落とし穴があったので、メモ書きしておきます。
html2canvasを使用する際、ビジュアルインターフェイスしかキャプチャできない、スクリーンショットの背景色がない、svgタグがキャプチャできないなどの問題に遭遇することがあります。
I. html2canvas.jsのインポート
これは紹介するまでもなく、githubの以下のページから入手できます。 https://github.com/niklasvh/html2canvas
で直接リンクを取り込むこともできます。
<script src="https://cdn.bootcss.com/html2canvas/0.5.0-beta4/html2canvas.js"></script>
また、使い勝手もよく、APIはウェブで検索できますし、"image/png"でpng画像を生成することも可能です。
$("#xxx") は取り込みたいdivで、jqueryで外部から取り込むことができますが、もちろんdocumentも可能です。
html2canvas($("#xxx"), {
         onrendered: function (canvas) {
             var url = canvas.toDataURL("image/png");
        window.location.href = url;
           }
   });
jpgなどの他の種類の画像、for image/jpegなどは、ご自身でAPIをご確認ください。
簡単なスクリーンショットは、実際にこちらで行っています。もう少し複雑なインターフェイスの場合は、様々なポットホールがあるかもしれませんが、それは以下で一つずつ解決していきます。
II. svgが傍受できない問題
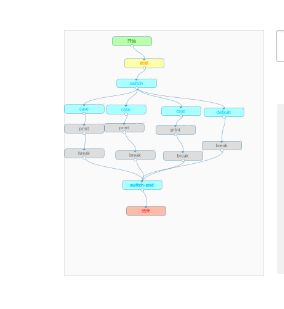
divを傍受するとき、divの中にsvgタグがあると、通常は傍受されません。例えば、フローチャートを傍受すると、以下のようになります。
見ての通り、フローチャートの行はインターセプトされていません。つまり、svgはインターセプトされていません。解決策は、svgをキャンバスに変換してからスクリーンショットを撮り、コード上に直接表示することです。
ここでの各ループは、すべてのsvgタグをループして、それらをすべてcanvasに変換しています。
if (typeof html2canvas ! == 'undefined') {
        // Here's what happens to the svg
        var nodesToRecover = [];
        var nodesToRemove = [];
        var svgElem = cloneDom.find('svg');
        svgElem.each(function (index, node) {
            var parentNode = node.parentNode;
            var svg = node.outterHTML.trim();

            var canvas = document.createElement('canvas');
            canvas.width = 650;
            canvas.height = 798;
            canvg(canvas, svg);
            if (node.style.position) {
                canvas.style.position += node.style.position;
                canvas.style.left += node.style.left;
                canvas.style.top += node.style.top;
            }

            nodesToRecover.push({
                parent: parentNode,
                child: node
            });
            parentNode.removeChild(node);

            nodesToRemove.push({
                parent: parentNode,
                child: canvas
            });

            parentNode.appendChild(canvas);
        });

   }
ここでは、canvg.jsとその依存ファイルであるrgbcolor.jsを使用する必要があり、これらはオンラインで直接ダウンロードするか、直接インポートすることができます。
III. 背景の透明性の問題
これは、デフォルトで透明になっているので、実はとても簡単です。html2canvas には、以下のように背景色を追加するための background というパラメータがあります。
html2canvas(cloneDom, {
      onrendered: function(canvas) {
           var url =canvas.toDataURL("image/png");
      },
      background:"#fafafa"
});
<スパン IV. 可視部分しか傍受できない問題
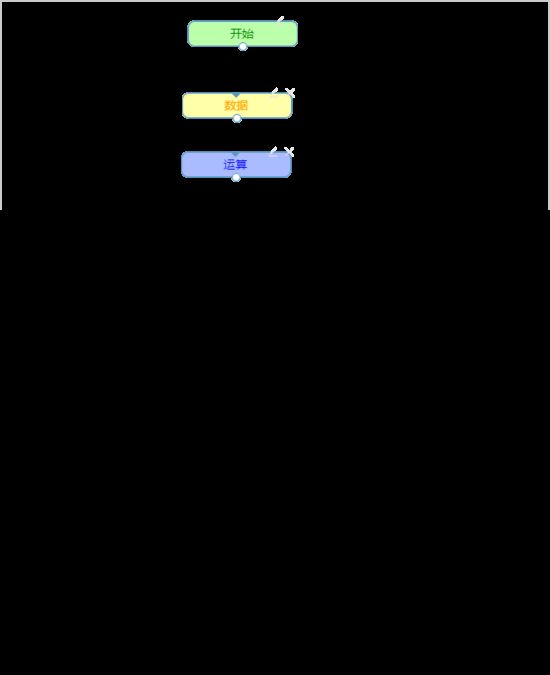
傍受する div がインターフェイスを超えている場合、上記のように、コンテンツの半分しか傍受できない不完全な問題に遭遇することがあります。これは、不可視部分が隠されているためで、html2canvas は隠された dom を傍受することができないのです。
そこで、この時点での解決策は、クローンを使用し、傍受する部分のコピーを作成してページの下部に配置し、html2canvas を使用して完全な div を傍受し、傍受が完了した後にその部分を削除します。全コードは以下のとおりです。
function showQRCode() {
    scrollTo(0, 0);

    // Clone the node, default is false, i.e. no method attributes are copied, true is all copied.
    var cloneDom = $("#d1").clone(true);
    // Set the z-index property of the cloned node, as long as it is at a lower level than the node being cloned.
    cloneDom.css({
        "background-color": "#fafafa",
        "position": "absolute",
        "top": "0px",
        "z-index": "-1",
        "height": 798,
        "width": 650
    });

    if (typeof html2canvas ! == 'undefined') {
        // Here's what to do with the svg
        var nodesToRecover = [];
        var nodesToRemove = [];
        var svgElem = cloneDom.find('svg');//divReport is the id of the dom that needs to be intercepted as an image
        svgElem.each(function (index, node) {
            var parentNode = node.parentNode;
            var svg = node.outterHTML.trim();

            var canvas = document.createElement('canvas');
            canvas.width = 650;
            canvas.height = 798;
            canvg(canvas, svg);
            if (node.style.position) {
                canvas.style.position += node.style.position;
                canvas.style.left += node.style.left;
                canvas.style.top += node.style.top;
            }

            nodesToRecover.push({
                parent: parentNode,
                child: node
            });
            parentNode.removeChild(node);

            nodesToRemove.push({
                parent: parentNode,
                child: canvas
            });

            parentNode.appendChild(canvas);
        });

        // Append the clone node dynamically behind the body.
        $("body").append(cloneDom);

        html2canvas(cloneDom, {
            onrendered: function(canvas) {
                var url =canvas.toDataURL("image/png");
                window.location.href = url ;
                cloneDom.remove(); //clear the clone
             },
             background:"#fafafa"
        });

   }
}
ここでは、まず外側で傍受する div のコピーをクローンし、見苦しいインターフェースを避けるために z-index を最小にしてから、上で解析した svg を処理し、最後にクローンしたノードを body の後ろに追加しています。
onrenderedでは、location.hrefを使って直接画像を表示したり、保存操作をしたり、$('#imgId').attr('src',url)のようにimgのsrcにurlを書いてインターフェース上に表示することが可能です。
最後に、先ほど横取りした画像は、以下のようにインターフェイスに表示することができます。
V. 画像をアップロードしてデータベースに保存し、インターフェイスに表示されるようにする
urlが得られたので、それをバックエンドにアップロードし、データベースに保存し、別の表示インターフェースで画像をロードする必要があります。一般的には、blobではなく、urlを使用して画像のパスを保存するのに慣れています。
別のインターフェイスで画像を取得する必要があるため、ウェブアプリと同じレベルのリソースディレクトリに画像を格納し、以下のようなコードを記述します。
// store the image and return the image path
        BASE64Decoder decoder = new BASE64Decoder();
        byte[] b = decoder.decodeBuffer(product.getProPic().substring("data:image/png;base64,".length())));
        ByteArrayInputStream bais = new ByteArrayInputStream(b);
        BufferedImage bi1 = ImageIO.read(bais);
        String url = "user_resource" + File.separator + "img" + File.separator + "product_" + UUID.randomUUUID().toString( ).replace("-", "")+".png";
        String totalUrl = System.getProperty("root") + url;
        File w2 = new File(totalUrl);
        ImageIO.write(bi1, "png", w2);

        product.setProPic(url); //store the relative path of the image to the database

        int res = productMapper.insertSelective(product); //add to database
他のロジックが絡むので、コードの一部だけをここに載せています。
ここでは、画像を格納するためにBASE64Decoderを使用して、我々は画像を取得した後、我々は&quot;データ:画像/ png;base64、&quot;の内容を傍受するためにサブストリングを使用する必要があり、&quotは、画像のURLであるため。
url.substring("data:image/png;base64,".length())
.
パスについては、上記のコードにあるurlはデータベースに保存するもので、totalUrlは実際にImageIOの書き込み操作を行ったときに保存される実際のパスです。 getProperty()メソッドはプロジェクトのルートディレクトリを取得しますが、これはweb.xmlで以下のように設定すれば、System.getProperty( "root" )で完了します。
<! -- Configure the system to get the project root -->
<context-param>
    <param-name>webAppRootKey</param-name>
    <param-value>root</param-value>
</context-param>
<listener>
    <listener-class>
        org.springframework.web.util.WebAppRootListener
    </listener-class>
</listener>
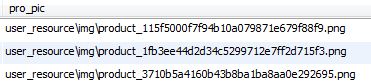
これで、画像のURLはデータベースに保存され、画像自体はこのプロジェクトではtomcatの下のこのディレクトリに保存されるようになりました。
最後に、外部からインターフェイスに入るには、現在の URL の前にプロジェクト名を付けるだけです。
< img class ="depot-img" src ="<%=request.getContextPath()%>/`+e.proPic+`" >
.
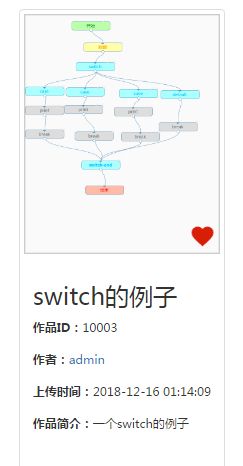
すると、インターフェースに表示される画像は、以下のようになります。
以上が今回の記事の内容ですが、皆様の学習の一助となり、スクリプトハウスをより一層応援していただければ幸いです。
関連
-
AmazeUIがモーダルボックスにフォームを埋め込んでモーダルインプットボックスを形成する
-
モバイル適応のためのremやviewportの使い方を説明する。
-
iframeのクロスドメインでよく使われるいくつかの方法
-
プリントイメージ機能のフロントエンド実装
-
左右の高さの差がありすぎる問題を解決するための小型プログラムウォーターフォール
-
HTML5 動画再生プラグイン video.js のご紹介
-
HTML5新タグの互換性 --> <! --<if lt IE 9><!endif--> の2つの方法があります。
-
HTML5でjsonオブジェクトを使用するためのサンプルコード
-
canvasで心電図を描画するサンプルコード
-
ivxプラットフォーム開発:9箱の抽選機能をコードレスで実装する。
最新
-
nginxです。[emerg] 0.0.0.0:80 への bind() に失敗しました (98: アドレスは既に使用中です)
-
htmlページでギリシャ文字を使うには
-
ピュアhtml+cssでの要素読み込み効果
-
純粋なhtml + cssで五輪を実現するサンプルコード
-
ナビゲーションバー・ドロップダウンメニューのHTML+CSSサンプルコード
-
タイピング効果を実現するピュアhtml+css
-
htmlの選択ボックスのプレースホルダー作成に関する質問
-
html css3 伸縮しない 画像表示効果
-
トップナビゲーションバーメニュー作成用HTML+CSS
-
html+css 実装 サイバーパンク風ボタン