HTML5開発によるダイナミックオーディオマップの実装
概要
今回は、html5とjsを使ってダイナミックなオーディオグラフを開発します
使用した技術ポイント
(1) js
(2) キャンバス+オーディオ
(3) Web Audio API
実装されています。
(1) まず、インターフェース実装の検討ですが、ブロック数が非常に多いため、従来のdom nodeの実装を使うことは非常に困難です(コンピュータのCPUを多く占有することになります)。ここでは、レンダリングにcanvasを使用することを検討します
(2) フロントエンドでは、できるだけ少ないjsでdomノードを制御する原則に従います。css3で実現できる効果をjsで実現してはいけません。(jsはマークアップ言語ではなく、スクリプト言語であり、html5も同じ言語ではないため。ブラウザの読み込みに時間がかかり、結果的にブラウザのパフォーマンスを浪費することになる)。したがって、jsを使ってdomを少なくし、domを使ってcssをできるだけ多く使うようにします。
(3) Web Audio APIによるオーディオノードでのオーディオ操作(オーディオの可視化)、以下のフローチャート。
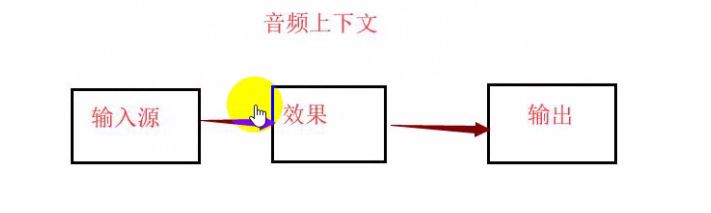
図では、オーディオコンテキストは、オーディオ処理の体系的なアプローチを提供しています。入力ソースは名前で紹介される音楽ファイルを指し、エフェクトはオーディオマップ、ソノグラム、3Dサラウンド、ベースエフェクトなどの作成など入力ソースの処理、出力はヘッドフォンやスピーカーなどの出力先にエフェクトを出力することである。
キャンバスの紹介
現在では、domノードを使ったレイアウトを除き、エフェクトは基本的にcanvasで実装されています。
キャンバスのメリット
(2)ゲーム作りに使われる。2020年にflashが引退するため、現在、ゲームはhtml5で作るようにシフトし始めている
(3) ビッグデータのフロントエンドレンダリング、データビジュアライゼーション、大画面データ表示
キャンバスプロセス:jsでブラシを作成
<!DOCTYPE html>
<html lang="en">
<head>
    <meta charset="UTF-8">
    <meta name="viewport" content="width=device-width, initial-scale=1.0">
    <title>Document</title>

    <style type="text/css">
        *{
            margin: 0;
            /* The outer margin is 0 so that the canvas can fill the full screen *        }
        #canvas{
            background: linear-gradient(
                135deg,
                rgb(142,132,133) 0%,
                rgb(230,132,110) 100%
            );
            /* Create linear gradient image*        }

    </style>
</head>
<body>
    <canvas id="canvas" width="500" height="500"></canvas>

    <script>
        var cxt=canvas.getContext('2d');//created brush
        cxt.beginPath();//start drawing
        cxt.closePath();//finished drawing

        cxt.fillStyle='#f2f';
        cxt.arc(250,250,100,0,2*Math.PI,false);
        cxt.fill();
    </script>
</body>
</html>
リニアグラデーションの画像を作成する際、100%の後に","を付けるとGoogleは読み込まず、付けないと読み込む。しかし、私はなぜかわからない
ここでは特にjsのcanvasの流れに注目し、ブラシを作る→"描き始める→"描き終わる→"色、形の情報を追加していく、という流れです。このうち最初の3つのステップはすべて決まっていて、タスクによってどのようにペイントを進めていくかが異なるだけで、コードも異なっています
Web Audio APiの流れ
<!DOCTYPE html>
<html lang="en">
<head>
    <meta charset="UTF-8">
    <meta name="viewport" content="width=device-width, initial-scale=1.0">
    <title>Document</title>
</head>
<body>
    <audio id="audio" src="mp3/1.mp3" controls></audio>

    <script>


        var oCtx=new AudioContext();//create audio object

        var oAudio=document.querySelector('audio');
        var audioSrc=oCtx.createMediaElementSource(oAudio);
        // Create a media source for the audio object

        var analyser=oCtx.createAnalyser();//create the analyser
        audioSrc.connect(analyser);//connect the analyser to the media source
        analyser.connect(octx.destination);//connect the results obtained by the analyser to the speaker

    </script>
</body>
</html>
ここで、オーディオの自動再生、jsのaudio.play()が動作しなくなったことに注意(Google Chromeのセキュリティポリシー:サウンドは自動再生できない、ユーザーがアクションを起こした後に再生する必要がある)。
上記のプロセスには、「音声データをどのように解析するか」という最も重要なステップが欠けており、このステップは、実装するタスクによって内容が異なります。しかし、残りのステップは同じで、ルーチンに満ちています。
ダイナミックオーディオグラフの開発
<!DOCTYPE html>
<html lang="en">
<head>
    <meta charset="UTF-8">
    <meta name="viewport" content="width=device-width, initial-scale=1.0">
    <title>Document</title>
    <style type="text/css">
        *{
            margin: 0;
        }
        #canvas{
            background:linear-gradient(
                135deg,
                rgb(142,132,133) 0%,
                rgb(230,132,110) 100%
            );
        }
    </style>
</head>
<body>
    <audio id="audio" src="mp3/1.mp3" controls></audio>
    <button type="button" onclick="play()"></button>
    <canvas id="canvas"></canvas>

    <script>
        // first introduce the canvas brush creation process
        var cCxt=canvas.getContext('2d');//create a 2D brush
        cCxt.beginPath();//start drawing
        cCxt.closePath();//finish drawing

        //design the style of the canvas
        //set the canvas size to the whole screen
        canvas.width=window.innerWidth;
        width=window.innerWidth; canvas.height=window.innerHeight;
        //set the gradient color of the lines
        var oW=canvas.width; var oH=canvas.height;
        var color=cCxt.createLinearGradient(oW/2,oH/2,oW/2,oH/2-100);
        color.addColorStop(0,'#000');
        color.addColorStop(.5,'#069');
        color.addColorStop(1,'#f6f');


        function play(){
            // first introduce the API function, go through the process of Web Audio API
            var oCtx=new AudioContext();//create the audio object
            var oAudio=document.querySelector('audio');
            var audioSrc=oCtx.createMediaElementSource(oAudio);//create a media source for the audio object
            var analyser=oCtx.createAnalyser();//create the analyser for the audio object
            audioSrc.connect(analyser);//connect the analyser to the media source
            analyser.connect(octx.destination);//connect the analyser to the speaker
            var count=80;//the number of audio bars
            var voiceHeight=new Uint8Array(analyser.frequencyBinCount);//create a data buffer (empty at this point)

            setInterval(draw(analyzer,voiceHeight,count),1000);
            oAudio.play();

         }

        function draw(analyser,voiceHeight,count){
            analyser.getByteFrequencyData(voiceHeight);// pass the current frequency data into an unsigned byte array for real-time connection
            var step=Math.round(voiceHeight.length/count);//every step number, take a number from the array
            for(var i=0;i<count;i++){
                var audioHeight=voiceHeight[step*i];
                cCxt.fillStyle=color;
                cCxt.fillRect(oW/2+(i*10),oH/2,7,-audioHeight);
                cCxt.fillRect(oW/2-(i*10),oH/2,7,-audioHeight);
             }
           //console.log(voiceHeight);
        }
関連
-
ドラッグ&ドロップでホバーアイコンを作成するhtml5サンプルコード
-
キャンバステキストフィルリニアグラデーション使用詳細説明
-
データストレージの3つの方法、Cookie sessionstorage localstorageの類似点と相違点の分析
-
キャンバス経由でのRGBAフォーマットへの色変換とパフォーマンス問題の解決
-
高さ調整可能なテキストエリアを作成するサンプルコード
-
HTML5新フォームコントロールとフォームプロパティのサンプルコード詳細
-
モバイル版Html5におけるBaidu地図のクリックイベント
-
HTML5で実現する写真・カメラ機能
-
HTML5によるメッセージ通知の利用(Web Notification)
-
モバイルでiframeを拡大縮小するサンプルコード
最新
-
nginxです。[emerg] 0.0.0.0:80 への bind() に失敗しました (98: アドレスは既に使用中です)
-
htmlページでギリシャ文字を使うには
-
ピュアhtml+cssでの要素読み込み効果
-
純粋なhtml + cssで五輪を実現するサンプルコード
-
ナビゲーションバー・ドロップダウンメニューのHTML+CSSサンプルコード
-
タイピング効果を実現するピュアhtml+css
-
htmlの選択ボックスのプレースホルダー作成に関する質問
-
html css3 伸縮しない 画像表示効果
-
トップナビゲーションバーメニュー作成用HTML+CSS
-
html+css 実装 サイバーパンク風ボタン