キャンバスのマウスがアニメーションの背景に従うことを達成するために5分
Canvasでクールな背景を作る方法については、随時gitを更新して詳しく解説していきたいと思います。
プリアンブル
この背景アニメーションを見たフロントエンドの方々は、どうすればこの効果を得られるのか、興味を持たれたのではないでしょうか?この効果を個人サイトに適用すれば、サイト全体が際立つことでしょう
/{p
<図
を使って、最短距離で、本題に入ります。 キャンバス を作成し マウスフォローアニメーション
アニメーションの作り方
アニメーションの描き方には、いくつかの一般的な方法があります。
- CSS3
- SVG
- キャンバス
- WebGL
まず、これらの方法のメリットとデメリットを分析してみましょう。
- CSS3のキーフレームなどでエフェクトをアニメーションさせるので、実用的に見えるかもしれないが、意味のないDOMノードが追加され、セマンティックプログラミングの仕様に準拠しない
-
SVG、Canvasはすべてスクリプト言語を使ってアニメーションさせることができる
- SVGは本来、XMLを使って2Dグラフィックス(ベクターグラフィックス)を記述する言語で、SVGで作成された各要素は独立したDOM要素である。独立したDOM要素なので、CSSやJSでDOMを制御したり、各DOM要素をリスニングすることも可能ということになりますが、すべてDOM要素なので、DOM要素を変更すると、ブラウザが自動的にDOM再描画を行うことになります
- CanvasはJavascriptを通して2Dグラフィックス(ビットマップ)を描画しますが、Canvasはグラフィックスが個別のDOM要素を作成しない単なるHTML要素なので、Jsを通してCanvas内部のグラフィックスを操作したり、特定のグラフィックスをリッスンしたりすることができません。
- WebGLは、3Dディスプレイ、アニメーション、ゲームに使用され、率直に言ってCanvasベースの3Dフレームワークである
Canvas、SVGの適用シナリオ
- キャンバスは、ビットマップ、データ描画頻度の高いシナリオ、ちょっとしたゲーム、ちょっとしたエフェクト、グラフの描画、イベントページ、クールな背景などに適しています。
- SVGは、ベクターグラフィックス、グラフィックチャートなどデータ描画頻度の低いシナリオに適しています。
マウスフォローアニメーションを作成することができます。
最終効果
<図
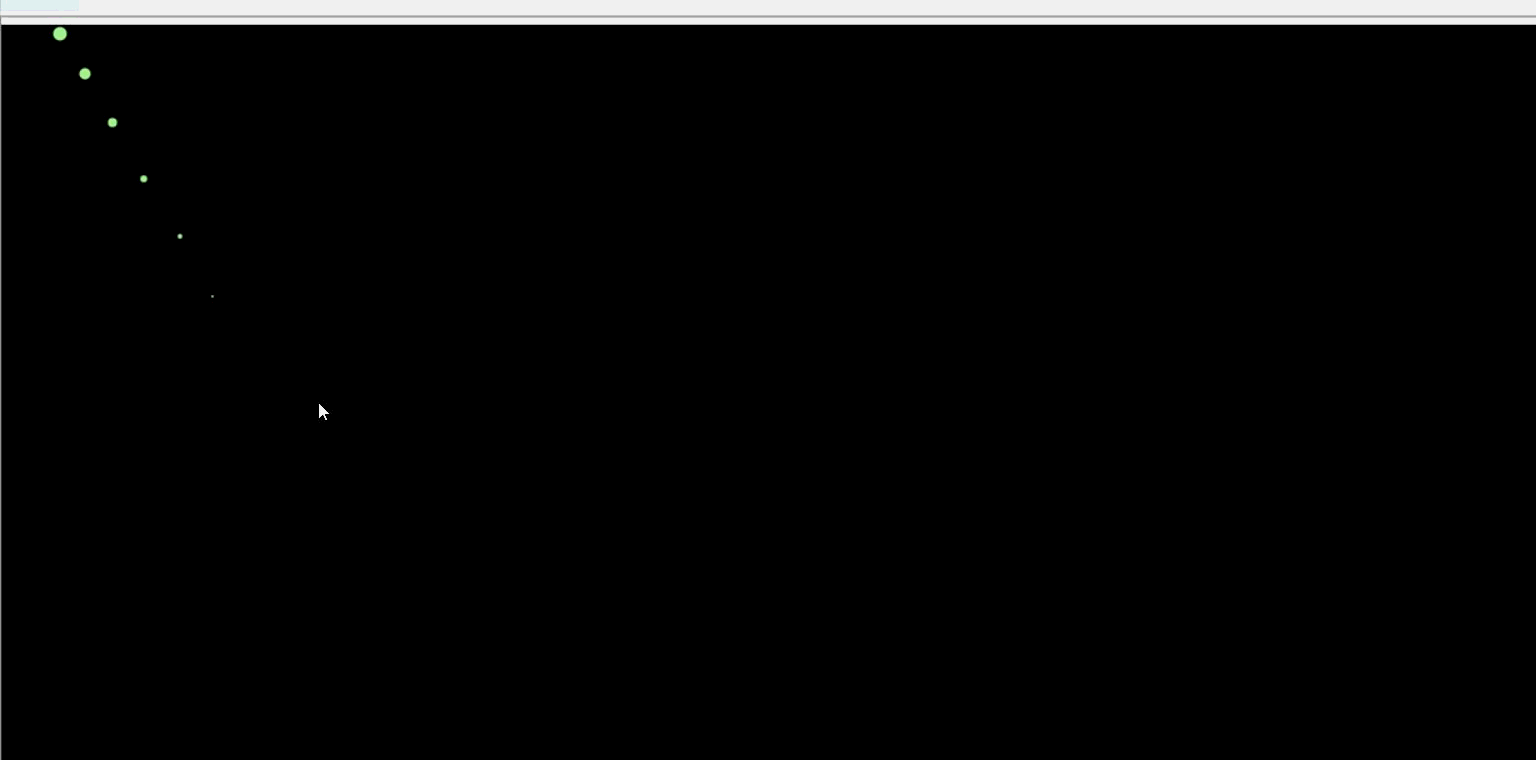
要件分析です。マウスが移動して通過する場所に円を作り、円の半径は小さいものから大きいものへと変化し、ある一定の大きさになると消える、円の色はランダムに変化する
フルスクリーンのCanvas要素を作成する
var canvas = document.getElementById('canvas'),
    ctx = canvas.getContext('2d'),
    WIDTH = canvas.width = document.documentElement.clientWidth,
    HEIGHT = canvas.height = document.documentElement.clientHeight,
    para = {
        num: 100,
        color: false, // color if false then it is a random gradient color
        radius: 0.9, // the radius of each increase of the circle
        o: 0.09, // the condition for the circle to disappear, the larger the value, the faster it disappears
    },
    color,
    circleColor,
    round_arr = []; // array of circles
マウスの声を聴く
onmousemove
イベント
要件 マウス移動時に、マウスオーバーした位置に徐々に大きくなる円を生成する。
Canvasでアニメーションを作成する方法は、画面をクリアして再描画し続けることです
軌跡は円で構成されているので、配列を使って円の情報(xy座標、半径)を格納し、マウスが動いたときにマウスの位置情報を配列に格納するようにします
そこで、onmousemoveイベントをリッスンして、マウスの情報を取得します。
window.onmousemove = function(event) {
    X = event.clientX // the current x position on the screen
    Y = event.clientY // the current y position on the screen

    // store the information into the round array
    round_arr.push({
        X:X,
        Y:Y,
        radius:para.radius
        o:1
    })
}
設定
color
onmousemoveでは、すでに座標情報と半径を円形配列round_arrに格納しているので、次は色を設定します。
パラオブジェクトでは、デフォルトの色はfalseで、円の色はランダムになります。colorがfalseでない場合、円の色は、color
if(para.color){
    circleColor = para.color
}else{
    color = Math.random() * 360
}

If you want to set a color gradient
if (!para.color) {
    color += .1;
    circleColor = 'hsl(' + color + ',100%,80%)';
}
色を変えたい場合は、常に実行される関数に色を変えるためのコードを記述する必要があります。
定義
animation()
関数 !
function animate() {

    if (!para.color) { # set color
        color += .1
        color2 = 'hsl(' + color + ',100%,80%)'
    }

    ctx.clearRect(0, 0, WIDTH, HEIGHT) # Clear the screen

    for (var i = 0; i < round_arr.length; i++) {

        ctx.fillStyle = circleColor
        ctx.beginPath()
        ctx.arc( round_arr[i].X ,round_arr[i].Y,round_arr[i].radius,0, Math.PI * 2) # draw the circle
        ctx.closePath()
        ctx.fill()
        round_arr[i].radius += para.radius # increase the radius
        round_arr[i].o -= para.o # disappear faster or slower

        if( round_arr[i].o <= 0){ # Remove the circle
            round_arr.slice(i,1)
            i--
        }
    }

    window.requestAnimationFrame(animate) # Use a callback function as an argument that will be called before the browser redraws
}
requestAnimationFrame() は、アニメーションを実行する必要があることをブラウザに伝え、次の再描画の前にアニメーションを更新するために指定した関数を呼び出すよう求めます。requestAnimationFrame() は、ブラウザの再描画の前に呼び出されるコールバック関数を引数として受け取ります。
コード全文
<!DOCTYPE html>
<html lang="en">

<head>
    <meta charset="UTF-8">
    <title> mouse screen interactive animation</title>
    <style>
        * {
            padding: 0;
            margin: 0;
        }

        #canvas {
            background: #000;
        }
    </style>
</head>

<body>
    <canvas id="canvas"></canvas>
    <script>
        var canvas = document.getElementById('canvas'),
            ctx = canvas.getContext('2d'),
            WIDTH = canvas.width = document.documentElement.clientWidth,
            HEIGHT = canvas.height = document.documentElement.clientHeight,
            para = {
                num: 100,
                color: false, // color if false then it is a random gradient color
                radius: 0.9,
                o: 0.09, // the condition to determine the disappearance of the circle, the larger the value, the faster it disappears
            },
            color,
            circleColor,
            round_arr = [];

        window.onmousemove = function(event) {
            X = event.clientX
            Y = event.clientY

            round_arr.push({
                X: X,
                Y: Y,
                radius: para.radius,
                o: 1
            })
        }

        // determine if color is set in the parameter, if so, use the color, otherwise it is random
        if (para.color) {
            circleColor = para.color
        } else {
            color = Math.random() * 360
        }

        function animate() {
            if (!para.color) {
                color += .1
                circleColor = 'hsl(' + color + ',100%,80%)'
            }

            ctx.clearRect(0, 0, WIDTH, HEIGHT) // Clear the screen

            for (var i = 0; i < round_arr.length; i++) {
                ctx.fillStyle = circleColor
                ctx.beginPath() // start path
                ctx.arc(round_arr[i].X, round_arr[i].Y, round_arr[i].radius, 0, Math.PI * 2) // draw the circle
                ctx.closePath() // ends the path
                ctx.fill()
                round_arr[i].radius += para.radius // increase the circle
                round_arr[i].o -= para.o // disappear faster

                if (round_arr[i].o <= 0) {
                    round_arr.slice(i, 1);
                    i--;
                }
            }

            window.requestAnimationFrame(animate)
        }

        animate()
    </script>
</body>

</html>
上記が本記事の全内容です。
関連
最新
-
nginxです。[emerg] 0.0.0.0:80 への bind() に失敗しました (98: アドレスは既に使用中です)
-
htmlページでギリシャ文字を使うには
-
ピュアhtml+cssでの要素読み込み効果
-
純粋なhtml + cssで五輪を実現するサンプルコード
-
ナビゲーションバー・ドロップダウンメニューのHTML+CSSサンプルコード
-
タイピング効果を実現するピュアhtml+css
-
htmlの選択ボックスのプレースホルダー作成に関する質問
-
html css3 伸縮しない 画像表示効果
-
トップナビゲーションバーメニュー作成用HTML+CSS
-
html+css 実装 サイバーパンク風ボタン