キャンバスのdrawImageの使用方法
html5のcanvasは本当に強力で、画像処理から動画処理、ゲーム開発まで、canvasの図を見ることができますが、これだけで
タグはとても強力です。これは主にcanvasの強力なAPIによるもので、あまりにAPIが多いため、多くの人がcanvasを敬遠してしまうのです。
drawImage は画像を描画します
drawImage
は
{{コード
この関数は、canvasに画像を描画するためのメソッドを提供します。まず、このメソッドの宣言を見てください。
canvas
画像
まず、いくつかのパラメータについて説明します。
- image: 描画される画像で、以下のような様々な形式に対応しています。
void ctx.drawImage(image, dx, dy);
void ctx.drawImage(image, dx, dy, dWidth, dHeight);
void ctx.drawImage(image, sx, sy, sWidth, sHeight, dx, dy, dWidth, dHeight);
, {コード {コード , {コード {コード {コード {{コード {{コード {{コード {{コード {{コード {{コード {を使用します。
{コード
- {{コード
HTMLImageElement - {{コード
SVGImageElement,HTMLVideoElement,HTMLCanvasElement,ImageBitmaporOffscreenCanvasdx: d stands for destination, which is the x-axis of the starting point on the canvasdy: the y-axis of the starting point on the canvasdWidth: the width of the drawing on the canvasdHeight: the height drawn on the canvassx: s represents the original (source), which is the x-axis of the starting point of the original imagesy: the y-axis of the starting point of the original imagesWidth: the width of the original image that was interceptedsHeight: the height of the original image to be capturedWith so many arguments, let me summarize the function in one sentence: take an image of the specified size from any location and draw it anywhere on the canvas at the specified size. The intercept size here issWidthandsHeightto set thedHeightanddWidthis the drawing size.Having said that, let's actually do it.<div style="border: 1px solid black; width: 300px;height: 300px;"> <canvas id="c1" width="300" height="300"></canvas> </div> <script> var c = document.getElementById('c1'); var ctx = c.getContext('2d'); var img = new Image(); img.src = "https://timgsa.baidu.com/timg?image&quality=80&size=b9999_10000&sec=1599994255228&di= 2f8ea231d1f1b557a73b0f1733bb71cf&imgtype=0&src=http%3A%2F%2Ff.01ny.cn%2Fforum%2F201206%2F28%2F143206f8u8ruk6eeqr7x3u.jpg& quot;; img.onload = function (e) { drawImg(this); }; function drawImg (img) { ctx.clearRect(0,0, c.width, c.height); ctx.drawImage(img, 0,0, 200, c.height); } </script>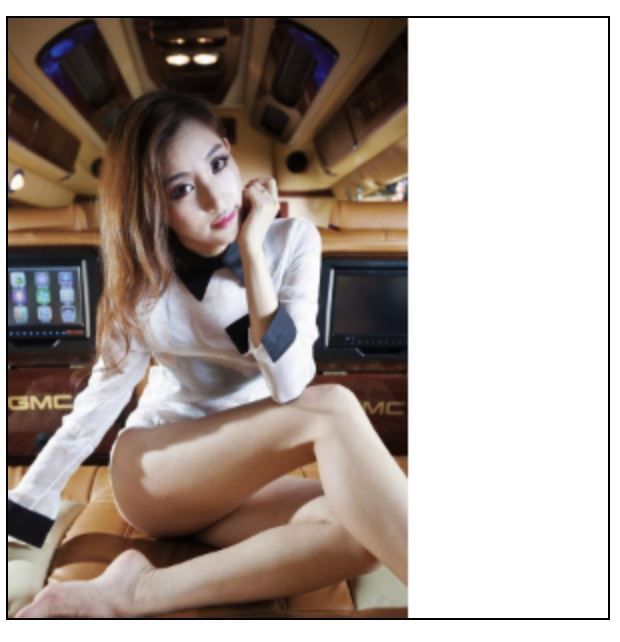
Here I've used 5 parameters, let's try a few others, here I want the head of a beautiful woman and draw it in the middle.ctx.drawImage(img, 200,150, 160, 180, 70, 60, 160, 180);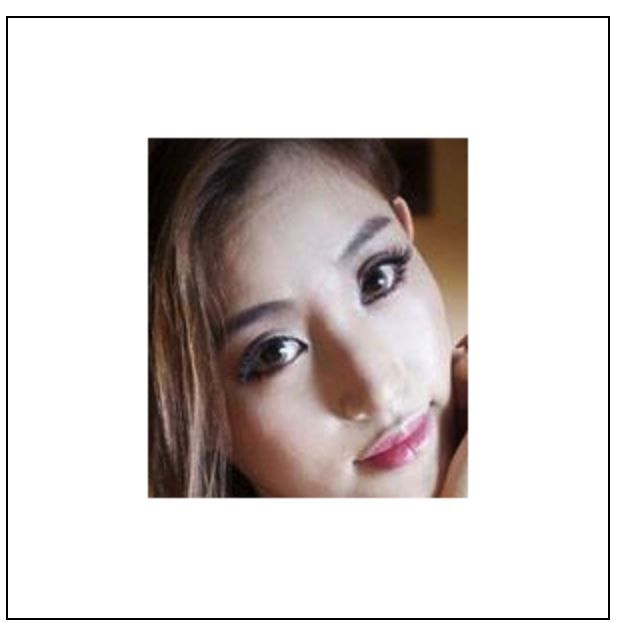
Make an image amplifierThe idea is simple, first get the pixel point of the mouse position, and then draw it into a larger area, then achieve the amplification. Without further ado, here is the result.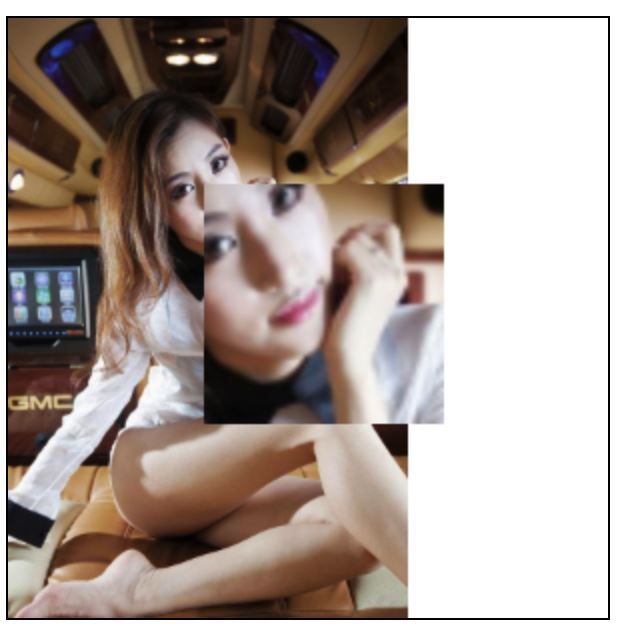
The code is also simple.<div style="border: 1px solid black; width: 300px;height: 300px;"> <canvas id="c1" width="300" height="300"></canvas> </div>It is important to note here that image resources cannot span domains, such as this.// The image is changed to Baidu's img.src =https://timgsa.baidu.com/timg?image&quality=80&size=b9999_10000&sec=1599994255228&di=2f8ea231d1f1b557a73b0f1733bb71cf&imgtype=0& src=http%3A%2F%2Ff.01ny.cn%2Fforum%2F201206%2F28%2F143206f8u8ruk6eeqr7x3u.jpg;In getImageData it will report an error saying that it is cross-domain.index.html:47 Uncaught DOMException: Failed to execute 'getImageData' on
'CanvasRenderingContext2D': The canvas has been tainted by cross-origin data.Anti-aliasing in canvasThe so-called anti-aliasing, that is, when the picture is enlarged to a large size, whether you can see the pixel by pixel, if you can see it, it means that it is not anti-aliasing, the default in canvas is turned on anti-aliasing, that is, the imageSmoothingEnabled property is true, turn on anti-aliasing will destroy the original pixel, the pixel is smooth transition between, generally the naked eye is not visible, we Let's do a comparison.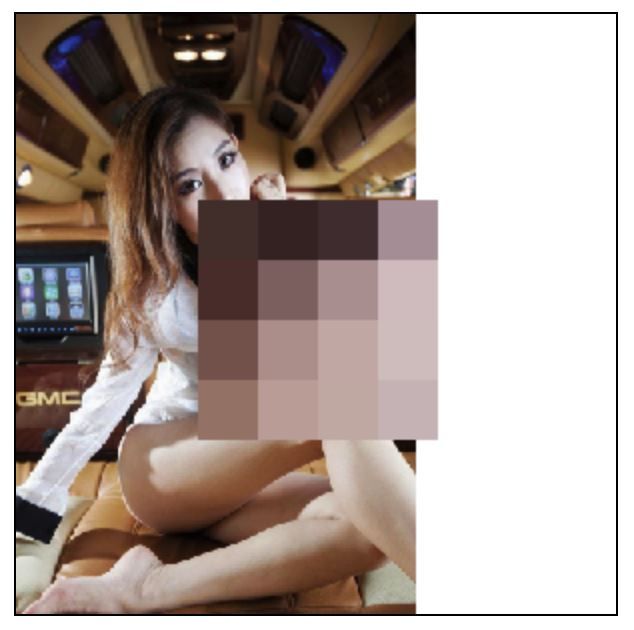
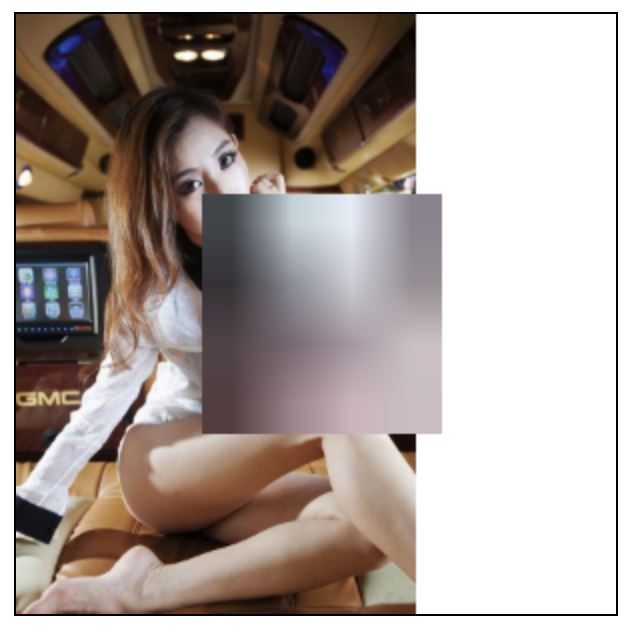
// Turn off anti-aliasing ctx.imageSmoothingEnabled = false;In obvious contrast, with anti-aliasing off, the zoomed area looks like a mosaic and you can clearly see each pixel, while with anti-aliasing on the gradient between each pixel is smooth and looks blurry to the human eye. However, from the whole picture, the picture is much blurred after turning off anti-aliasing.Rendering the video with canvasAs mentioned at the beginning, canvas can handle video, so now let's render a video with drawImage.Let's start with the idea: intercept the current frame of the video at regular intervals and draw it. It's that simple.<video id="video1" controls="" width="180" style="margin-top:15px;"> <source src="1.mp4" type="video/mp4"> </video> <canvas id="c2" width="180" height="320"> </canvas> <script> var v=document.getElementById("video1"); var c3=document.getElementById("c2"); ctx3=c3.getContext('2d'); var i = null; // intercept video frames every 20ms v.addEventListener('play',function() { i = window.setInterval(function() { ctx3.drawImage(v,0,0, 180, 320) },20); }, false); v.addEventListener('pause',function() { window.clearInterval(i); i = null; },false); v.addEventListener('ended', function() { clearInterval(i); i = null; },false); </script>Effect.
cool, the left side is the video tag showing the video, the right side is what we draw with canvas, every 20 milliseconds, great. If we put the time longer, we can achieve the lag effect ????
drawImageData compatibility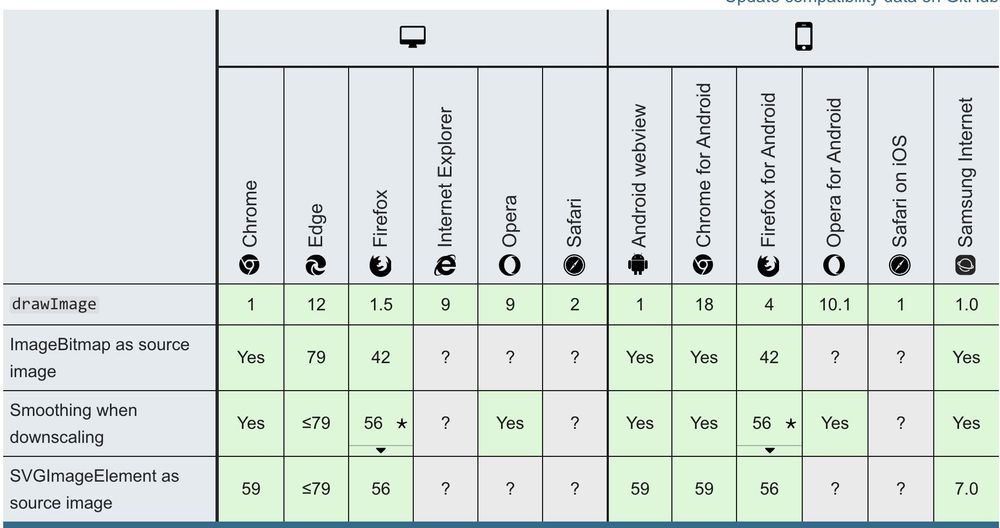
This article on how to use drawImage for canvas is all about this. For more information about drawImage for canvas, please search the previous articles of Script House or continue to browse the following related articles. - {{コード
dx: d stands for destination, which is the x-axis of the starting point on the canvas - {{コード
dWidth: the width of the drawing on the canvas - {{コード
sx: s represents the original (source), which is the x-axis of the starting point of the original image - {{コード
sWidth: the width of the original image that was intercepted - {{コード
With so many arguments, let me summarize the function in one sentence: take an image of the specified size from any location and draw it anywhere on the canvas at the specified size. The intercept size here issWidthandsHeightto set thedHeightanddWidthis the drawing size.
CSSImageValue
{{コード
sHeight
{{コード
{{コード
{{コード
dWidth
{{コード
{{コード
<div style="border: 1px solid black; width: 300px;height: 300px;">

    <canvas id="c1" width="300" height="300"></canvas>

  </div>

<script>

var c = document.getElementById('c1');

var ctx = c.getContext('2d');

var img = new Image();

img.src = "https://timgsa.baidu.com/timg?image&quality=80&size=b9999_10000&sec=1599994255228&di= 2f8ea231d1f1b557a73b0f1733bb71cf&imgtype=0&src=http%3A%2F%2Ff.01ny.cn%2Fforum%2F201206%2F28%2F143206f8u8ruk6eeqr7x3u.jpg& quot;;

img.onload = function (e) {

  drawImg(this);

};

function drawImg (img) {

  ctx.clearRect(0,0, c.width, c.height);

  ctx.drawImage(img, 0,0, 200, c.height);

}
</script>
{{コード
Make an image amplifier
{{コード
{{コード
{{コード
It is important to note here that image resources cannot span domains, such as this.
{{コード
// The image is changed to Baidu's
img.src =

https://timgsa.baidu.com/timg?image&quality=80&size=b9999_10000&sec=1599994255228&di=2f8ea231d1f1b557a73b0f1733bb71cf&imgtype=0& src=http%3A%2F%2Ff.01ny.cn%2Fforum%2F201206%2F28%2F143206f8u8ruk6eeqr7x3u.jpg

;
{{コード
;
{{コード
Anti-aliasing in canvas
{{コード
{{コード
{{コード
{{コード
// Turn off anti-aliasing
ctx.imageSmoothingEnabled = false;
https://timgsa.baidu.com/timg?image&quality=80&size=b9999_10000&sec=1599994255228&di=2f8ea231d1f1b557a73b0f1733bb71cf&imgtype=0& src=http%3A%2F%2Ff.01ny.cn%2Fforum%2F201206%2F28%2F143206f8u8ruk6eeqr7x3u.jpg

In obvious contrast, with anti-aliasing off, the zoomed area looks like a mosaic and you can clearly see each pixel, while with anti-aliasing on the gradient between each pixel is smooth and looks blurry to the human eye. However, from the whole picture, the picture is much blurred after turning off anti-aliasing.
{{コード {{コード
{{コード
Let's start with the idea: intercept the current frame of the video at regular intervals and draw it. It's that simple.
{{コード
<video id="video1" controls="" width="180" style="margin-top:15px;">
	  <source src="1.mp4" type="video/mp4">
	</video>

	<canvas id="c2" width="180" height="320"> </canvas>

<script>
    var v=document.getElementById("video1");
var c3=document.getElementById("c2");
ctx3=c3.getContext('2d');
var i = null;

// intercept video frames every 20ms
v.addEventListener('play',function() {
	i = window.setInterval(function() {
		ctx3.drawImage(v,0,0, 180, 320)
	},20);
}, false);

v.addEventListener('pause',function() {
	window.clearInterval(i);
	i = null;
},false);

v.addEventListener('ended', function() {
	clearInterval(i);
	i = null;
},false);
</script>
{{コード
Effect.
{{コード
cool, the left side is the video tag showing the video, the right side is what we draw with canvas, every 20 milliseconds, great. If we put the time longer, we can achieve the lag effect ????
{{コード
{{コード
{{コード
This article on how to use drawImage for canvas is all about this. For more information about drawImage for canvas, please search the previous articles of Script House or continue to browse the following related articles.
{{コード
index.html:47 Uncaught DOMException: Failed to execute 'getImageData' on

'CanvasRenderingContext2D': The canvas has been tainted by cross-origin data.
{{コード
Anti-aliasing in canvas
{{コード
{{コード
Anti-aliasing in canvas
The so-called anti-aliasing, that is, when the picture is enlarged to a large size, whether you can see the pixel by pixel, if you can see it, it means that it is not anti-aliasing, the default in canvas is turned on anti-aliasing, that is, the imageSmoothingEnabled property is true, turn on anti-aliasing will destroy the original pixel, the pixel is smooth transition between, generally the naked eye is not visible, we Let's do a comparison.
{{コード
{{コード
{{コード
{{コード
// Turn off anti-aliasing
ctx.imageSmoothingEnabled = false;
{{コード
// Turn off anti-aliasing
ctx.imageSmoothingEnabled = false;
{{コード
In obvious contrast, with anti-aliasing off, the zoomed area looks like a mosaic and you can clearly see each pixel, while with anti-aliasing on the gradient between each pixel is smooth and looks blurry to the human eye. However, from the whole picture, the picture is much blurred after turning off anti-aliasing.
関連
-
HTML+Css+transformを使った3Dナビゲーションバーのサンプルコード
-
CAPTCHAを生成するHTML5サンプルコード
-
amaze uiを使った詳細チュートリアル
-
動画下の自動再生プロパティが無効な場合の解決方法(ミュートプロパティを追加する)。
-
画像処理におけるキャンバスの活用
-
HTML5でオプションのスタイルシートを使ってWebサイトやアプリケーションにダークモードを追加する方法を解説
-
HTML5クライアントサイドデータベースが簡単に使える:IndexedDB
-
html5でBUI折りたたみメニュープラグインを書く方法
-
html5 コロンセパレータのアライメント実装
-
HTML5で実現する写真・カメラ機能
最新
-
nginxです。[emerg] 0.0.0.0:80 への bind() に失敗しました (98: アドレスは既に使用中です)
-
htmlページでギリシャ文字を使うには
-
ピュアhtml+cssでの要素読み込み効果
-
純粋なhtml + cssで五輪を実現するサンプルコード
-
ナビゲーションバー・ドロップダウンメニューのHTML+CSSサンプルコード
-
タイピング効果を実現するピュアhtml+css
-
htmlの選択ボックスのプレースホルダー作成に関する質問
-
html css3 伸縮しない 画像表示効果
-
トップナビゲーションバーメニュー作成用HTML+CSS
-
html+css 実装 サイバーパンク風ボタン