[CSSチュートリアル]CSS気まぐれボーダーアニメーション効果
今日のショップ ブログサイト -- shoptalkshow と、このとても興味深いインターフェイスを目にしました。
画像
特にボーダーが独特なスタイルだと思いました。
ねえ、じゃあ、CSSを使ってボーダーで何ができるのか、ボーダー特集の記事を紹介するよ。
そのボーダーのプロパティ
ボーダーというと、まず思い浮かぶのは
border
よりも頻繁に使用します。
{コード
と
{コード
上図では
solid
.
に加え、最も一般的な
dashed
があります。
{コード
{コード
また、CSSボーダーもサポートしています。
dashed
と
{コード
{コード
,
{コード
{コード
{コード
, {{コードダブル
solid
/code ,
{コード
{コード
{コード
{{コード
{{コード
{{コード
{{コード
{{コード
{{コード
{{コード
dashed
{{コード
{{コード
none
{{コード {{コード {{コード
{{コード {{コード {{コード
{{コード
{{コード
hidden
{{コード
{{コード
{{コード
dotted
double
{{コード
{{コード
groove
ridge
ridge
inset
, outset
and so on. Except for the
none
and
hidden
and look at all the natively supported border styles: 
OK, let's take a look at some additional interesting borders.
Border length variation
Let's start with a simpler one, implementing a border effect like this.
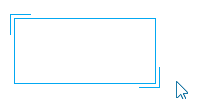
Here it actually borrows two pseudo-elements from the element. The two pseudo-elements set only the top and left borders, and the bottom and right borders, respectively, via the
hover
to change the height and width of the two pseudo elements. Very well understood.
div {
position: relative;
border: 1px solid #03A9F3;
&::before,
&::after {
content: "";
position: absolute;
width: 20px;
height: 20px;
}
&::before {
top: -5px;
left: -5px;
border-top: 1px solid var(--borderColor);
border-left: 1px solid var(--borderColor);
}
&::after {
right: -5px;
bottom: -5px;
border-bottom: 1px solid var(--borderColor);
border-right: 1px solid var(--borderColor);
}
&:hover::before,
&:hover::after {
width: calc(100% + 9px);
height: calc(100% + 9px);
}
}
CodePen Demo -- width border animation
Next, it will start to get a little more difficult.
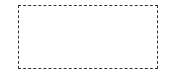
Dashed border animation
Use the
dashed
keyword, you can easily create dashed borders.
div {
border: 1px dashed #333;
}
The goal, of course, is to enable the border to move. Using the
dashed
keyword is not an option. But there are many ways to implement dashed lines in CSS, and a good way to do this is with gradients such as
div {
background: linear-gradient(90deg, #333 50%, transparent 0) repeat-x;
background-size: 4px 1px;
background-position: 0 0;
}
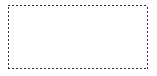
Look, the dashed line simulated using the gradient is as follows.

Okay, the gradient supports multiple gradients, so we can represent all 4 sides of the container with a gradient.
div {
background:
linear-gradient(90deg, #333 50%, transparent 0) repeat-x,
linear-gradient(90deg, #333 50%, transparent 0) repeat-x,
linear-gradient(0deg, #333 50%, transparent 0) repeat-y,
linear-gradient(0deg, #333 50%, transparent 0) repeat-y;
background-size: 4px 1px, 4px 1px, 1px 4px, 1px 4px;
background-position: 0 0, 0 100%, 0 0, 100% 0;
}
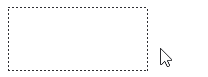
The effect is as follows.
OK, at this point, we're actually halfway done with the dashed border animation. Although the
border-style: dashed
doesn't support animations, but gradients do. Let's give the above div another
hover
effect.
hover
is added when the
animation
animation that changes the element's
bakcground-position
will work.
div:hover {
animation: linearGradientMove .3s infinite linear;
}
@keyframes linearGradientMove {
100% {
background-position: 4px 0, -4px 100%, 0 -4px, 100% 4px;
}
}
OK, look at the effect, when the hover goes up, the border can move, because the whole animation is connected to the first and last, the infinite loop of the animation looks like the dashed border in motion all the time, this is a small blindfold or a small trick: the
Here is another tip, if we want the dashed border animation to be animated from other borders, transition to the dashed border and then march through the animation. It is possible to simulate this entirely by fading, and if you want to save some code, use
border
would be faster, like this.
div {
border: 1px solid #333;
&:hover {
border: none;
background:
linear-gradient(90deg, #333 50%, transparent 0) repeat-x,
linear-gradient(90deg, #333 50%, transparent 0) repeat-x, linear-gradient(90deg, #333 50%, transparent 0) repeat-x,
linear-gradient(0deg, #333 50%, transparent 0) repeat-y,
linear-gradient(0deg, #333 50%, transparent 0) repeat-y;
background-size: 4px 1px, 4px 1px, 1px 4px, 1px 4px;
background-position: 0 0, 0 100%, 0 0, 100% 0;
}
}
Due to the difference in the position of border and background on the box model, there is a clear visual appearance of misalignment: the
To solve this problem, we can set the
border
Replace with
outline
because
outline
can be set
outline-offset
. This solves the problem perfectly: the
div {
outline: 1px solid #333;
outline-offset: -1px;
&:hover {
outline: none;
}
}
Finally, see how it looks when applied to the actual button.

The complete code for the above demo is as follows.
CodePen Demo -- dashed border animation
In fact, due to the special relationship between the background and the border, the border is used by modifying the
background-position
It is possible to solve this problem, but it is a bit more complicated. For more information about the relationship between background and border padding, see this article.
Multiple ways to implement striped borders
Other great uses of gradients
The gradient can be used for more than just the above effects.
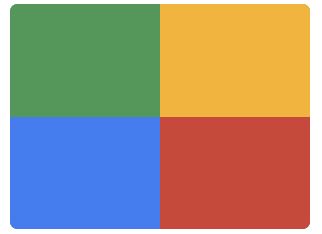
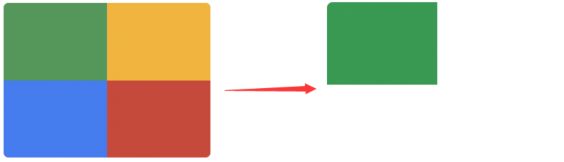
Let's dig deeper into the gradient and use it to achieve a background like this.
div {
position: relative;
&::after {
content: '';
position: absolute;
left: -50%;
top: -50%;
width: 200%;
height: 200%;
background-repeat: no-repeat;
background-size: 50% 50%, 50% 50%;
background-position: 0 0, 100% 0, 100% 100%, 0 100%;
background-image: linear-gradient(#399953, #399953), linear-gradient(#fbb300, #fbb300), linear-gradient(#d53e33, #d53e33), linear- gradient(#377af5, #377af5);
}
}
Note that this graphic is generated using the pseudo-element of the element, and that the width and height are those of the parent element
200%
and beyond that
overflow: hidden
.
Next, add rotations to it: the
div {
animation: rotate 4s linear infinite;
}
@keyframes rotate {
100% {
transform: rotate(1turn);
}
}
See the effect of.
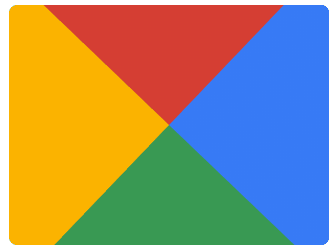
Finally, a pseudo-element is used to mask out the middle and a Nice border animation comes out.
The full code for the above demo is as follows, the effect I first saw from this author --
Jesse B
CodePen Demo -- gradient border animation
Change the color of the gradient
After mastering the basic technique above, we can then make some adjustments to the color of the gradient, where we turn 4 colors into 1 color.
div::after {
content: '';
position: absolute;
left: -50%;
top: -50%;
width: 200%;
height: 200%;
background-color: #fff;
background-repeat: no-repeat;
background-size: 50% 50%;
background-position: 0 0;
background-image: linear-gradient(#399953, #399953);
}
Get a graph like this.
Again, let it rotate together and a monochrome chase border animation comes out with.

CodePen Demo -- gradient border animation 2
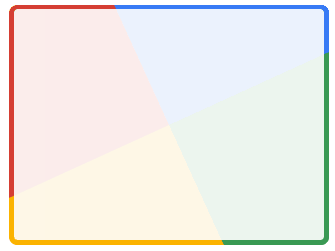
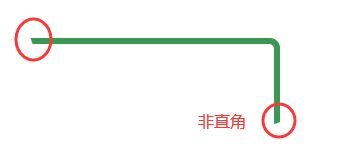
Wow, very nice looking. However, if it is a single line, there is an obvious flaw that the border ends with a small triangle instead of vertical, which may not work in some scenarios or may not be acceptable to the PM.
So is there any way to get rid of these little triangles? Yes, in the following we introduce another way, using the
clip-path
to get rid of the little triangles.
conic-gradient
The great use of
Introducing again
clip-path
before introducing the angular gradient.
The main use of the above is the linear gradient
linear-gradient
. We use the angular gradient
conic-gradient
It's actually possible to achieve the exact same effect.
Let's try using
conic-gradient
to do the same, this time in a darker style. The core code is as follows.
.conic {
position: relative;
&::before {
content: '';
position: absolute;
left: -50%;
top: -50%;
width: 200%;
height: 200%;
background: conic-gradient(transparent, rgba(168, 239, 255, 1), transparent 30%);
animation: rotate 4s linear infinite;
}
}
@keyframes rotate {
100% {
transform: rotate(1turn);
}
}
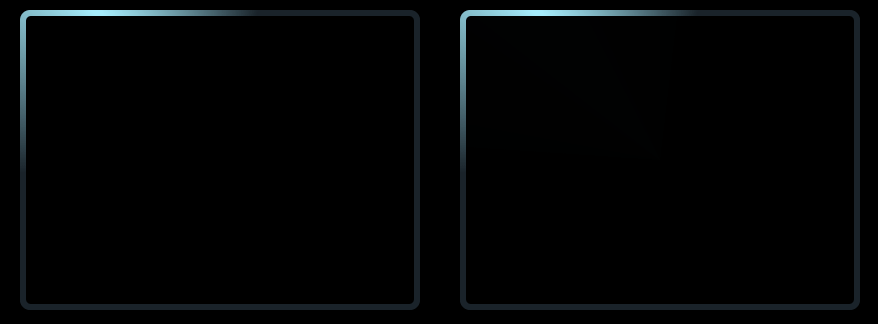
The renderings and schematics are as follows, rotating a partially angular gradient graphic, with the middle part masked using another pseudo-element, leaving out only the line part.
CodePen Demo -- Rotating border 3
clip-path
The great use of
Another old friend
clip-path
It's always interesting to see what's going on.
clip-path
By itself, it is possible to animate coordinate points, transforming from one clip shape to another.
Using this feature, we can subtly implement such a border-following effect. The pseudo-code is as follows.
div {
position: relative;
&::before {
content: "";
position: absolute;
top: 0;
left: 0;
right: 0;
bottom: 0;
border: 2px solid gold;
animation: clippath 3s infinite linear;
}
}
@keyframes clippath {
0%,
100% {
clip-path: inset(0 0 95% 0);
}
25% {
clip-path: inset(0 95% 0 0);
}
50% {
clip-path: inset(95% 0 0 0);
}
75% {
clip-path: inset(0 0 0 95%);
}
}
Renderings together with schematics.
CodePen - clip-path border animation
Here, since the element will be cropped, it is enough to borrow the pseudo-element as a background to crop and animate, using the
clip-path
The advantage of this method is that the cut out border does not produce small triangles. Also, this method, which supports rounded corners
border-radius
of the
If we use another pseudo-element as well, to actually implement a button style, we can get the effect of

CodePen - clip-path border animation 2
overflow
The beauty of
The following trick uses overflow to achieve this. Implement a border animation like this.

Why is the use of
overflow
to achieve?
Post a diagram.

CodePen Demo -- Using overflow and transform to achieve line hover effect
Two core points.
We use the
overflow: hidden
to hide an entire element that was outside the container
Using the
transform-origin
which controls the center of rotation of the element
Did you notice that almost all of the interesting CSS effects use a similar technique: the
Simply put, we see a small part of the original animation, and we end up with only a part of the original phenomenon through specific cropping, transparency changes, masks, etc.
border-image
The great use of
Using
border-image
, we can also implement some interesting border animations. Regarding the
border-image
there is a very good article on this - the
The correct use of border-image
This article does not go into much detail about the basic definitions.
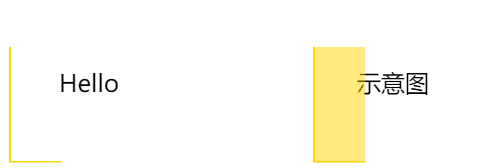
If we have a picture like this.

Then you can use the
border-image-slice
and
border-image-repeat
to obtain a similar border pattern with the characteristics of
div {
width: 200px;
height: 120px;
border: 24px solid;
border-image: url(image-url);
border-image-slice: 32;
border-image-repeat: round;
}
On top of this, the height and width of the element can be changed at will, so that it can be extended to any size container border.
CodePen Demo -- border-image Demo
Then, in this article --
How to Animate a SVG with border-image
also explains a way to use the
border-image
which is a very cool border animation.
Unlike the above example, we just need to make our pattern, move, that is, we need a background image like this (Blogland does not support SVG motion graphics, the
The original image address
).
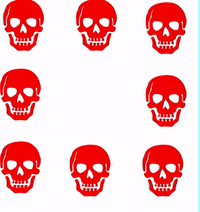
Then, we also get the border image in motion, with exactly the same code, but with the border in motion:.
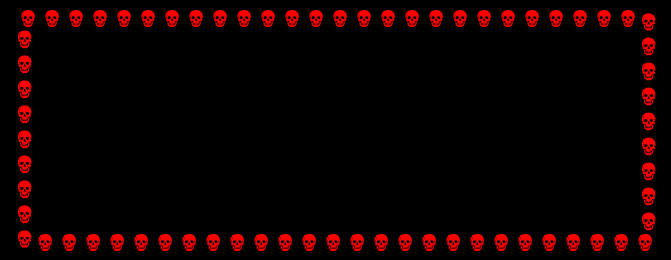
CodePen Demo -- Dancing Skull Border
border-image
Using the gradient
border-image
In addition to the mapping references
url
it is also possible to fill colors or gradients directly.
There is also a previous article on
border-image
article - the
Cleverly implementing a gradient border with rounded corners
We can use the
border-image
+
filter
+
clip-path
Rounded corners of the gradient transform are implemented.
.border-image-clip-path {
width: 200px;
height: 100px;
border: 10px solid;
border-image: linear-gradient(45deg, gold, deeppink) 1;
clip-path: inset(0px round 10px);
animation: huerotate 6s infinite linear;
filter: hue-rotate(360deg);
}
@keyframes huerotate {
0% {
filter: hue-rotate(0deg);
}
100% {
filter: hue-rotate(360deg);
}
}
CodePen Demo -- clip-path, border-image with filter for rounded gradient border
Finally
This article introduces some of the more interesting border animation tricks I think, but of course CSS produces a lot of interesting effects, so I won't go into them one by one for space.
This article on CSS whimsical border animation effect is introduced here, more related css border animation content please search the home of the script previous articles or continue to browse the following related articles, I hope you support the home of the script more in the future!
{{コード
ridge
{{コード
{{コード
{{コード
{{コード
{{コード
{{コード
{{コード
{{コード
{{コード
Let's start with a simpler one, implementing a border effect like this.
{{コード
{{コード
{{コード
div {
    position: relative;
    border: 1px solid #03A9F3;

    &::before,
    &::after {
        content: "";
        position: absolute;
        width: 20px;
        height: 20px;
    }

    &::before {
        top: -5px;
        left: -5px;
        border-top: 1px solid var(--borderColor);
        border-left: 1px solid var(--borderColor);
    }

    &::after {
        right: -5px;
        bottom: -5px;
        border-bottom: 1px solid var(--borderColor);
        border-right: 1px solid var(--borderColor);
    }

    &:hover::before,
    &:hover::after {
        width: calc(100% + 9px);
        height: calc(100% + 9px);
    }
}
{{コード
Use the
dashed
keyword, you can easily create dashed borders.
{{コード
{{コード
div {
    border: 1px dashed #333;
}
{{コード
dashed
{{コード
{{コード
div {
    background: linear-gradient(90deg, #333 50%, transparent 0) repeat-x;
    background-size: 4px 1px;
    background-position: 0 0;
}
{{コード
{{コード
{{コード
{{コード
{{コード
{{コード
Okay, the gradient supports multiple gradients, so we can represent all 4 sides of the container with a gradient.
{{コード
{{コード
{{コード
OK, at this point, we're actually halfway done with the dashed border animation. Although the
border-style: dashed
doesn't support animations, but gradients do. Let's give the above div another
hover
effect.
hover
is added when the
animation
animation that changes the element's
bakcground-position
will work.
{{コード
{{コード
border-style: dashed
{{コード
animation
{{コード
{{コード
div:hover {
    animation: linearGradientMove .3s infinite linear;
}

@keyframes linearGradientMove {
    100% {
        background-position: 4px 0, -4px 100%, 0 -4px, 100% 4px;
    }
}
{{コード
{{コード
OK, look at the effect, when the hover goes up, the border can move, because the whole animation is connected to the first and last, the infinite loop of the animation looks like the dashed border in motion all the time, this is a small blindfold or a small trick: the
{{コード
Here is another tip, if we want the dashed border animation to be animated from other borders, transition to the dashed border and then march through the animation. It is possible to simulate this entirely by fading, and if you want to save some code, use
border
would be faster, like this.
{{コード
div {
    border: 1px solid #333;

    &:hover {
        border: none;
        background:
            linear-gradient(90deg, #333 50%, transparent 0) repeat-x,
            linear-gradient(90deg, #333 50%, transparent 0) repeat-x, linear-gradient(90deg, #333 50%, transparent 0) repeat-x,
            linear-gradient(0deg, #333 50%, transparent 0) repeat-y,
            linear-gradient(0deg, #333 50%, transparent 0) repeat-y;
        background-size: 4px 1px, 4px 1px, 1px 4px, 1px 4px;
        background-position: 0 0, 0 100%, 0 0, 100% 0;
    }
}
{{コード
{{コード
{{コード
border
ストライプボーダーの複数の実装方法
{{コード {{コード
{{コード
{{コード
The gradient can be used for more than just the above effects.
{{コード
{{コード
Let's dig deeper into the gradient and use it to achieve a background like this.
div {
    position: relative;

    &::after {
        content: '';
        position: absolute;
        left: -50%;
        top: -50%;
        width: 200%;
        height: 200%;
        background-repeat: no-repeat;
        background-size: 50% 50%, 50% 50%;
        background-position: 0 0, 100% 0, 100% 100%, 0 100%;
        background-image: linear-gradient(#399953, #399953), linear-gradient(#fbb300, #fbb300), linear-gradient(#d53e33, #d53e33), linear- gradient(#377af5, #377af5);
    }
}
{{コード
200%
{{コード
{{コード
overflow: hidden
{{コード
div {
    animation: rotate 4s linear infinite;
}

@keyframes rotate {
    100% {
        transform: rotate(1turn);
    }
}
{{コード
div {
    animation: rotate 4s linear infinite;
}

@keyframes rotate {
    100% {
        transform: rotate(1turn);
    }
}
{{コード
Finally, a pseudo-element is used to mask out the middle and a Nice border animation comes out.
{{コード
The full code for the above demo is as follows, the effect I first saw from this author --
Jesse B
{{コード
After mastering the basic technique above, we can then make some adjustments to the color of the gradient, where we turn 4 colors into 1 color.
{{コード {{コード
{{コード
div::after {
    content: '';
    position: absolute;
    left: -50%;
    top: -50%;
    width: 200%;
    height: 200%;
    background-color: #fff;
    background-repeat: no-repeat;
    background-size: 50% 50%;
    background-position: 0 0;
    background-image: linear-gradient(#399953, #399953);
}
{{コード
{{コード
Get a graph like this.
Wow, very nice looking. However, if it is a single line, there is an obvious flaw that the border ends with a small triangle instead of vertical, which may not work in some scenarios or may not be acceptable to the PM.
{コード
clip-path
{{コード
conic-gradient
{{コード
Introducing again
clip-path
before introducing the angular gradient.
{{コード
clip-path
{{コード
The main use of the above is the linear gradient
linear-gradient
. We use the angular gradient
conic-gradient
It's actually possible to achieve the exact same effect.
{{コード
linear-gradient
{{コード
{{コード
conic-gradient
{{コード
{{コード
.conic {
    position: relative;

    &::before {
        content: '';
        position: absolute;
        left: -50%;
        top: -50%;
        width: 200%;
        height: 200%;
        background: conic-gradient(transparent, rgba(168, 239, 255, 1), transparent 30%);
        animation: rotate 4s linear infinite;
    }
}
@keyframes rotate {
    100% {
        transform: rotate(1turn);
    }
}
{{コード
{{コード
The renderings and schematics are as follows, rotating a partially angular gradient graphic, with the middle part masked using another pseudo-element, leaving out only the line part.
{{コード
{{コード
{{コード
{{コード
{{コード
clip-path
{{コード
Using this feature, we can subtly implement such a border-following effect. The pseudo-code is as follows.
{{コード
div {
    position: relative;

    &::before {
        content: "";
        position: absolute;
        top: 0;
        left: 0;
        right: 0;
        bottom: 0;
        border: 2px solid gold;
        animation: clippath 3s infinite linear;
    }
}

@keyframes clippath {
    0%,
    100% {
        clip-path: inset(0 0 95% 0);
    }
    25% {
        clip-path: inset(0 95% 0 0);
    }
    50% {
        clip-path: inset(95% 0 0 0);
    }
    75% {
        clip-path: inset(0 0 0 95%);
    }
}
{{コード
{{コード
{{コード
{{コード
Here, since the element will be cropped, it is enough to borrow the pseudo-element as a background to crop and animate, using the
clip-path
The advantage of this method is that the cut out border does not produce small triangles. Also, this method, which supports rounded corners
border-radius
of the
{{コード
clip-path
{{コード
{{コード
border-radius
{{コード
CodePen - clip-path border animation 2
{{コード
overflow
The beauty of
{{コード
{{コード
overflow
{{コード
{{コード
{{コード
overflow
{{コード
CodePen Demo -- Using overflow and transform to achieve line hover effect
{{コード
{{コード
We use the
overflow: hidden
to hide an entire element that was outside the container
{{コード
Using the
transform-origin
which controls the center of rotation of the element
{{コード
transform-origin
{{コード
{{コード
Simply put, we see a small part of the original animation, and we end up with only a part of the original phenomenon through specific cropping, transparency changes, masks, etc.
{{コード
border-image
{{コード
Using
border-image
, we can also implement some interesting border animations. Regarding the
border-image
there is a very good article on this - the
The correct use of border-image
This article does not go into much detail about the basic definitions.
{{コード
border-image
{コード
{{コード
- {{コード
Then you can use theborder-image-sliceandborder-image-repeatto obtain a similar border pattern with the characteristics of {を使用します。
{コード
{{コード
border-image-slice
{{コード
div {
  width: 200px;
  height: 120px;
  border: 24px solid;
  border-image: url(image-url);
  border-image-slice: 32;
  border-image-repeat: round;
}
{{コード
div {
  width: 200px;
  height: 120px;
  border: 24px solid;
  border-image: url(image-url);
  border-image-slice: 32;
  border-image-repeat: round;
}
{{コード
{{コード
CodePen Demo -- border-image Demo
{{コード
{{コード
Then, in this article --
How to Animate a SVG with border-image
also explains a way to use the
{{コード
border-imageの正しい使い方
border-image
which is a very cool border animation.
{{コード
{{コード
Then, we also get the border image in motion, with exactly the same code, but with the border in motion:.
{{コード
{{コード
border-image
{{コード
{{コード
{{コード
border-image
In addition to the mapping references
url
it is also possible to fill colors or gradients directly.
{{コード
We can use the
border-image
+
filter
+
clip-path
Rounded corners of the gradient transform are implemented.
{{コード
border-image
{{コード
clip-path
{{コード
.border-image-clip-path {
    width: 200px;
    height: 100px;
    border: 10px solid;
    border-image: linear-gradient(45deg, gold, deeppink) 1;
    clip-path: inset(0px round 10px);
    animation: huerotate 6s infinite linear;
    filter: hue-rotate(360deg);
}

@keyframes huerotate {
    0% {
        filter: hue-rotate(0deg);
    }
    100% {
        filter: hue-rotate(360deg);
    }
}
{{コード
{{コード
Finally
{{コード
This article introduces some of the more interesting border animation tricks I think, but of course CSS produces a lot of interesting effects, so I won't go into them one by one for space.
{{コード
{{コード
clip-path
{{コード
{{コード
div {
    position: relative;

    &::before {
        content: "";
        position: absolute;
        top: 0;
        left: 0;
        right: 0;
        bottom: 0;
        border: 2px solid gold;
        animation: clippath 3s infinite linear;
    }
}

@keyframes clippath {
    0%,
    100% {
        clip-path: inset(0 0 95% 0);
    }
    25% {
        clip-path: inset(0 95% 0 0);
    }
    50% {
        clip-path: inset(95% 0 0 0);
    }
    75% {
        clip-path: inset(0 0 0 95%);
    }
}
{{コード
{{コード
Renderings together with schematics.
{{コード
{{コード
Renderings together with schematics.
{{コード
{{コード
{{コード
clip-path
{コード
{{コード
border-radius
{{コード
If we use another pseudo-element as well, to actually implement a button style, we can get the effect of
{{コード
関連
-
[CSSチュートリアル]CSSで簡単!高周波な異形ボタンを実現する方法
-
[CSSチュートリアル】CSSスコープ(スタイル分割)の使い方まとめ
-
[CSSチュートリアル】カットコーナー+ボーダー+プロジェクション+コンテンツ背景色のグラデーション効果を実現するCSS
-
[CSSチュートリアル】シングルセレクトの折りたたみメニュー機能を実現するCSS
-
[CSSチュートリアル】SVGを使ったCSSアニメーションでエネルギーフローを表現する
-
[CSSチュートリアル】ピュアCSSでロウソクの溶ける(水滴)を実現するサンプルコード
-
[CSSチュートリアル】ピュアCSS3による水平無限スクロールのサンプルコード
-
[CSSチュートリアル】CSSスタイルをプログラムで処理するサンプルコード
-
[CSSチュートリアル】CSS疑似要素を使って、連続する複数の要素のスタイルを制御する
-
[CSSチュートリアル]なぜheadタグにcssを入れるのか?
最新
-
nginxです。[emerg] 0.0.0.0:80 への bind() に失敗しました (98: アドレスは既に使用中です)
-
htmlページでギリシャ文字を使うには
-
ピュアhtml+cssでの要素読み込み効果
-
純粋なhtml + cssで五輪を実現するサンプルコード
-
ナビゲーションバー・ドロップダウンメニューのHTML+CSSサンプルコード
-
タイピング効果を実現するピュアhtml+css
-
htmlの選択ボックスのプレースホルダー作成に関する質問
-
html css3 伸縮しない 画像表示効果
-
トップナビゲーションバーメニュー作成用HTML+CSS
-
html+css 実装 サイバーパンク風ボタン
おすすめ
-
[CSSチュートリアル】純粋なCSSでWebページの内容をコピーできないようにする方法
-
[CSSチュートリアル】 css border add four corners コード
-
[CSSチュートリアル】resizeで画像のプレビューを切り替える方法
-
[CSSチュートリアル】CSS擬似要素::マーカー解説
-
[CSSチュートリアル】背景-位置の割合の原則の説明
-
[css3]ピュアCSS3によるネオンライト効果
-
[css3]CSS3遷移回転遠近法2D3Dアニメーションなどの効果を持つサンプルコード
-
[CSSチュートリアル]アダプティブスクエアを実現するCSSの例
-
[CSSチュートリアル】画面全体に広がるアダプティブな高さを実現するCSS
-
[CSSチュートリアル】オーバーフロースクロールでスクロールの詰まりを解消する